Wednesday, 19 October 2011

Old favourites... Part 4 - Fish pie


Last week I made fish pie for the kids - normally I'd instantly blog about it but the IRS in my shoulder started playing up and I have been resting my arm as much as I have been able to, so blogging stuff had to be put on hold. Fish pie made like this is one of the kids favourite fish dishes and the love it when I make a mashed potato top instead of the more usual pastry one - not really sure why they like it more like this but well... that's kids for you *wink*

Ingredients for a medium large oven dish (2-4 people depending on size of appetite) :
  •  Leftover mashed potato, enough to put a layer on the dish or 750 grams /  1 1/2 pounds potatoes cooked and mashed.
  • About  100 grams/ 4 oz salmon
  • About 200 grams / 8 oz cod
  • 2 small onions, finely diced.
  • Milk
  • Pepper
  • 1 small bay leaf (fresh if possible)
  • Knob of butter
  • 1 tablespoon of flour
  • 1 - 2 fish stock cube ( to taste)
How to make it:
  1. Put the fish in a pan with the bay leaves, some pepper and onions.
  2. Pour in enough milk to cover and bring to the boil, allow to simmer for 10 minutes if fresh 15 if frozen.
  3. Strain the fish, catching the milk in a bowl.
  4. Preheat the oven to 220 C/430 F  
  5. In a clean pan melt a knob of butter.
  6. Add the flour stirring all the time till it bubbles.
  7. Pour in some of the milk and stir till thickened, keep adding the milk till it's all gone, making sure that you don't stop stirring.
  8. Turn the heat down low.
  9. Crumble the stock cube(s) into the sauce - do one at a time and taste to make sure you don't add too much.
  10. Add some pepper to taste if needed.
  11. Take the bay leaf out of the strained fish/onion mix and flake the fish.
  12. Add the fish/onions to the sauce.
  13. Stir gently to mix and put it in the bottom of an oven dish.
  14. Cover the fish with spoonfuls of the mashed potato.
  15. Gently spread it over the fish where needed to make it smooth and about even.
  16. Put in the oven for about 30 - 45 minutes depending till brown on top and hot all the way through.
Enjoy!

Monday, 10 October 2011

Tea time...


Every now and then I spoil the kids and we have tea as a snack and then later a supper with more healthy stuff. Tea being the mealtime in this case not the beverage, although admittedly I do like a nice cup of tea with my tea *wink*. In this case we had 4 types of mini cupcakes: "after 8", almond, apple & cinnamon and "stroopwafel" flavours. I had also baked another batch of the caramel/fudge cupcakes and to top it all off we had digestive biscuits and mini stroopwafels.

I had made the "after 8"cupcakes by adding a few drops of peppermint essance + chocolate chips to the batter along with a bit of green food colouring so they'd be the same colour as the ice cream the kids like so much.

The stroopwafel cupcakes were made by crushing some stroopwafels and adding them to the batter along with a hint of cinnamon to give the batter flavour.

The almond ones were made with ground almond and a few drops of almond essence to give a nice rich slightly nutty flavour (you can use any nut for this of course )

I "cheated" and bought the biscuits *grin*

Saturday, 8 October 2011

Kitchen revamp.. or at least partly...


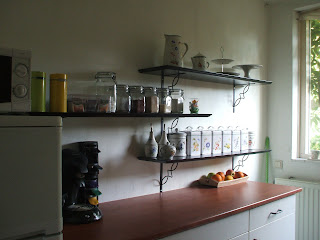
Last January after getting a new kitchen unit installed on the other wall I used the old lower unit to make a second work surface etc. by swapping the metal sink surface for a cherry surface to match the new kitchen. Since my health is iffy at best it took a while before I was ready to face the pain of painting the walls and I spent the last week slowly preparing and painting the entire wall (also behind the fridge and kitchen unit) a bit at a time. Although the picture here doesn't show it, it was in bad shape so needed a lot of prep work to make the surface almost flat and it didn't help that last time when ex painted he didn't bother with any prep work at all so the paint tried to come off when I used a roller so I had to use a brush instead (my shoulder wasn't too happy about that). The green was stubborn and so it needed 2 layers of paint to subdue the green completely.

I also needed some additional shelving to put all the jars/tins I use for flour/sugar/pasta etc., so I had bought some black shelves with ornamental brackets to fix them up with. You can't see it here but I haven't actually screwed the shelves to the brackets yet because the MDF is murder to hand screw into so I need to get an additional bit for my drill so I can use that.


This is the end result - the wall next to the window is still the same white it was before - it needs painting as well but that is a job for another day after I  have recovered from doing all this. I have space on the wall to add 2 more shelves, which I will do at a later date when I have the money to buy them .

Friday, 30 September 2011

Borders.... already?

 
Usually one waits with the borders till the main part of the quilt is finished. However I was tired of cutting orange fabrics and wanted to sew something so I got out the box of green 1 1/2 inch squares and decided to see how far I got with them before I ran out with the only rule being that I could only use one of each and no more than one. When I started with the greens I had a small bit that was about 30 cm / 12 inches long and now I have 2 lengths.


The green length is 45 inches / 114 cm and is made up of 147 units
The blue length is 46 inches / 119 cm and is made up of 153 units
So the total length made so far is 91 inches / 233 cm which is about enough for one side. The angled edges are to make joining the sections easier later on.

Does it make sense to make the borders already?
Well yes and no:
  • Yes it makes sense as it spreads the work of sewing the fiddly bits together so I don't have to spend weeks *just* sewing 1/2 inch sided hexagons together. 
  • No it doesn't make sense because I have no idea how big the border needs to be, however because I am sewing it in sections and am only using one of each scrap I have, I can always make them longer if I need it.
For now I'm continuing with this a bit longer and am in the middle of preparing the browns which will be about as long as the green length I made.

Thursday, 22 September 2011

The most divine cupcakes ever...


Sometimes i have idea's about how to make something - last night after baking some cupcakes for a client I had this most wonderful idea but was too tired to mix up another batch of cupcake batter to try it out. Needless to say it was the best idea ever and I'm glad I took the time to try it out.

What I did was bake a batch of caramel cupcakes using My favourite cake batter  and replace just milk with a mixture of 1 - 2 tablespoon of caramel coffee syrup mixed with 3 tablespoons of milk.

Then after baking while the cakes are just out of the oven make a gooey Fudge mix:
  • 150 grams / 6 oz finely grated fudge (it's a bit of a pain to do but worth it)
  • 2 - 3 table spoons of milk
 How to make:
  1. Put a small amount of water in the bottom of a small saucepan
  2. Bring the water to the boil and turn down so it just simmers.
  3. Put a bowl over the pan making sure it doesn't touch the water (you can throw away some of the water if it does)
  4. Put the milk and fudge in the bowl and gently melt the fudge while stirring.
  5. When completely melted take the bowl off the pan (turn the heat off) and allow to stand for about 5 minutes.
  6. Use a syringe with a large opening (take the needle off) to suck up the fudge mix
  7. Stab a cupcake in the middle with the syringe and squirt some of the fudge into it - it will spill out a little when you take it out.
  8. You will need about 1/3 of the fudge mix for this.

    Then using the rest of the still warm fudge mix make the fudge frosting - you will also need:
    • 1 - 2 table spoons water
    • 125 grams of icing sugar
    How to make:
    1. Add the water and the icing sugar and whisk till blended - add a little water if needed 
    2. Spread the mix over the cupcakes
    3. Allow to set.
    Enjoy! ( I know I did *wink* )

    Monday, 19 September 2011

    Pasta bake...


    Every now and then I like to surprise the kids with a cooked lunch - pasta is favourite for this as it's cheap and tasty and today I did an easy pasta bake for them with bacon, cheese and finely chopped onions As I like a crunchy crust on oven dishes I sprinkled breadcrumbs on the cheese to get that extra crunchiness.

    Ingridients:
    • about 250 grams / half a pound of pasta
    • 100 grams / 4 ounces bacon - I used thinly sliced bacon that I chopped up
    • 150 grams grated cheese with extra for on top
    • 1 small onion - finely chopped
    • 1 glass of milk ( 1/4 litre / 1/2 pint)
    • 2 glasses of water ( 1/2 litre / 1 pint)
    • handful of breadcrumbs (optional) 
    • 25 grams / 1 ounce margarine or butter
    How to make:
    1. Preheat the oven to 200 C / 392 F
    2. On a high flame (highest setting on an electric etc. cooker) Lightly fry the onions in the margarine
    3. Add the bacon and fry till cooked
    4. Add the water and milk and stir well
    5. Bring to the boil while still stirring
    6. Turn the heat off and add the cheese bit by bit - it doesn't have to completely melt at this point.
    7. Half fill a deep dish with the pasta
    8. Pour over the sauce you just made
    9. Sprinkle the leftover grated cheese over the pasta and the breadcrumbs if you are using them
    10. Put in the oven for about 45 minutes
    Enjoy!

    Saturday, 17 September 2011

    Light Army Greens...


    Done at last! I was starting to get pretty bored of green after about the 7th block - I wanted a change but that wasn't to be. Finishing the greens is a milestone in itself but on top of that it's also the 3/4 mark for me - only another 10 blocks are needed for the project HOWEVER I will be seeing how many blocks I get from all the colours I want to use for this as then I can play around with the blocks and see what I like best.

    Still left to go are the reds, yellows and oranges. I'm doing orange next as oldest wanted to choose which ones I did and he likes orange a lot (youngest choose the greens)


    This is the 30th block and the 10th green one.
    Next up: Cutting oranges!

    For more information see:  The insane hexagon quilt
    To see all the quilt blocks together look here:  Insane Hexagon Project

    Wednesday, 14 September 2011

    PIZZA!!


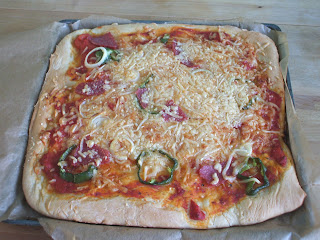
    Today my oldest son's best friend was over and I'd promised him that we'd make pizza again next time he was here so that's what we did. I made the dough and put it in the shapes then I let the kids loose to add toppings of their own choosing. The pizza above was the one shared by my oldest and his friend.  The ones below are made in a dish that has 5 "boat" shaped holes that I filled with dough and me and youngest put toppings on them. These end up as "deep pan"  pizza's while the top one is more Italian style.


    Ingredients for the dough (you can also "cheat" and use a packet to make the dough but it's so easy anyone can do this) enough for the top pizza:
    • 15 gram / 1/2 oz fresh yeast or 1 packet active dry yeast
    • 2/3 cup / 150 ml warm water (Not hot! - hand warm)
    • 2 cups flour
    • 1 tsp salt
    How to make the dough:
    1. In a small bowl put the yeast and warm water mix well and leave for about 10 minutes.
    2. Put the flour and salt into a bowl and mix.
    3. Add the yeast and mix till it's all absorbed
    4. Knead the dough till it well kneaded (5 minutes or so)
    5. Put the dough back into the bowl and cover with a clean cloth or with cling film and put in a warm place. (I find above the central heating works OR on a windowsill of a closed window in the sun OR on the cooker with the oven turned on to the lowest setting) Leave for an hour.
    6. After that time give it a gentle knead for about 1 minute.
    7. Oil the tray your are going to bake the pizza on or line it with greaseproof paper to avoid having to scrape the pizza off the tray *wink*
    8. Then you can roll out the dough into your desired shape. I pressed the dough into the boat shapes but rolled the dough for the larger pizza after pressing it as flat as I could first by hand.
    9. Preheat the oven to   230 C / 450 F
    10. Give it 10 minutes rest as dough tends to shrink a little after rolling before going on to the toppings.
    The toppings basically you can use anything you have around the house as a topping. This is what we used:
    •  Tinned chopped tomato mixed with some French herbs and pepper for the tomato sauce on the base.
    • Cheese - this can be cheddar, mozzarella or something else that melts nicely. We used mature Gouda as that's what we had in the house.
    • Salami
    • Ham
    • Turkish sausage
    • Sweet green pepper freshly picked from the garden (oddly enough the kids will eat this but not shop bought)
    • Sliced onion
    How to proceed:
    1. Put some tomato mix on the base - a thin even layer.
    2. Scatter cheese over the base
    3. Put toppings of choice on top
    4. If, like my kids, you like extra cheese put more cheese on now
    5. Place in the oven for 15 - 20 minutes
    Enjoy!

    Tuesday, 13 September 2011

    Dark Army Greens...


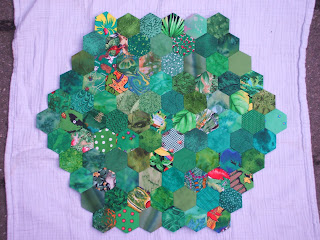
    Since I had basted all the remaining greens already (See Making snakes... ) and didn't know which one to do first I asked I one of the IRC channels I lurk in which I should do: "light: or "dark" without telling them what the choice was about. Everyone that voted said "dark" so I did this one first. It would have been done sooner but I had to fix Dilly first and got side tracked by making a necklace as well.

    This is the 29th block and the 9th green one.
    Next up: the tenth (and last) green one - light army greens

    For more information see:  The insane hexagon quilt
    To see all the quilt blocks together look here:  Insane Hexagon Project

    Autumn leaves...


    Despite hating the cold and the wet weather that often comes with autumn I love this time of year - the winds blowing through invigorate me and my idea of fun is to bicycle with the wind against me as fast as I can make myself go (yeah I  know - crazy). Inspired by the changing weather and the leaves that are starting to fall I made this autumn necklace from glass leaf beads I had lying around and leather cords.  I chose green and 2 shades of brown as those are the colours of the leaves being blown around at this time. I used glass beads to match the cords.

    Monday, 12 September 2011

    Fixing Dilly...


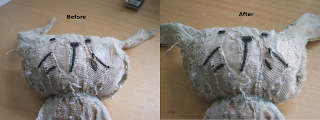
    Once upon a time there was a cuddly rabbit much like the one above but then in blue. It was given to a baby to be loved. The baby loved it very much and didn't stop loving it as he grew older and when he got old enough to talk he named it "Dilly". Dilly was loved and loved and loved and eventually started to wear out a little so the boys mother darned it to mend the holes. As time went on darning wasn't enough any more so during the first major operation patches were added behind Dilly's face on the left hand side to conserve the face and head as much as possible. After more time a second major operation was required to fix holes on the right hand side and this was done today. 

     One large patch was slid behind the face with the use of a letter opener (much to the distress of the now 8 year old boy) one part going to the front and one part going round the back. on the front near the ear some holes were darned as well.
    At the back the ear was darned as well as the bit down the centre back and the bit to the left of the neck.

    The operation was completed successfully in an hour and the boy is thrilled to bits that his darling Dilly is fixed again. As always you can click the images to see larger versions :)

    Sunday, 11 September 2011

    Darkest greens...


    As I mentioned a few days ago I'd had a severe case of butter fingers and dropped all the fabrics for the last 3 blocks. This is the first of those 3 that I'd mass basted and prepared at the time. In the photo's it doesn't look much darker than the last block but when looking at them next to each other there is a clear difference.

    This is the 28th block and the 8th green one.
    Next up: the ninth green one - dark army greens (by popular vote of an IRC channel I lurk in)

    For more information see:  The insane hexagon quilt
    To see all the quilt blocks together look here:  Insane Hexagon Project

    PIES!!


    I love baking pies - I just don't bake them often enough.  Today however I did bake pies - one for dinner and one for pudding. For pudding I made an apple pie and for dinner a beef and potato filling.

    Ingredients for apple pie (no real amounts this time as how much depends on the size of the dish used).:
    • Pastry (enough for the dish you wish to use)
    • Apples (one per person)
    • Cinnamon (to taste)
    • Brown sugar (1/2 table spoon per apple)
    Instructions: 
    1. Preheat the oven to 220 C/430 F
    2. Butter the dish you wish to use with butter
    3. Line with pastry leaving a flap sticking out on each long side that is about enough to reach to the middle.
    4. Core the apples and cut them into 8ths
    5. Mix the sugar with the cinnamon in a bowl 
    6. Add the apples to the bowl and stir to cover the apples with the sugar
    7. Put the apple/sugar mix into the dish with the pastry.
    8. Fold the flaps over so they meet in the middle - leave an opening and then cover the top with any sugar left in the bowl you mixed the apples with the sugar in.
    9. Bake in the oven for about 30 - 45 minutes.


    The beef pie takes a bit more work but tastes lovely. I used bacon fat for my version as my father had taught me to keep the fat from cooking things like bacon and using the fat to cook other things with. This gives a special flavour to the food you are cooking and makes it taste even better.

    Ingredients:
    • 200 gr / 8 ox minced (ground) beef
    • 400 gr / 16 oz small potatoes, sliced
    • 2 spring onions, sliced (optional)
    • 2 large tomatoes, diced (optional)
    • Bell peppers or other veg that fries well can be added to taste.
    • Pepper
    • Gravy granules/powder ( I used Bisto)
    • Glass of water.
    • 25 grams of butter/margarine/grease
    Instructions:
    1. Preheat the oven to 220 C/430 F 
    2. Melt the fat in the frying pan (skillet) you are using.
    3. Add the beef and onions 
    4. Once brown add the tomatoes and fry for a moment.
    5. Add the potatoes and fry for a little longer.
    6. Add the water and bring to the boil
    7. Add the gravy granules/powder
    8. Simmer for about 10 minutes then put in a pie ish.
    9. Cover with pastry and put in the oven for about 30 - 45 minutes.
    Enjoy!

    Thursday, 8 September 2011

    Making Snakes...


    When I'm preparing the hexagons for the next block I start by basting (see image above on how I do that) them around a hexagon paper and then laying them out on top of another block so I can see what they will look like when completed. This gives me the chance to make sure that the fabrics chosen work together and that the overall look of the block is what I want. When I was getting out the fabrics for the next block I accidentally dropped the fabrics for 3 blocks (don't ask *wink*) and since I had to sort the fabrics again and didn't have space on the dining room table for this I decided to baste the hexagons and sort them straight into the hexagons as if I was doing one block but then with 3 blocks. I ended up doing 300 hexagons to get the 270 I needed for the blocks as I'm pretty fussy about how the colours go together.


    Having sorted them I then carefully strung them onto a thread so as to keep the order I'd laid them out into - since I always sew in the same way I can go "backwards' and thread them onto the thread in the reverse order that I sew them and then I can just take them off the thread one by one as I sew them into a block and it will be exactly the same as when I laid it out. I call these threads with hexagons "Snakes" In the picture above you can see the 3 "Snakes" I made. I put the two I'm not working on into a box to keep them safe till I need them.

    It probably sounds very complicated but for me it's as simple as making a cup of tea

    Monday, 5 September 2011

    Old favourites... Part 3 - Pasta Carbonara


    Saturday I made another old favourite of the kids: Carbonara sauce with macaroni. I made it with bacon, cheese and spring onion this time and although the panful *should* have been enough for 2 meals it was almost completely finished by the kids having not just seconds but thirds and fourths as well!

    Ingredients:
    • 150 grams / 6 ounces bacon strips
    • 3 spring onions - thinly sliced
    • 1 onion - finely diced
    • 25 grams / 1 ounce margarine or butter
    • 1 tablespoon flour
    • 150 grams / 6 ounces cheese
    • 1/2 liter / 1 pint milk
    • Pasta - enough for 3 - 4 people
    How to make: 
    1. Put the water for the pasta on to boil
    2. Melt the margarine / butter in a frying pan (skillet) on a high heat and keep it high till told to change.
    3. Add the bacon and fry for a moment before adding the onion
    4. As soon as the onion starts to go transparent add the spring onion.
    5. Fry for a bit longer till the onion starts to brown.
    6. The water for the pasta should be boiling now so add the pasta to the pan.
    7. Add the flour and stir with a wooden spoon if it's a non stick pan or whisk if it's not.
    8. After about 1 minute you can start slowly adding the milk, first enough to cover the bottom and stirring till it's thick - then adding what's left in 2 - 3 goes each time stirring till it's thick again.
    9. Turn the heat down.
    10. Slowly add the cheese and stir till completely melted before adding more.
    11. Turn the heat off.
    12. Check to see if the pasta is done and if so strain and serve with the sauce.
    Enjoy!

    Thursday, 1 September 2011

    The first year...


    This time last year I started sewing the hexagons for my Insane Hexagon Quilt now one year on I'm 27 blocks, 2457 units and 6 colours down the road on my way to completing the quilt. I still have 3 green blocks and an unknown number of red, orange and yellow blocks to go before I'm finished with the central area of the quilt. If you right click the picture and choose "view picture" you will see a high resolution image of the blocks. They are laid out on a double bed comforter cover in order of being made - starting at the top white one and then going right to left on each row - and pinned in place as I had to make the photo on the road in my street as my garden is too small for it to be completely photographed in the sun and I didn't want to have to spend ages laying out the blocks while a car could come driving up any second.  The spaces you see between the blocks are intentional as I plan on sewing the blocks together with a diamond spacer between the blocks. I'll be using a lovely black fabric for it which is a really dark grey leaf print on black which, once cut up, looks more like a marble than anything.

    I also have plans for an equally insane border made up of 1/2 inch hexagons - I haven't worked out how many I need yet and I don't think I want to know *wink* the spaces between the border and the blocks will be filled with equally insane small diamonds (boy will I be cursing when I have to do this bit lol)


    The strip you can see here is 30 cm - 12 inches long and made up of  35 hexagons of 1/2 inch sides. Making the border will probably take me longer than making the central part.

    Quiche.. the easy way.


    Last night I made quiche as the kids had been asking me to make it for a while and I'd promised them it before the end of the month. Since one of the kids friends was staying for dinner and we all have our favourites I made 4 flavours in 2 dishes. Here in The Netherlands Créme fraiche comes in little cups - 100 grams / 3 1/2 oz and 200 grams / 7 oz. and I use the cup from this to measure with.

    For one large quiche you need:
    • One large cup (200 grams/ 3 1/2 oz) Créme Fraiche
    • Use the cup of the Créme Fraiche as a measure and fill it once with milk.
    • Fill the cup again with eggs + one extra added to the bowl. (around 5 - depends on the size of egg but it's always the cup filled with egg +1 egg) - just to add - you crack the eggs into the cup - not the egg shell and all *wink*
    • Enough pastry to cover the inside of a rectangular dish - I usually use frozen pastry.
    • 1/2 pound cheese - anything that melts nicely works - I used Mature Gouda, Semi Mature Gouda and Old Amsterdam - a really really Mature Gouda.
    • Flavourings to taste. ( I used bacon strips, cherry tomatoes and chopped onion)
    How to make: 
    1. Defrost the pastry if using frozen pastry.
    2. Butter the dish you are using really well - sticking pastry really isn't a good thing with this.
    3. Preheat the oven to 230 C / 450 F
    4. Put the Créme Fraiche into a largish bowl.
    5. Measure out the milk and add it.
    6. Mix till it's combined and frothy
    7. Measure out and add the eggs
    8. Mix till it's combined and frothy
    9. Line the dish with the pastry
    10. Put the flavourings into the dish - you can do 2 flavours in a dish if you keep each to one side.
    11. Spread the cheese evenly and then carefully combine the flavourings with the cheese so when you eat it will be evenly distributed.
    12. Pour the eggy mix over it all and give it a stir to make sure that the eggy mix is down to the bottom
    13. Put the Quiche into the oven for about 45 minutes.
    I did one quiche with one half just cheese, one half bacon and cheese. The other one I did with cheese and whole cherry tomatoes and the other half bacon, finely chopped onion and halved cherry tomatoes.

    Enjoy - We did!

    Autumn wonders


    Sometimes I like to go all out and decorate the cupcakes I made. I made a half batch of my usual cupcake batter and made half mocha flavour and half caramel flavour. I then made some simple icing from icing sugar, water and some flavouring (again mocha and caramel). I made some flowers from marzipan and put them on top while the icing was still wet.

    Needless to say there aren't as many now as when I made the photo above *wink*

    Wednesday, 31 August 2011

    Emeralds come in many colours


    Just when I thought I wouldn't be able to complete any more before the end of my first year working on this and I go and finish another lol  There isn't much to say at this point so I'll let the picture do the talking :-)

    This is the 27th block and the 7th green one.
    Next up: the eighth green one - dark greens

    For more information see:  The insane hexagon quilt
    To see all the quilt blocks together look here:  Insane Hexagon Project

    Saturday, 27 August 2011

    Greens of the Ocean Deep.


    It's been a while since I have managed to do so many blocks in a single month. I have now completed 26 blocks for the project and still have another 4 greens to go and then the reds, yellows and oranges. I have been working on this project for almost a year now and am amazed that I managed to sew so much in such a short time. When I started I thought it would take me about 5 years to complete, now I'm pretty sure it's going to be a LOT less - how much less really depends on how the joining of the blocks goes.


    This is the 26th block and the 6th green one.
    Next up: the seventh green one - medium dark greens

    For more information see:  The insane hexagon quilt
    To see all the quilt blocks together look here:  Insane Hexagon Project

    Sunday, 21 August 2011

    Old favourites... Part 2 - Weiner schnitzels


    Another old favourite of the kids is Weiner schnitzels. Not the huge bit of meat covered in breadcrumbs but smaller bits that you can have loads of. Why have one when you can have 8 instead? *wink*

    What I do is I take the unbreaded schnitzel I buy at the supermarket and slice it lengthways to make it in to thinner slices of about 1 - 3 mm thick (no more than 1/8 ") and I sometimes cut them into smaller pieces as well. I then give them all a whack with the rolling pin (when I lived at my dad's still we'd use a washed, empty beer bottle instead so that works too if you don't  have a rolling pin handy). Then I introduce them to the eggy mix ( I put all liquid or soft herbs/spices/garlic into the egg and all the dry herbs and pepper into the breadcrumbs) and then carefully put the schnitzel into the breadcrumbs making sure to keep one hand "eggy" and one hand for the crumbs. I give it all a single layer of breadcrumbs. Once done I fry them all ( a few at a time)  in a large pan and put the ones that are fully cooked into a second pan to keep warm.

    Simple to make as you can see but beware! Thinly slicing meat is tricky at best and knives slip easily and you don't really want to be eating YOU schnitzels!

    Enjoy!

    Old favourites... Part 1 - Macaroni cheese


    Today I made one of the kids favourites - mac cheese, not the yucky processed type but the really nice and gooey home made kind. Since they like a crunchy crust on top I put it in the oven after making it but it's also possible to just dig in straight away and skip the long wait before you can sink your teeth in *wink* This may seem complicated but both my kids (8 and 10 at the time of writing this) can make the cheese sauce alone so if they can do it so can you!

    Ingredients (all rough estimates as I do this by eye)
    • 25 gr / 1 oz butter or margarine
    • 1/2 Table spoon of flour
    • 1/2 litre / 1 pint of milk
    • 100 grams 4 oz mature cheese - cheddar works - I use Gouda cos that's what I can get.
    • Pepper to taste
    • 1/4 teaspoon mustard
    • Pasta (any pasta will do - even spaghetti)  - enough for about 3 people.
    How to make:
    1. bring the water for the pasta to the boil and cook as per the instructions on the packet.
    2. Meanwhile in a small 1 litre/ 2 pint  pan melt the butter on a medium high heat - keep the heat at this level while you do the rest.
    3. Add the flour and stir, letting it bubble a little but not brown.
    4. Pour in a slosh of milk while still stirring
    5. When it's thick add more milk - about 1/4 of what you have left - Don't stop stirring!
    6. When it's thick add more milk - about 1/3 of what you have left - stir like your life depends on it *wink*
    7. When it's thick add more milk - about 1/2 of what you have left - and yes.. keep stirring.
    8. When it's thick add all the you have left and stir till thick.
    9. Turn the heat down low.
    10. Add the pepper and mustard and stir.
    11. Add the cheese a bit at a time still stirring to avoid it sticking and to make sure it mixes through properly.
    12. When it's all mixed through and melted turn the heat off.
    13. The pasta will be about ready now.
    14. Drain the pasta and putit back in the pan.
    15. Mix the cheese sauce through the pasta and you are done.
    Optional: put the pasta in an oven dish and sprinkle with some more cheese and if you have it a small amount of breadcrumbs will make for a nice crunchy topping (not shown on my pic - I'd run out of breadcrumbs) and put in the oven on a high heat for 15 - 20 minutes.

    You can make this in advance if you like but if you leave it for more than a day you should add a slosh of milk to the dish to avoid the pasta drying out.

    Enjoy!

    Saturday, 20 August 2011

    Home Grown...


    In April the kids wanted to see what would happen if we planted one of the potatoes that had gone to seed. So they both planted a potato and we waited.. and waited.. and waited.. till they really couldn't wait any longer. So today we dug them up to see what our harvest would be. As you can see in the picture (AA battery included for scale) they are not big and there are not many but then that's to be expected from supermarket potatoes that have been chucked into a hole in the ground and left to look after themselves.

    Of course we cooked them for dinner - the bigger ones went in first, then 5 minutes later the medium ones and 5 minutes after that the marble sized ones. Served with butter and a bit of salt and pepper they were out of this world!

    Friday, 19 August 2011

    Grassy Greens...


    I'm had fun making this one as well - it too has travelled around the country on trains and in museums while I made it  causing more than a few people to wonder what on earth I was doing on the train and what I was making. Always good for a nice chat in a train to pass the time and people never cease to be amazed that I'd undertake such a large project by hand.

    This is the 25th block and the 5th green one.
    Next up: the sixth green one - Dark teals

    For more information see:  The insane hexagon quilt
    To see all the quilt blocks together look here:  Insane Hexagon Project

    Friday, 12 August 2011

    Bring on the browns!


    When I dyed the sofa covers I had one wash that wasn't as full as the rest and because I wanted to make sure the covers were about the same colour I added a large piece of muslin to the wash to fill it to the same amount. I was planning on using that to make the backing of a quilt but when I looked at the dining room chairs I got another idea for the fabric: re-cover the chairs. I've never upholstered anything before but didn't think that it would be too hard so I took the first seat off the chair and had a look at how they had done it. It was just fabric stretched over the seat and staple gunned down and since I have one I decided it would be easy enough.

    After ironing the fabric to make it nice and flat I cut a rough square from the fabric that was large enough to wrap around and a bit more so I could fold over the edges and tuck the raw edges in. I then put a staple in the middle of each edge to stop the fabric being pulled off in the wrong direction and then worked my way from the middle to the corners, doing first the sides, then the front and last of all the back.

    The corners were of course the most fiddly but I think I didn't do a too bad a job of it for a first effort. In the image you can see one of the other dining room chairs that is in about the same shape as the newly re-upholstered chair was before I did it, so you an see that they really did need a bit of TLC.

    I CAN do magic!


     As you can see in the image above the sofa was looking pretty tired and grubby - even after washing the covers they still looked dirty so I decided to bite the bullet and do something about it. Since making new covers would have been too expensive I decided to dye the covers instead and chose a dark brown dye and hoped it would work out ok on the green covers. It took me two days to do this as for each of the 4 loads i had to do a wash, dye wash and rinse wash so that was a total of 12 washes. Then I had to wrestle the covers back on, which wasn't an easy task and I broke 4 nails and took off a fair bit of skin from my knuckles in the process. My hands look like I've been in a bar fight!

    Below is the resulting colour - it looks a bit greenish brown from some angles but I do like how it came out :) It's certainly not as dark as the dye packet promised but on the other hand it now looks nice and clean and has made the whole room look different. 


    So yes I CAN do magic! With the help of a couple of packets of dye and some salt *wink*

    Tuesday, 9 August 2011

    Creamy Chicken...


    One of the kids favourite things is creamy chicken with rice. With the kids still away I decided to make a more grown up version of it for myself: Creamy chicken with spring onion in a creamy sauce with rice cooked with carrots.

    Ingredients for 2 portions:
    • 2 - 3 small carrots, grated.
    • 2 cups uncooked rice (any kind works - I use long grain).
    • 2 chicken breasts, cut into 1 inch - 2 1/2 cm cubes.
    • 3 - 4 spring onions cut into 1/4 inch - 3/4 cm slices.
    • 2 small onions, one skinned and cut into 4 the other finely diced.
    • Milk
    • Pepper
    • 2 small bay leaves (fresh if possible)
    • Knob of butter
    • 1 table spoon of flour
    • 1/2 chicken stock cube
    How to make it:
    1. Put the rice in a pan and add water till it reaches the first knuckle on your index finger with the tip gently resting on but not in the rice.
    2. Add the grated carrots and stir.
    3. Put the lid on the an and bring to the boil.
    4. Meanwhile put the chicken in a pan with the bay leaves, some pepper and onion that was cut into 4.
    5. Pour in enough milk to cover and bring to the boil, allow to simmer for 10 minutes.
    6. When the rice boils turn it down and let it finish cooking.
    7. Strain the chicken, catching the milk in a bowl.
    8. In a clean pan melt a knob of butter, add the spring onion and the remaining onion.
    9. Lightly brown them on a high heat and then add the flour stirring all the time.
    10. Pour in some of the milk and stir till thickened, keep adding the milk till it's all gone, making sure that you don't stop stirring.
    11. Turn the heat down low.
    12. Check the rice to see if it's done and turn off the heat if it is., keeping the lid on the pan.
    13. Add the stock cube to the sauce and additional pepper to taste.
    14. Add the chicken and your dinner is ready to serve:)
    Enjoy!

    Sunday, 7 August 2011

    Lovely lamb...

    One of the things my kids really don't like is lamb - I have no idea why but they don't - a shame really as it's really lovely so I save eating it as a special treat when they aren't around (like now while they are away with ex) I made this on Friday but am a bit behind in adding this. This time I decided to roast it after cutting some slits to put fresh garden herbs in (I have thyme, bay and rosemary growing in the garden that I used for this) and some slices of fresh garlic.I placed the meat in a buttered oven dish and put a knob of butter on top to help avoid it drying out and roasted it in the oven for about an hour on gas 6 - 200 C - 390 F. In another dish I had put unpeeled parboiled potatoes, red bell peppers and onions and a bit of butter to roast them in which I put in the oven at the same time. Then i took the lamb out and put the oven on high to brown the potatoes a bit more before taking them out. Serve the lamb sliced on a plate with the roast veg and mint sauce or gravy to taste.

    The image shows the whole piece of meat as I am so bad at carving I decided I'd get a nicer picture if I made it before carving the meat.

    The leftovers I had on Saturday night, done the simple way:  I placed the slices of leftover lamb in a small pan and added a little water - just enough for the couscous I was going to cook. I then brought it all to the boil, added the couscous and turned the heat off, leaving the lid on the pan.  All I had to do after that was pour it all onto a plate.

    Enjoy!

    Redcurrants!


    I adore redcurrants almost as much as I adore peaches and nectarines. redcurrants have a short season so I like to pig out a bit when they are around however they are so sour they need a bit of work to make them taste nice. One of my favourite things is to eat them with yoghurt in some way - like in the image above - with finely grated apple (that in this image admittedly looks a bit like worms lol) Making the redcurrants ready to eat takes a lot of time as I like to leave them in the fridge overnight to "sweeten" a little.

    Ingredients:


    • a pound of redcurrants
    • 2 - 3 oz - 50 - 75 grams of castor sugar
    • 1 oz - 25 grams of brown sugar
    • pint - 500 ml of yoghurt
    • small apple, finely grated or chopped


    To prepare redcurrant "goo":

    1. Wash and take the berries from the stalks, making sure to take out any bad ones.
    2. Put the redcurrants and castor sugar (not the brown sugar yet) in a largish bowl squish them with a fork.
    3. When you can see no more whole berries cover the bowl with cling film and put in the fridge over night.
    4. Just before serving add the brown sugar and stir - this makes it darker but also sweetens it a bit more
    This goo can be used for all kinds of things :)

    To prepare the yoghurt drink:
    1. Put the grated apple into the bottom of a a really large glass or bowl.
    2. Add a good 10 - 15 table spoons of the goo till the glass or bowl is half full.
    3. Pour yoghurt over the top.
    Even though if you taste the goo it's pretty sour still the yoghurt seems to stop the sourness and makes it almost sweet.

    Enjoy!

    Chocolate Orange cake...


    When making the mini cupcakes the other day I had gotten a bit carried away with making chocolate orange batter so had quite a bit leftover (about half a batch) so I decided to make a cake out of it using 2 of the 4 inch cake tins. After letting it cool (and after a trip to the shops for marmalade) I did the following:
    1. Split the 2 cakes in half.
    2. Filled each cake with marmalade - I used thick cut for this as i like finding chunks of orange peel.
    3. I then covered the lower cake top with Nutella (you know you like it *wink*)
    4. I placed the second cake on top and added a thin layer of Nutella on the top too (don't do the sides with Nutella - i know it's yummy but... it's overpowering too, especially on a little cake like this.)
    5. I added some chocolate sprinkles.
    You can also do this with a bought normal chocolate cake - or swap the marmalade for cherry jam (if you don't have orange chocolate batter that is *wink* )

    Enjoy!

    Thursday, 4 August 2011

    Loving music..


    I've had the G clef charm (the musical note charm)  for a long time and not really found a way to use it but the sewing charm necklace inspired me to see if there was a way to use it and with a bit of leather I had lying around (yes I AM that type of person - I keep al kinds of small bits and pieces in case I'll need them for one of my many projects) and beads and "findings" from my bead stash and what you see above is what the result is <grin>

    Not much to tell really so I'll let the picture speak for itself .

    Wednesday, 3 August 2011

    Cupcakes!


    With the kids away on holiday I can make cupcakes in flavours I prefer. My main challenge today was making do with what I had in the house - no additional shopping allowed. This was a bit of a problem as the milk had gone off and smelled of cauliflower for some weird reason (I have no cauliflower in the house and haven't had it while that pack was in the fridge either) so I really couldn't use that. As a result I used freshly squeezed orange juice instead and that in itself made my choice of what type of cupcake I could make fairly limited. Since I was making mini cupcakes I didn't want just the one flavour so I challenged myself even more and looked for more flavours I could make.

    The first flavour was obvious - plain orange.  The second flavour was inspired by Terry's Chocolate Orange
    which I adore - only problem being that I don't have any cocoa in the house. I did have chocolate though so I melted that and let it cool a bit before adding that to the batter. The third flavour I decided to make was caramel orange, I used some of my caramel coffee syrup to make the batter taste of orange with more than a hint of caramel. As you can see in the image I'm still getting used to my mini cupcake tin so they aren't all the same size.

    I'm listing the ingredients for a full batch of cupcakes for each flavour as it's easier than converting to the 1/3 batches I made by first making the orange cupcake batter and then adding flavours to 2 x 1/3 of it.

    Ingredients for orange cupcakes:
    • One batch of My favourite cake batter made with:
      • Orange juice instead of milk
      • Omit the vanilla flavouring (you might need to add some additional orange juice to replace this).
    • Orange glaze made with: 
      • 125 gr / 1 cup icing sugar
      • 1 - 2 tablespoons of orange juice
      • Orange colouring.
    __________________________________________________________________

    Ingredients for chocolate orange cupcakes:
    • One batch of My favourite cake batter made with: 
      • Orange juice instead of milk 
      • 50 gram / 2 oz chocolate slowly melted in a bowl over a pan of hot water, then set aside to cool while you make the batter - you add this last of all.
      • Omit the vanilla flavouring (you might need to add some additional orange juice to replace this). 
    • Orange glaze made with: 
      • 125 gr / 1 cup icing sugar
      • 1  - 2 tablespoons of orange juice 
      • Orange colouring.
    • Some chocolate decoration - I used doughnut shaped chocolate covered crunchy things. 
    __________________________________________________________________  
     Ingredients for caramel orange cupcakes:
    • One batch of My favourite cake batter made with:
      •   1 - 2 tablespoon of caramel coffee syrup mixed with 3 tablespoons of orange juice instead of milk
      • Omit the vanilla flavouring (you might need to add some additional orange juice to replace this).
    • Caramel glaze made with: 
      • 125 gr / 1 cup icing sugar
      • 1 - 2 tablespoons of caramel coffee syrup
     Enjoy!

    My favourite cake batter

    Everyone has their own favourite batter for making cakes with and this is mine - I use it for cakes and cupcakes and adjust ingredients as needed for the different flavours I want. Since I make a lot of cakes I decided to put the basic recipe here and then refer to adjustments in the posts with my cakes. To convert my recipes to USA measuring standards I used this site: traditional oven Although they don't show it linked on their home page they do have some great converters that I found were accurate.

    You can choose to either make this by hand, with a mixer or just in a kitchen machine.
    For a 7" round cake tin or 12 cupcakes you need:
    • 125 grams / 1 1/10  stick of butter of butter or margarine at room temperature
    • 170 grams / 3/4 cup of sugar this can be castor sugar or demerara sugar etc.
    • 2 large eggs
    • 5 ml / 1 teaspoon of vanilla flavouring
    • 35 - 60 ml / 2 - 4 tablespoons of milk
    • 225 grams / 1 4/5 cup of self raising flour
    Instructions to make by hand or using a mixer:
    1. Preheat the oven to gas 4 / 350 F / 180 C
    2. Prepare your cake tin by spraying it with baking spray, carefully covering the sides with butter or putting cupcake liners into the cupcake tin.
    3. Put the butter in a mixing bowl and mix till creamy.
    4. Add the sugar and mix well.
    5. Add the eggs and mix well - if you did steps 1 and 2 correctly you will see little lumps of butter/sugar mix floating around - if not mix a bit more till it is smaller.
    6. Add the vanilla flavouring and  half the milk and stir.
    7. Add the flour and mix well - if it gets hard to mix add more milk.
    8. Fill the cake tin/cupcake cases
    9. If you are making a cake it will take about 55 minutes - if making cupcakes it will take about 35 minutes till baked - use a skewer or wooden toothpick to poke the cake down to the bottom and see if it's done - if it's clean when you pull it out it's done, if not give it 5 more minutes.
    10. Leave it/them to cool a few minutes in the tin - then take it/them out and leave to cool on a cake rack (or just the counter top/plate if you don't have one)
    11. Wait with icing till they are cold or it will get too messy
    If you want to use a kitchen machine to make the batter do it like this:
    1. Put the butter and sugar in the kitchen machine and mix till smooth.
    2. Add the eggs and all liquids and mix.
    3. Add the flour and mix for 5 minutes.
    4. Continue with step 8 above.
    Enjoy!

    Oodles of noodles...


    My kids call anything made with noodles "oodles of noodles" , I think because they like the sound of it.
    Last night I made this version of it - with chicken and whatever veg I had in the house at the time. I'll give the recipe for what you see in the image however you can use any meat/veg combination you prefer for this.

    For 2 people (or one person with a large appetite):
    • 1 large or 2 small carrots - thinly sliced
    • 1 thin or 1/2 - 3/4 thick leek sliced really thinly
    • 1 small onion - diced
    • 1/2 yellow bell pepper - sliced into thin strips (you can use another colour of course and you can add chilli pepper too if you like it spicy)
    • 300 gr chicken - in strips
    • Chinese noodles (the packs I buy have 3 "sheets" and I used one of them)
    • Sweet soy sauce
    • Garlic
    • Pepper, 5 spice
    • 1 tbp cornflour or normal flour (I will say cornflour in the instructions but use flour if that's what you have - both work well)
    Instructions:
    1. Make a marinade of some soy sauce, pepper, garlic and 5 spice in a bowl and add the chicken to it and leave to marinade while you chop the veg.
    2. Put the carrot slices into a pan of cold water and bring to the boil - allow to simmer for a max. of 5 minutes
    3. Meanwhile melt a knob of butter/marg or pour some oil in a frying pan (skillet) or wok and heat.
    4. Add the chicken to the pan, making sure to squeeze out any excess marinade back into the bowl (you will need this later) and make sure all the sides are sealed. 
    5. Put all your remaining veg into the frying pan and stir fry till cooked. 
    6. Turn the heat off the pan with the carrots once the 5 minutes has passed and add the Chinese noodles - leave for 4 minutes
    7. Meanwhile make the sauce:  pour the marinade into the pan, add a bit more soy sauce and enough water so you have about 1 cm (1/4 inch) of liquid in the pan and bring to the boil
    8. Put the cornflour into a glass and add some water - mix to a paste with no lumps (this is important)
    9. While stirring the contents of the frying pan slowly add the cornflour paste and allow to thicken.
    10. Turn the heat low.
    11. Strain the carrots/noodles and add them to the frying pan.
    12. Mix thoroughly and serve.
    I hope you enjoy it as much as I did :)

    Tuesday, 2 August 2011

    Luscious limes...


    It's the first week of the month and another block is done! Lime is a colour that is really in your face bright and cheerful and speaks of springtime and good days ahead, so it was really fun to be sewing these while out and about taking my kids to museums the past few weeks.

    This is the 24th block and the 4th green one.
    Next up: the fifth green one - Grassy greens

    For more information see:  The insane hexagon quilt
    To see all the quilt blocks together look here:  Insane Hexagon Project

    Sunday, 31 July 2011

    Pink Drink...


    One of my favourite summer time drinks is a watermelon smoothie. It's cold, healthy and (almost) non fattning so it can't really get much better than that :) Best of all it's easy to make too - even if you don't have a blender or kitchen machine!

    All you need is for about 3 large glasses:
    • About a pint/half a litre of natural low fat yoghurt
    • 1/4 small or 1/8th watermelon cut into chunks.
    • Sugar to taste (or sweetening if you can deal with the artificial taste it adds)
    • For the decoration 2 straws and 2 slices of watermelon about 1/2 inch / 1.25 cm thick per glass
    If you are using a kitchen machine or blender just put all the ingredients into the machine and turn it on till smooth.
    If you are doing it by hand chop up the watermelon into small 1/4 inch / 1 cm cubes and press through a sieve before mixing it through the yoghurt.

    Pour into glasses and slide the slices of watermelon onto the glass - I put the front slice in with the rind in the glass first - then put the second slice pointing the other way second making sure I didn't push it down as far. then add straws and serve

    Friday, 29 July 2011

    Dolly bags..


    With the kids going with my ex on holiday to Turkey for a fortnight they wanted a way to take their "Can't live without dollies" with them on the aeroplane as they haven't flown since they were very small and are a bit nervous. They waited till the last moment to tell me this (of course), so I made them a dolly carrier each - with fabrics they chose of course as they were allowed to choose anything from my stash that was big enough for the project.

    I kept it simple and used a 20" x 9" rectangle of fabric each for the inner and outer cover placed right sides together and placed some super strong cut away stabiliser from Madeira (that I happened to have lying around) on top and sewed most of the way around. I then turned it right side out and sewed the seam shut.  Then I added some Velcro and the strap before sewing the side seams closed and turning it right sides out. This makes the flap a little bigger than the sides but I was doing it the fast and dirty way as I didn't have much time to do this in.

    To make the straps I used a strip of 3" x WOF (that's Width Of Fabric for the non quilters reading this) folded in half right sides together - sewed the seam and tuened it before sewing a line 1/4 away from each side to keep it flat.

    It took me 2 1/2 hours to make both bags and I finished about 5 minutes before my ex showed up to collect the kids.

    Sewing charms...


    Last week when we were in Tilburg (The Netherlands) I was at a lovely little quilt shop - Quilt-it it's housed in an old Dutch house and the shop itself is in the parlour, with the class room being in the room across the hallway - it had lovely tiles on the floor in the hall that were original to the house. They specialise in old style fabrics - muted reds/brown/blues etc. not really my taste but certainly lovely fabrics so I got myself a couple of FQ's (that's a piece of fabric that's around 20 x 18 inches for the non quilters reading this) in some red tones, some needles and some lovely sewing related charms.

    Today while in town with the kids I got the coloured leather laces, closure and other bits and pieces for making a necklace and made myself this in about 20 minutes.

    Monday, 25 July 2011

    Cookies.... On-a-stick!


    Last Thursday when we were in Utrecht we not only visited the Railway Museum but also the Utrecht University Museum after which we did a bit of shopping - the kids love going shopping with me as we always go to fun shops. Although admittedly they don't like it when I disappear into a quilt shop they are very well behaved there and I always let them go into a shop of choice after (comic or toy shop usually lol) one thing we did after the quilt shop was go into this lovely baking shop Cute Cakes where I got my hands on a star cookie tin that allows you to make cookies-on-a-stick.

    Today was the day to finally try it out. and I made it recipe included on the back of the wrapper - it was too dry so I added a second egg to the mix and it was enough to make over double the amount they said it was for. The 6 in the photo are from the first batch made - at the time of writing I have the 3rd batch in the oven with enough dough left to make at least another 6, though I'm not putting sticks in any more as I don't want to run out of sticks on the first day of using the tin.

    Sunday, 24 July 2011

    Giant beanbags!


    Last winter I got my hands on this MASSIVE bag of beanbag beans with the plan of making a couple of old fashioned beanbags, however the curved shapes needed and the sheer size of them daunted me too much to I kind of stalled on making them. Yesterday I made the decision to stop procrastinating and just make them - not circular but the newfangled rectangle shapes instead, something I could easily do. I don't have the final outer fabric bought for these yet so they are just 2 layers of muslin sewn shut which will make the beanbags more childproof than a single layer would be. When I have a spare bit of money I'm going to raid the fabric shop and buy some nice soft fleece to use as the outer covers, oldest wants blue while youngest wants green on one side and blue on the other. The photo has a standard sized paperback book tucked between the beanbags so you can see how huge they really are.

    Size of each beanbag: 1,5 meters x 1 meter ( 4,9 foot x 3.2 foot)
    Cost per beanbag: 16 Euro's (approx 23 USD / 14 GBP)

    Wednesday, 20 July 2011

    New cupcake tin...


    Monday we were in town so the kids could spend their pocket money and while we were there they wanted to go into the sweetshop which happens to also sell baking stuff so I splurged and got a new cupcake tin - one for 24 mini cupcakes. Since we were in Tilburg yesterday I couldn't test it out till today and have found that I need a bit more than 1/2 a normal batch of cake batter to make 24 well filled cupcakes so I'll probably just stick to making 18 unless I'm making more than just one batch.

    The white cupcakes are vanilla and the pink ones are raspberry and as you can see I didn't ice them as I had run out of icing sugar.