I realised when setting up the "2019 Finishes" page that I hadn't added all of my 2018 finishes to my blog - which is a pity as I *did* finish stuff towards the end of the year as well, though not all of it was cross stitch. One of the things I finished was this scarf - it's huge! I used two 200gr balls of Lana Grossa Gomitolo Versione colour 407 to make it, the hat and mittens below. It's 18 x 122 inches / 45.7 cm x 3.10 metres! It's not very thick but wrapped round several times it is nice and cosy!
I first started this blog due to "popular demand" for me to to share my cooking and quilting results in blog form as it was easier for friends and people who know me to see what I'm up to, especially compared to just an image hosting site. Now I blog because I enjoy sharing what I do and hope that I do in some way inspire people to try new things out as well.
Pages
- Home
- Completed Ancient Things SALs
- Completed Blackwork SALs
- Completed Fob SALs
- Completed Mystery SALs
- Completed Mini Magical Mystery SALs
- Completed NFSALs
- Completed Ornament of the Month SALs
- Completed Stocking Patterns
- Completed Temperature SALs
- Completed Weavers Band Sampler SALs
- All Other Completed SALs
- Tips and Tutorials
- Mystery SAL Tips
- Helpful Links
- Freebies on Other Sites
- 2010 Finishes
- 2011 Finishes
- 2012 Finishes
- 2013 Finishes
- 2014 Finishes
- 2015 Finishes
- 2016 Finishes
- 2017 Finishes
- 2018 Finishes
- 2019 Finishes
- 2020 Finishes
- 2021 Finishes
Showing posts with label Crochet. Show all posts
Wednesday, 23 January 2019
Tuesday, 14 February 2017
100 Colour shawl
This is the biggest thing I've ever crocheted, and the biggest number of colours I've used for a crochet project too! I discovered this new Dutch brand of crochet yarn - Yarn and Colors, Must-Have-Minis - and I fell in love with all the colours - yes even the pink! I knew I had to do something with all the colours but I didn't know what so I started collecting the mini balls of yarn anyway knowing that I'd think of something eventually.
Wednesday, 10 February 2016
WIP Wednesday
I thought I'd use today to give a bit of an update as to what I'm actually working on, and also share a few recent finishes.
First of all I'll start with the photo at the top, it's Theresa Wentzler's Castle Ridge that I started last year on January 1st at the stroke of midnight. The last time you saw it it looked like this:
I picked it up again on Sunday and as you can see I have made quite a bit of progress since then - when I;ve finished the bit I'm working on now I'll have done ~1000 additional stitches. What I had done before was roughly 800 stitches. I plan on working on this till Saturday when I will pick up the next project, probably Mike's Mushrooms, but I'll update about that at a later date.
Before I picked this up on Sunday I spent around a week working on another project The "a border a week" better known in The Netherlands as "randje per week" I was planning on keeping up as best as I could but it wasn't to be, so many other projects pushed this out of the way. The last photo I have of this that was posted on the WIP page of the blog is this one:
Made some time in the spring. I worked on and off on it in between other stuff when I needed something simple to work on. It now looks like this after last week's work on it:
The different motifs were ones I added myself, the butterfly and ravens are both from old magazine cuttings I have that were originally in other colours, the lizard I found on this site: amintkipattan.blogspot.com (linked to the page with the pattern) I'm not certain which language this is but the language of cross stitch is universal and I'm sure you will enjoy the patterns this designer offers too!
Another thing I have been working on recently is crochet. I am currently working on a purple and black hooded cowl for my oldest son. It doesn't look like much yet, but I'm only on the 4th round so that's to be expected.
I'm using Stylecraft DK special, the shade you see here is 1425, Emperor although it's a bit richer/darker in person. Purple is such a difficult colour to photograph. I'll be adding some details with the black I have of the same make and ending up with some rows of black too. It was mean and decided to be an infinity cowl, which I tried very hard to avoid, but somehow managed anyway. it has made the adding of the desired pattern more difficult but I'll muddle my way through. I started with a chain of 300 so it's pretty big.
Time for a couple of recent finishes!
First of all is the pesky backstitching issue I had with the spray of Jasmine when I used the colours in the pattern they just didn't show up at all, probably because I chose a green linen and not the asked for white Aida.
Ripping it out was so difficult it ended up in the drawer of doom and sat there till I unearthed it last weekend. I decided on the colours to use and I'm ok with the result but even now it's not as obvious as I'd have wanted, however I still dislike this piece as much as I did last time I worked on it, so disappointing. Interestingly enough the linen looks almost grey in this picture, which it definitively isn't in reality as it's a lovely pale green. This will now be moved to my completed list.
Then there is the ornament pattern I wanted to do for the Halloween SAL with Leonore and the gang, which didn't really go as well as planned due to the enormous amount of other things that needed to be stitched. When you last saw it it looked like this:
Some time in January I finally completed the last stitches, I'm not yet sure how i want to finish this so I'm leaving it as is for now.
Because I didn't want a stripy effect from the threads I'd worked the cross stitch area's in a circle instead of rows. I'm quite happy with the way this turned out.
That's all for now - see you next time!
First of all I'll start with the photo at the top, it's Theresa Wentzler's Castle Ridge that I started last year on January 1st at the stroke of midnight. The last time you saw it it looked like this:
I picked it up again on Sunday and as you can see I have made quite a bit of progress since then - when I;ve finished the bit I'm working on now I'll have done ~1000 additional stitches. What I had done before was roughly 800 stitches. I plan on working on this till Saturday when I will pick up the next project, probably Mike's Mushrooms, but I'll update about that at a later date.
Before I picked this up on Sunday I spent around a week working on another project The "a border a week" better known in The Netherlands as "randje per week" I was planning on keeping up as best as I could but it wasn't to be, so many other projects pushed this out of the way. The last photo I have of this that was posted on the WIP page of the blog is this one:
Made some time in the spring. I worked on and off on it in between other stuff when I needed something simple to work on. It now looks like this after last week's work on it:
The different motifs were ones I added myself, the butterfly and ravens are both from old magazine cuttings I have that were originally in other colours, the lizard I found on this site: amintkipattan.blogspot.com (linked to the page with the pattern) I'm not certain which language this is but the language of cross stitch is universal and I'm sure you will enjoy the patterns this designer offers too!
Another thing I have been working on recently is crochet. I am currently working on a purple and black hooded cowl for my oldest son. It doesn't look like much yet, but I'm only on the 4th round so that's to be expected.
I'm using Stylecraft DK special, the shade you see here is 1425, Emperor although it's a bit richer/darker in person. Purple is such a difficult colour to photograph. I'll be adding some details with the black I have of the same make and ending up with some rows of black too. It was mean and decided to be an infinity cowl, which I tried very hard to avoid, but somehow managed anyway. it has made the adding of the desired pattern more difficult but I'll muddle my way through. I started with a chain of 300 so it's pretty big.
Time for a couple of recent finishes!
First of all is the pesky backstitching issue I had with the spray of Jasmine when I used the colours in the pattern they just didn't show up at all, probably because I chose a green linen and not the asked for white Aida.
Ripping it out was so difficult it ended up in the drawer of doom and sat there till I unearthed it last weekend. I decided on the colours to use and I'm ok with the result but even now it's not as obvious as I'd have wanted, however I still dislike this piece as much as I did last time I worked on it, so disappointing. Interestingly enough the linen looks almost grey in this picture, which it definitively isn't in reality as it's a lovely pale green. This will now be moved to my completed list.
Then there is the ornament pattern I wanted to do for the Halloween SAL with Leonore and the gang, which didn't really go as well as planned due to the enormous amount of other things that needed to be stitched. When you last saw it it looked like this:
Some time in January I finally completed the last stitches, I'm not yet sure how i want to finish this so I'm leaving it as is for now.
Because I didn't want a stripy effect from the threads I'd worked the cross stitch area's in a circle instead of rows. I'm quite happy with the way this turned out.
That's all for now - see you next time!
Tuesday, 20 January 2015
IHSW report for January
This IHSW I did a lot of crochet instead of stitching because my oldest son had a friend staying over and I was pretty tired and decided I'd rather avoid frogging. Considering the amount of crochet I had to rip out I'm pleased I made this decision as ripping out crochet is a LOT easier. Before I started on Friday I took the following photo, if you enlarge it you can see the wool to the top right about where the fold is.
The shawl is going to be a bit of a monster - it's 126 stitches wide and 27 inches high, so far I've used about 4 balls of wool - Stylecraft double knit special - I have 14 balls in total to use so there is another 10 balls to go. Each strip is 2" / 5 cm wide and I'm 2 rows into the diamond pattern I'm adding - white with rust diamonds which explains the rust dots at the top of the photo below. Over the weekend I added 8 inches of crochet. Fortunately Carla had her hangout open and I was able to chat quite a bit with her and Nancy who also dropped by for the first time in ages, so I was able to de-stress from having other people in the house which isn't my favourite thing but it's good for the kids to socialise in this way.
Yesterday my February issue of the CrossStitcher arrived and it has a cute little owl scissor holder with matching fob as this month's freebie so I decided to start that in the evening and extend IHSW by a day so I'd be able to report on something stitchy after all. My January issue hasn't arrived yet but it's still within the 14 working days since they told me they were re-sending the issue so I'm not worried yet.
I didn't get much done but it's good to have at least done a few stitches and have another pair of items for the Tons of Tiny project. It's not going so fast stitching wise right now as both kids are now ill (youngest was poorly on Sunday and oldest came home from school today)
Thursday, 23 October 2014
More adventures with crochet
So last Sunday I placed an order for a knook hook and some yarn to knook with, and while I was on the online shop I got side tracked by some other yarn - Spray by Lang Yarns as it looked lovely and soft and I loved the colour but it was 100% wool. I wasn't sure if it would work for me due to my allergies for animals but I decided to risk it as I needed to know and one of my kids might have liked it enough to want it instead. I got 3 balls of 50 grams. It took a few goes as I'd initially made it too wide and I did not have had enough yarn to do more than 1/3 of a scarf at that width. So I pulled it ALL out and started again - part of me wanted to make it a different size so I had to rip out several rows more than a few times but in the end after 2 days of crocheting and ripping I have my lovely soft scarf.
I love how the yarn is not the same width - some places it's fluffy, some skinny and it goes really fast too! It's not my usual length or width but as an autumn scarf it's perfect.
Stats:
Yarn: 3 balls of Spray by Lang Yarns in colour 879.0097
Stitch: Double crochet (US stitch name)
Hook size: 9/N
14 stitches wide x 65 rows
6 1/2" x 54 1/2" / 16.51 cm x 138.43 cm
The Crochet WIP:
I still had several balls of yarn left from doing my Doctor Who scarf and hat so decided to make some slippers using the colours with a full ball of wool left. I chose a pattern from the drops website that used the Paris yarn I have. I didn't have a size 4 crochet hook but the new knook hook I'd ordered was a size 4 so I decided to use that. The Paris yarn normally uses a size 5 hook in case you were wondering how I did the Who scarf without a size 4 hook.
I started by making the 2 granny squares and was planning on doing both at the same time but it was going too slowly for me so i opted to just go back to doing one at a time. I realised while doing the stripes that I had chosen a rather rastafarian colour scheme but that was just a happy accident. This was started before I started the completed scarf above but using a size 4 hook on size 5 yarn is painful after a while and my hands needed the rest from it.
I have also done some more stitching on my secret cross stitch project.
I love how the yarn is not the same width - some places it's fluffy, some skinny and it goes really fast too! It's not my usual length or width but as an autumn scarf it's perfect.
Stats:
Yarn: 3 balls of Spray by Lang Yarns in colour 879.0097
Stitch: Double crochet (US stitch name)
Hook size: 9/N
14 stitches wide x 65 rows
6 1/2" x 54 1/2" / 16.51 cm x 138.43 cm
The Crochet WIP:
I still had several balls of yarn left from doing my Doctor Who scarf and hat so decided to make some slippers using the colours with a full ball of wool left. I chose a pattern from the drops website that used the Paris yarn I have. I didn't have a size 4 crochet hook but the new knook hook I'd ordered was a size 4 so I decided to use that. The Paris yarn normally uses a size 5 hook in case you were wondering how I did the Who scarf without a size 4 hook.
I started by making the 2 granny squares and was planning on doing both at the same time but it was going too slowly for me so i opted to just go back to doing one at a time. I realised while doing the stripes that I had chosen a rather rastafarian colour scheme but that was just a happy accident. This was started before I started the completed scarf above but using a size 4 hook on size 5 yarn is painful after a while and my hands needed the rest from it.
I have also done some more stitching on my secret cross stitch project.
Monday, 20 October 2014
Doctor who scarf final update + a little more
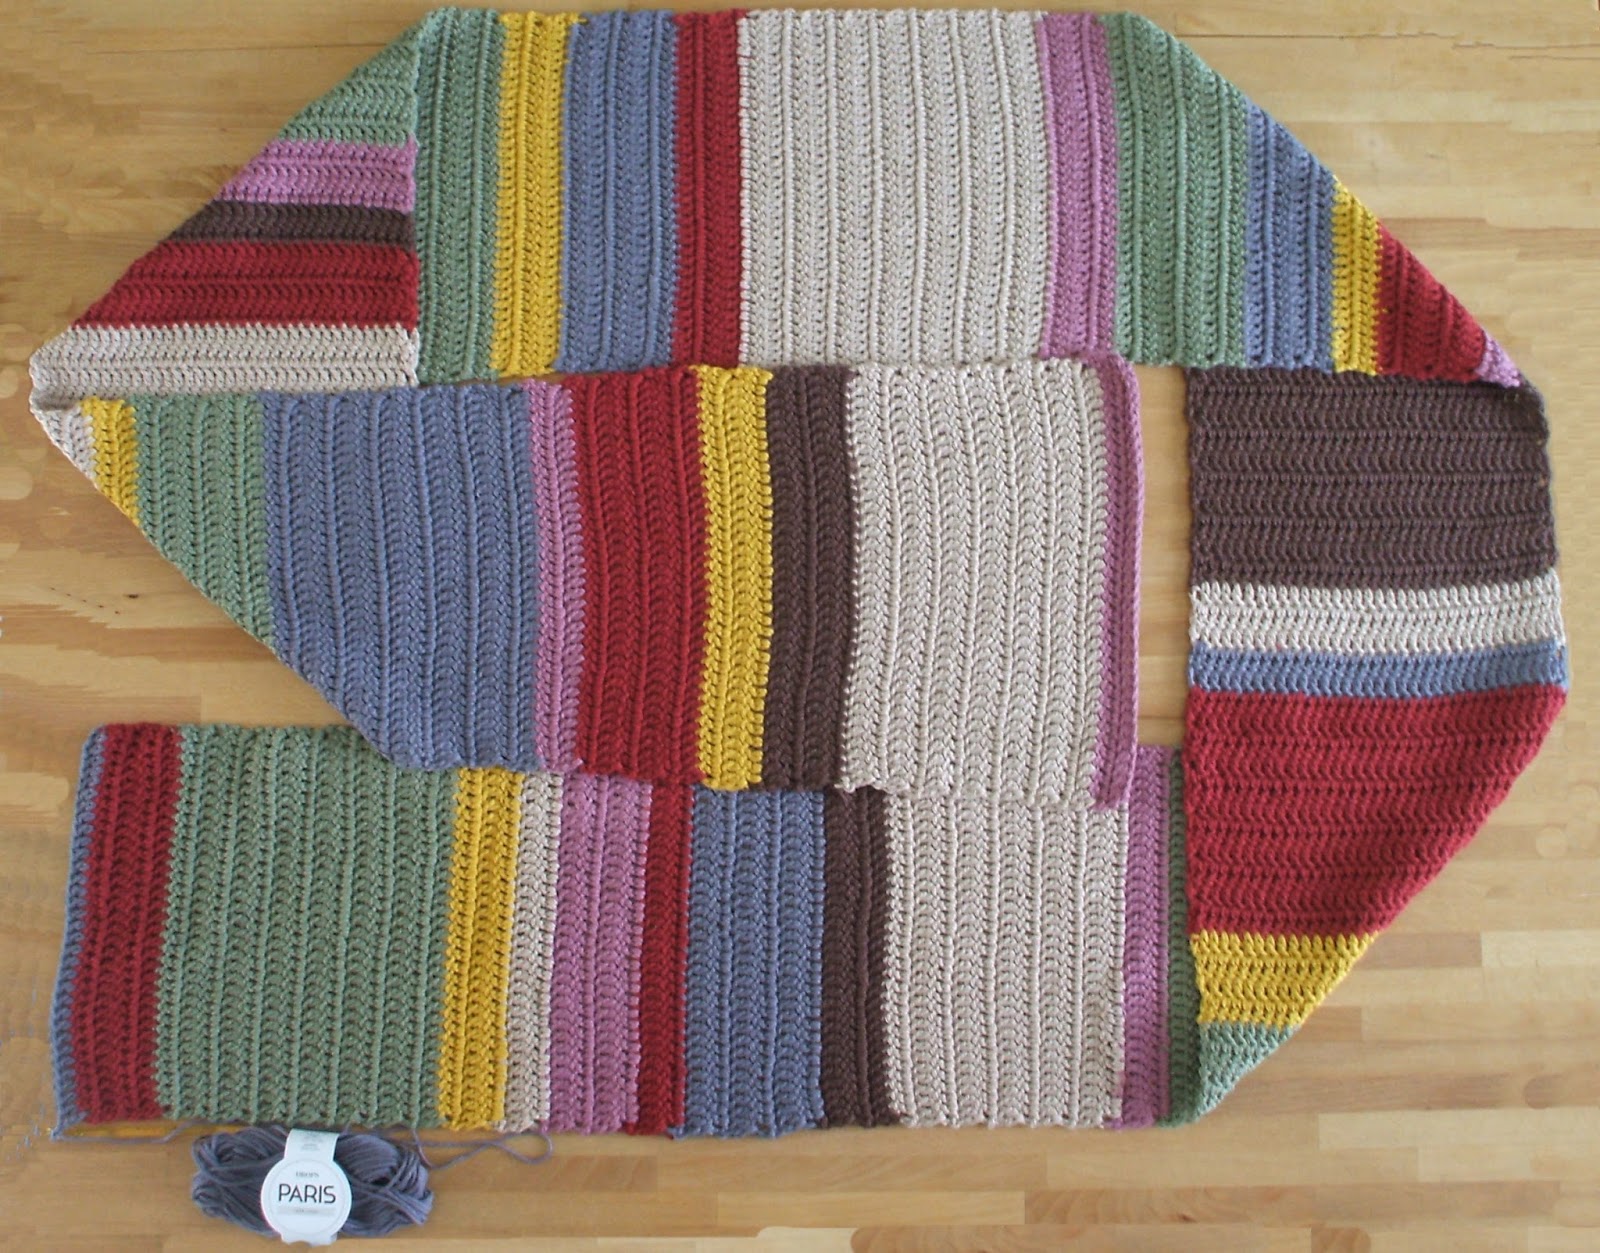
Last Friday when I posted the image above I was expecting to finish the scarf on Sunday as I'd done about 21 rows a day and still had 59 left, however I was wrong.. very wrong. I finished the scarf Friday night apart from the fringe, which I did Saturday. I entered the berserker mode and did the 59 rows in a single day.
On Saturday I measured and cut 24 lots of 12" lengths of all of the 7 colours in this scarf - don't worry I did it the fast way by holding all 7 colours together and measuring them like that. I then proceeded to add the tassels to the scarf. After that a trip into the garden to photograph the scarf was in order as it was a lovely sunny day.
Here is the scarf in all it's glory being modelled by my mystery apple tree. Please do ignore the weeds, between my hand not working properly and my knee feeling that bending was beneath it getting down to weed was not an option.
As I had stacks of wool left I decided that it would be a good idea to make a matching hat. I used Lion brand's Free Crochet Pattern: Tip Top Topper (sign up is required to view this - sorry) as I thought that a more eccentric hat suited the 4th Doctor so much more than a beanie and using the same inch pattern as I had done for the Doctor Who scarf itself as the base I made the hat. I started at the same place as you would normally to make the scarf and counted each inch on the pattern as a row for the hat and rounded the partial inches up or down to whatever was closest.
The result is this lovely hat which isn't quite as sturdy as it would have been if it had been done with the suggested yarn instead of 2 x the Drops Paris I had used for the scarf however this way it matches better.
This is the hat from above with the scarf on the table so you can see them together. The photo might be slightly out of focus - it took me a good 15 photo's to get this one with me standing on my tip toes on a chair and holding my arm up as high as I could.
I still have several full balls and some partial balls of wool left and I am plotting what else to use them on.
On Saturday I measured and cut 24 lots of 12" lengths of all of the 7 colours in this scarf - don't worry I did it the fast way by holding all 7 colours together and measuring them like that. I then proceeded to add the tassels to the scarf. After that a trip into the garden to photograph the scarf was in order as it was a lovely sunny day.
Here is the scarf in all it's glory being modelled by my mystery apple tree. Please do ignore the weeds, between my hand not working properly and my knee feeling that bending was beneath it getting down to weed was not an option.
As I had stacks of wool left I decided that it would be a good idea to make a matching hat. I used Lion brand's Free Crochet Pattern: Tip Top Topper (sign up is required to view this - sorry) as I thought that a more eccentric hat suited the 4th Doctor so much more than a beanie and using the same inch pattern as I had done for the Doctor Who scarf itself as the base I made the hat. I started at the same place as you would normally to make the scarf and counted each inch on the pattern as a row for the hat and rounded the partial inches up or down to whatever was closest.
The result is this lovely hat which isn't quite as sturdy as it would have been if it had been done with the suggested yarn instead of 2 x the Drops Paris I had used for the scarf however this way it matches better.
This is the hat from above with the scarf on the table so you can see them together. The photo might be slightly out of focus - it took me a good 15 photo's to get this one with me standing on my tip toes on a chair and holding my arm up as high as I could.
I still have several full balls and some partial balls of wool left and I am plotting what else to use them on.
Friday, 17 October 2014
Doctor who scarf update
Last time I blogged about the scarf, a mere two days ago it looked like the photo above and clocked in at a length of 94 1/2 inches after just 6 days work. Something I forgot to mention in the last post was that I had decided to make life difficult for myself and make faux slip stitches as the original scarf had slip stitches at the ends where the colour changes. I achieved this by not finishing the colour and starting the next but by adding the new colour into the loop of the colour I'd just finished and then doing another chain stitch before turning the work and doing the double crochet stitches. This is slightly fiddly to do as if you pull too much the end falls through.
On day 7 I did an additional 25 rows adding 12 1/2 inches to the length of the scarf making it 106 1/2 inches.
Day 8 (yesterday) I managed to add another 23 rows = 11 1/2 inches to the scarf making it 118 inches long (that's almost 3 metres!) I won't be able to take any more photo's of the scarf along the width of my table - it's just too long now, so I'll have to move the Lego and embroidery thread boxes off the end of the table to use the length tomorrow.
Just 59 rows left to do! I should be finished by Sunday at the latest.
On day 7 I did an additional 25 rows adding 12 1/2 inches to the length of the scarf making it 106 1/2 inches.
Day 8 (yesterday) I managed to add another 23 rows = 11 1/2 inches to the scarf making it 118 inches long (that's almost 3 metres!) I won't be able to take any more photo's of the scarf along the width of my table - it's just too long now, so I'll have to move the Lego and embroidery thread boxes off the end of the table to use the length tomorrow.
Just 59 rows left to do! I should be finished by Sunday at the latest.
Wednesday, 15 October 2014
It's been a while.... again...
It's been a while since I last posted, mostly because I just can't share what I'm working on which then puts me off from sharing my TUSAL jars. The past 6 days my index finger has been so swollen I can't stitch, so instead I have embarked on my own Doctor Who scarf, something I've been wanting to do for many years. Seeing Carla's finished one certainly inspired me to get started - anything she can do I can also do - or at least that's what I try to convince myself.
As I cannot knit too well and find it far too slow I decided to crochet it and am using the inches pattern for the Hero scarf from Doctor Who scarf as the basis of my work as it's easier to measure amounts than try to guess rows. I decided to use Carla's yarn amounts as the basis of my own yard order and added 1 ball to each to make up for the fact that I'm doing crochet. I had some trouble finding the right green, brown and purple and decided in the end to use Drops Paris I didn't take the time to check their own site which I linked here as I thought the photo's on the site I bought the yarn from were clear enough. As a result I didn't see that the purple that they have might have been a better match than the "dark old pink" that the site I was on called aubergine (and in honesty it is a more purple than the pinkish colour on the drops site).
Below you will see the daily progress I made over the last 6 days - it's been going really fast, even though the last 2 days I haven't done so much and might not manage much today either.
This is the yarn I bought - LOTS - better known as 29 balls.
The first day's work didn't start so well - I got muddled and made it too wide... twice! The first time I had made the chain 12 1/2 inches wide when It was supposed to be 11 and didn't notice till I was 9 rows in - aarrgghh! I started again as I didn't want to use more yarn than I already had bought and knew that a wider scarf would use more yarn. Even though the chain was 11 inches the second time it became 12 after adding the first row of stitches so I removed some stitches till I was 11 inches and then fiddled and removed the chains from the "starting" end of the chain - not the official way to do it but well.. it worked hehe. By pure coincidence it turns out that one double stitch = 1/2 inch with this yarn and a size 5 hook. In the end I ended up finishing the first 24 rows = 12 inches on the first day.
The second day I did an additional 36 rows = 18 inches bringing the total to 60 rows = 30 inches.
Day 3 resulted in me having to "squish" the scarf to fit the width of my dining room table, which I've been using as the background for the photo's. I'd done 19 rows - 9 1/2 inches - I'd now done a total of 51 1/2 inches
On the 4th day I managed to do 44 rows = 22 inches, quite a bit more than the other days so far. I had now done 73 1/2 inches
Day 5 it had grown even more and as you can see it's starting to get rather difficult to photograph in it's entirety.
21 rows done so 10 1/2 inches. I had spent quite a bit of the evening dyeing my sheets/duvet cover and didn't get as much done. Total completed: 84 1/2 inches. I had passed the half way point on this day - so happy it's going this fast!
Yesterday was day 6 and I reached this stage despite it being wash day - so again lots of going up and down stairs and feeling tired. Even so I managed another 20 rows so added another 10 inches to the final result bringing it to 94 1/2 inches complete.
I'm not sure how far I will get today, been taking photo's of the results of my dyeing 2 days ago after wrestling the massive duvet cover on (king sized) and flipping my mattress as it was that time of the month to do that. The next post will be all about the dyeing and the results.
As I cannot knit too well and find it far too slow I decided to crochet it and am using the inches pattern for the Hero scarf from Doctor Who scarf as the basis of my work as it's easier to measure amounts than try to guess rows. I decided to use Carla's yarn amounts as the basis of my own yard order and added 1 ball to each to make up for the fact that I'm doing crochet. I had some trouble finding the right green, brown and purple and decided in the end to use Drops Paris I didn't take the time to check their own site which I linked here as I thought the photo's on the site I bought the yarn from were clear enough. As a result I didn't see that the purple that they have might have been a better match than the "dark old pink" that the site I was on called aubergine (and in honesty it is a more purple than the pinkish colour on the drops site).
Below you will see the daily progress I made over the last 6 days - it's been going really fast, even though the last 2 days I haven't done so much and might not manage much today either.
This is the yarn I bought - LOTS - better known as 29 balls.
The first day's work didn't start so well - I got muddled and made it too wide... twice! The first time I had made the chain 12 1/2 inches wide when It was supposed to be 11 and didn't notice till I was 9 rows in - aarrgghh! I started again as I didn't want to use more yarn than I already had bought and knew that a wider scarf would use more yarn. Even though the chain was 11 inches the second time it became 12 after adding the first row of stitches so I removed some stitches till I was 11 inches and then fiddled and removed the chains from the "starting" end of the chain - not the official way to do it but well.. it worked hehe. By pure coincidence it turns out that one double stitch = 1/2 inch with this yarn and a size 5 hook. In the end I ended up finishing the first 24 rows = 12 inches on the first day.
The second day I did an additional 36 rows = 18 inches bringing the total to 60 rows = 30 inches.
Day 3 resulted in me having to "squish" the scarf to fit the width of my dining room table, which I've been using as the background for the photo's. I'd done 19 rows - 9 1/2 inches - I'd now done a total of 51 1/2 inches
On the 4th day I managed to do 44 rows = 22 inches, quite a bit more than the other days so far. I had now done 73 1/2 inches
Day 5 it had grown even more and as you can see it's starting to get rather difficult to photograph in it's entirety.
21 rows done so 10 1/2 inches. I had spent quite a bit of the evening dyeing my sheets/duvet cover and didn't get as much done. Total completed: 84 1/2 inches. I had passed the half way point on this day - so happy it's going this fast!
Yesterday was day 6 and I reached this stage despite it being wash day - so again lots of going up and down stairs and feeling tired. Even so I managed another 20 rows so added another 10 inches to the final result bringing it to 94 1/2 inches complete.
I'm not sure how far I will get today, been taking photo's of the results of my dyeing 2 days ago after wrestling the massive duvet cover on (king sized) and flipping my mattress as it was that time of the month to do that. The next post will be all about the dyeing and the results.
Thursday, 19 September 2013
Recycled plastic... Part 2
Having used part of a large red plastic bag to complete my recycled plastic bag earlier this week I had a good chunk of it left. It seemed a huge waste and contrary to the theme of recycling to have such a large amount of the bag leftover to just throw it away, even if it was into the plastic recycling bin, so I decided to cut what was left into 3/8"/ 1 cm strips and crochet them into a little basket. I used my size 10 hook, which is a size P in the USA and a 000 in the UK
Crocheting plastic strips is hard work, even when they are as skinny as the ones I was using so my hands soon complained about life so it took a bit longer to make than it would normally have done to make a same sized basket from yarn. I have no idea how many strips i used but I used a large expensive clothes shop bag so it was rather on the large size and quite thick. This did result in a fairly sturdy basket which can be used to keep things in.
The basket is roughly 4 inches / 10 cm in diameter and 5 inches / 12.5 cm high.
Crocheting plastic strips is hard work, even when they are as skinny as the ones I was using so my hands soon complained about life so it took a bit longer to make than it would normally have done to make a same sized basket from yarn. I have no idea how many strips i used but I used a large expensive clothes shop bag so it was rather on the large size and quite thick. This did result in a fairly sturdy basket which can be used to keep things in.
The basket is roughly 4 inches / 10 cm in diameter and 5 inches / 12.5 cm high.
Subscribe to:
Posts (Atom)