Monday 19 October 2015

Hand dying fabric with Dylon fabric paint

Many moons ago, including at least 2 blue and a blood moon, @Dylon_UK asked bloggers if they were interested in using their dye and I thought it would be great fun to play with dye so contacted them as instructed. I was overjoyed when they said I was in, and *may* have overlooked that they were sending me paint instead of the dye I thought they were sending - but then I only know Dylon from dye and not paint. They were wonderful and asked me which colours I wanted and I couldn't choose so said "surprise me" and boy was I surprised!

Initially I was full of idea's but I can't actually paint so kept on hitting the brick wall of "this looks awful". So I ended up putting it aside as a project till I did get an idea. I'm glad I did in the end as I did get an idea of what to do and it's completely out of the box, which is more my style anyway when it comes to crafting.

If anyone reading this thinks this is a complaint then please don't as this is just me explaining why it took me so many months to get this blog post written as promised. I love a challenge and this was certainly that!

So just to be clear: although Dylon kindly sent me the paints I used, the way I used them and what I have written are entirely my own thoughts, ideas and opinions.

With that bit over it's time to tell you what I did with the paints... I used them to hand dye embroidery fabric! It might seem a bit odd but I found it works really well.
Materials:
  • Dylon fabric paint, I used royal blue (8) and turquoise (28) but any colour of the normal range works well.
  • Small containers to mix the paint in
  • Spoons or something else to stir with, one per colour paint you make
  • Fabric - I used 18ct and 20ct Aida embroidery fabric
  • Paintbrush
  • Optional: plant spray that hasn't been used to spray chemicals.
Experiments made before I got started: drops, swirls and stripes
Notes:
  • Dylon fabric paint was NOT made to be used like this and results may vary according to the material you use the paint on.
  • Dylon fabric paint for dark fabric does not like being diluted and is therefore not suitable for this method.
  • Before starting it's important to protect your work surface as this is going to get a bit messy. I put down a layer of newspaper and followed that with a plastic shopping bag I had cut open - a bin (garbage) bag works well too - just make sure you have plenty of space around the fabric you use.
  • Any creases in the news paper or plastic bag can result in the paint pooling which can affect the end result.
  • When I started this it was a huge experiment so I started on a few scraps of 18ct Aida I had left over from another project, I suggest you play around on some scraps first to see what pattern you like before working on a larger project. 
  • If the paints are not spreading enough either use a plant spray filled with water or dip your fingers in water and splash that on the fabric and the paint will spread more.
  • Once mixed the paint keeps for a week or so if you keep it covered (or if you forget just add water and mix well)
Instructions:
  • First you need to mix your paints. 1/2 a coffee spoon (about 2-3 ml) mixed with a tablespoon of water makes the paint thin enough to work with. Stir the mixture till all the paint is diluted
  • You can mix colours! I made 4 colours using the 2 paints I chose to use: 
    • Just royal blue
    • Just turquoise
    • 1 part royal blue and 2 parts turquoise
    • 2 parts royal blue and 1 part turquoise
  • Hand wash your fabric to remove any sizing or other chemicals from the production process so that the fabric takes the dye.
  • If you wring the fabric you might create creases which will affect the dye result, if this is what you want go for it, otherwise hold it up for a bit to let most of the water drip out.
  • You need to keep the fabric wet to let the paint spread.
  • Give the paint another stir before starting, this means that any bits that you missed earlier will be mixed in.
  • I used a small paintbrush to make the spots and drops on the fabric.
  • Start with one colour and cover the fabric with spots before moving on to the next colour
  • Keep adding colours till you are happy with the result, remember that as it dries the colours will continue to spread.
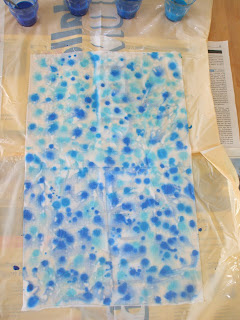
I added more paint after this but sadly forgot to take a photo.
  • It will take quite some time for the fabric to dry so it's best to leave it overnight to dry.
  • Heat set the fabric according to the instructions on the paint.
  • Hand wash, dry and iron again to remove any creases from washing and you are ready to use your fabric for whatever you wish!
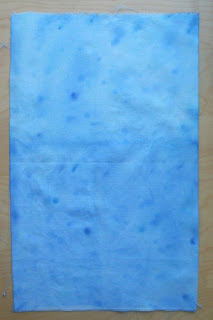
  • You can see the result I got from this at the top of this post.
I also experimented with hand dying embroidery floss... but that's something for another post.

I hope you enjoyed this post, if you do use this to dye your own fabric I'd love to see your results!
Saturday 17 October 2015

Fob a Month - 8

This month's fob is fortunately only a day late, which is quite an improvement on last month.

With autumn on our doorstep my mind turned towards that as a theme, I chose a toadstool as that is really one of the more visible things you can see that herald autumn other than the falling of leaves. I used a lovely picture by ky-sta over on deviantArt which can be found here: Red Mushrooms 9 and did 2 things with it.

The first thing I did was do a direct pattern conversion and then reduce the colours from around 100 to a "mere" 43. I stitched this and then added small beads to create the dots of the toadstool.

The second thing I did was use the picture as an underlay over which I then placed the colours over the top to create a pattern with just 15 colours, which I also stitched.

The results are 2 different toadstools made from the same picture using mostly the same colours made into a fob. Because I chose to use brown 28ct jobelan the fob is again rather on the large side but it does make it about the right size to use as an ornament as well.

The fob is 3" round. The realistic toadstool is 29 x 28 stitches. The stylised toadstool is 29 x 25 stitches.
What you need to make the example above:
  • 2 pieces of 5 1/2" square 28ct brown jobelan
  • DMC in the colours on the patterns
  • Mill Hill Magnifica colour: 10010
  • Your stuffing of choice
  • Bordeaux craft thread for the cord
  • White rick rack: 11 1/2" long and about 5/16" wide
  • Water soluble pen
  • Matching thread to sew
  • Contrasting thread to baste with
You can download the patterns here: Realistic toadstool - Stylised toadstool
 
Instructions: Stitch one or both of the toadstools onto the centre of the jobelan.

Randomly stitch the beads onto the realistic toadstool as the spots.

Use a 3" round biscuit/cookie cutter and a water soluble pen to mark a circle on the back each embroidery, making sure to keep the embroidery centred.

Use the contrasting thread to baste the rick rack onto the front of one of the embroideries, use the line on the back as your guide and make sure the rick rack is centred on the line (a bit fiddly but not too difficult) overlap the ends a little and make sure you tuck the endings into the seam line.

Cut the circle out making sure to leave a 1/4" seam allowance.

Pin the cord in the top centre of the embroidery making sure the have the loop placed on the embroidery and the ends sticking out, as you don't want the loop on the inside of your ornament when stitched *wink*

Place the two sides right sides together and pin into place making sure to line up the circles.

Starting at the bottom stitch the 2 sides together carefully making sure to sew through the rick rack and leaving about 1 1/2" to turn - don't remove the basting thread yet!

Snip the seam allowance making sure not to go too close to the sewing line and carefully turn your work the right way round.

Check to see if all is sewn down properly before removing the basting thread and sewing the fob closed.

I hope you enjoy this pattern, please do share a link to yours if you make it!

The very delayed... Fob a Month - 7

A month late but nevertheless here it is...

The reason it's late is mostly that when the fob was due I was in the middle of redecorating my living room and somehow after that was done I didn't get round to finishing it.

This month's fob was the brainchild of my bf who wanted to have a go at designing a cross stitch pattern as well. I made the actual pattern but the idea of it and what elements to use were his decisions. With Doctor Who starting the new season the day after this fob was due he wanted to make something that reflected the show and the time of year it started. The stories are adventures in space and time so the clock represents time and the star sign represents space, with Virgo being the star sign at the time of the first episode of the season with the added effect of hands of a clock which was quite unintentional.


The fob is 3" square. 46 stitches square.
What you need to make the example above:
  • 2 pieces of 5 1/2" square 14ct black Aida
  • Kreinik #4 braid: 001L, 002 and 012L
  • Your stuffing of choice
  • Black craft thread for the cord
You can download the pdf pattern here: Fob a Month - Main pattern
You can download a clock version here: Fob a Month - Clock version
Notes:
  • If you prefer a clock use the alternate pattern given, remember you can set the clock to any time you like by changing the direction of the hands.
  • If you would rather use another star sign go for it! Almost any star chart on the internet can be used to make it. 
 
Instructions: Stitch the pattern in the centre of the square of Aida, doing the back stitches and last of all the French or colonial stitches. I always do colonial stitches as they are easier to do.

I used the usual method for making a biscornu and started by doing an outline of 42 backstitches per side 3 stitches away from the finished cross stitch. On the front I used copper Kreinik, on the back gold and the 2 sides were stitched together using silver which gives a really nice finish.

Remember to add the cord at the 12 O'clock position so it hangs the right way up!

I hope you enjoy this pattern, please do share a link to yours if you make it!


Friday 2 October 2015

Ornament of the Month - October

Somehow or another it's already Autumn, Halloween is only weeks away and that means it's October, time for the next ornament! There are only 2 more months left after this pattern and then they will all be done - hopefully in time for Christmas. October has 2 birthstones Opal and Pink Tourmaline so this month has 2 patterns.