
Wednesday, 31 December 2014
Ornament of the Month 2015 SAL
Thursday, 23 October 2014
More adventures with crochet


Stats:
Yarn: 3 balls of Spray by Lang Yarns in colour 879.0097
Stitch: Double crochet (US stitch name)
Hook size: 9/N
14 stitches wide x 65 rows
6 1/2" x 54 1/2" / 16.51 cm x 138.43 cm

The Crochet WIP:
I still had several balls of yarn left from doing my Doctor Who scarf and hat so decided to make some slippers using the colours with a full ball of wool left. I chose a pattern from the drops website that used the Paris yarn I have. I didn't have a size 4 crochet hook but the new knook hook I'd ordered was a size 4 so I decided to use that. The Paris yarn normally uses a size 5 hook in case you were wondering how I did the Who scarf without a size 4 hook.

I have also done some more stitching on my secret cross stitch project.
Monday, 20 October 2014
Doctor who scarf final update + a little more


As I had stacks of wool left I decided that it would be a good idea to make a matching hat. I used Lion brand's Free Crochet Pattern: Tip Top Topper (sign up is required to view this - sorry) as I thought that a more eccentric hat suited the 4th Doctor so much more than a beanie and using the same inch pattern as I had done for the Doctor Who scarf itself as the base I made the hat. I started at the same place as you would normally to make the scarf and counted each inch on the pattern as a row for the hat and rounded the partial inches up or down to whatever was closest.


I still have several full balls and some partial balls of wool left and I am plotting what else to use them on.
Friday, 17 October 2014
Doctor who scarf update


Just 59 rows left to do! I should be finished by Sunday at the latest.
Wednesday, 15 October 2014
My hand dyeing adventure
Note before reading: this post is word heavy at the top and picture heavy at the bottom - I had not originally planned on doing a blog post about this but then decided that I wanted to share a whole load of photo's and this was the best place for it. If you don't want to read the how I did it stuff just skip to the bottom and enjoy the photo's.
Not so long ago I splurged and got myself a king sized wool filled 4 seasons duvet. My old one was also wool and 4 seasons but I'd previously been sold an extra long single person duvet and it's only because I am so short that it was "long enough", when used on it's side, to cover me. I had used this old duvet for years and just got tired of it being so short. A new duvet meant new duvet covers and while I found one that was okish I couldn't find another that I liked enough to buy.
So... A trip to IKEA got me a plain white duvet cover set, sheet and extra pillow cases as the duvet set only had 2 in it and I need 6. Then a trip to the shops got me 4 packs of Dylon dye - 2 in sunflower yellow and 2 in ocean blue. The plan was to tie dye the lot and have splashes of blue, yellow, green and white. In the past I have always used the dye for the washing machine so doing it by hand was a new adventure. The old tins had always put me off as they were so complicated to use but these "new" packets are a lot more user friendly so I decided to take the plunge.
When I started the actual task of wrapping string around the corner of a pillow case, I soon realised it would take me a gazillion days to do so as my hands didn't like the job and it was also hard on my iffy shoulder. Those of you who don't know me won't know that I am the lucky recipient of palindromic rheumatism, arthritis, a dodgy back and some other joint issues thanks to working too hard so any task that requires repetitive movements is going to hit me hard. I decided that it would be a better idea to dip dye instead - easier on the hands etc. *wink*
After washing out the old baby bath I had lurking in my garage that my oldest had kindly carried up to the bathroom for me, I proceeded to mix up the first lot of dye - the yellow. The dye once mixed with water in the jug was a lovely orange and I was glad I didn't skimp on getting rubber gloves or I'd have had garish yellow/blue hands by the end of this. I then proceeded to ignore the instructions as what I had planned required more water so less dye per litre of water. I knew in advance that this would result in a lighter colour.
I half filled the baby bath with warm water, added the required salt and then the dye. As I had never dip dyed and I couldn't remember what order I had to do the dipping I decided to put it in to the half way point first and pull a bit out as time went by. I squished the submerged fabric around for about 5 minutes - about 10 less than you are supposed to do as I didn't want a flat finish but splodges and blodges, just like you'd get with tie dyeing.
I draped the duvet and sheet over a plastic step so it would not lie on the floor. Doing it this way is messy - the dye tends to drip a bit if you don't squeeze any excess dye out first. Don't do it this way if you are not in a tiled area that is easy to clean. Once the last bit had been in the bath for around 45 minutes I took it out and did my best to rinse it out as much as possible, doing the pillow cases was easy but the sheet and duvet were a lot more difficult.
I spread the items on the tiled floor so the white undyed parts wouldn't get in contact with the dyed parts. I then poured the leftover dye into a tub and threw an old white sheet in that looked a bit grubby as it had gone slightly greyish and needed a bit more life added to it - I wasn't sure if this was going to have any effect but I knew that the sheet couldn't get any worse than it was already. I left that sheet to soak for a couple of hours.
Then it was time for the blue dye - even though the yellow dye had been orange seeing the purple that was the result of the packets of blue dye made me rather worried, especially when the first bit of white fabric into the bath turned lilac. I took a deep breath and decided to give it some time thinking that if the worst came to the worst nothing would happen that could not get fixed by a trip to the washing machine with a pack or 2 of black washing machine dye. This time round I was trying it the other way - slowly putting more fabric into the bath as time went by.
Like with the yellow dye I did my best to rinse out the blue dye but by this time my back had decided to play up and it was very painful to do so when the worst was off I decided to see if the washing machine could get the rest out. I was thrilled with the results so far despite noticing that I'd not pushed the fabric in far enough to get a green area between the yellow and blue. and really hoped that the bright yellow and bright blue I saw would be what I ended up with. I then chucked 2 faded bottle green sheets into the blue dye to give them a little oomph that they were missing. I do like re-using dye, though really one should not as it's mostly stopped working by then.
I carefully carried it all up to the attic and made sure to put the blue dyed area's at the bottom of the machine with the yellow on top. and washed it according to the instructions. I hung up the pillow cases on hangers and the duvet cover and sheet over the banister.
2 days later it was all finally dry and I could get it onto my bed and take photo's
 This is the sheet, as you can see the yellow is not so bright but it's still a very nice yellow and certainly suits the paintwork (not visible in this shot).
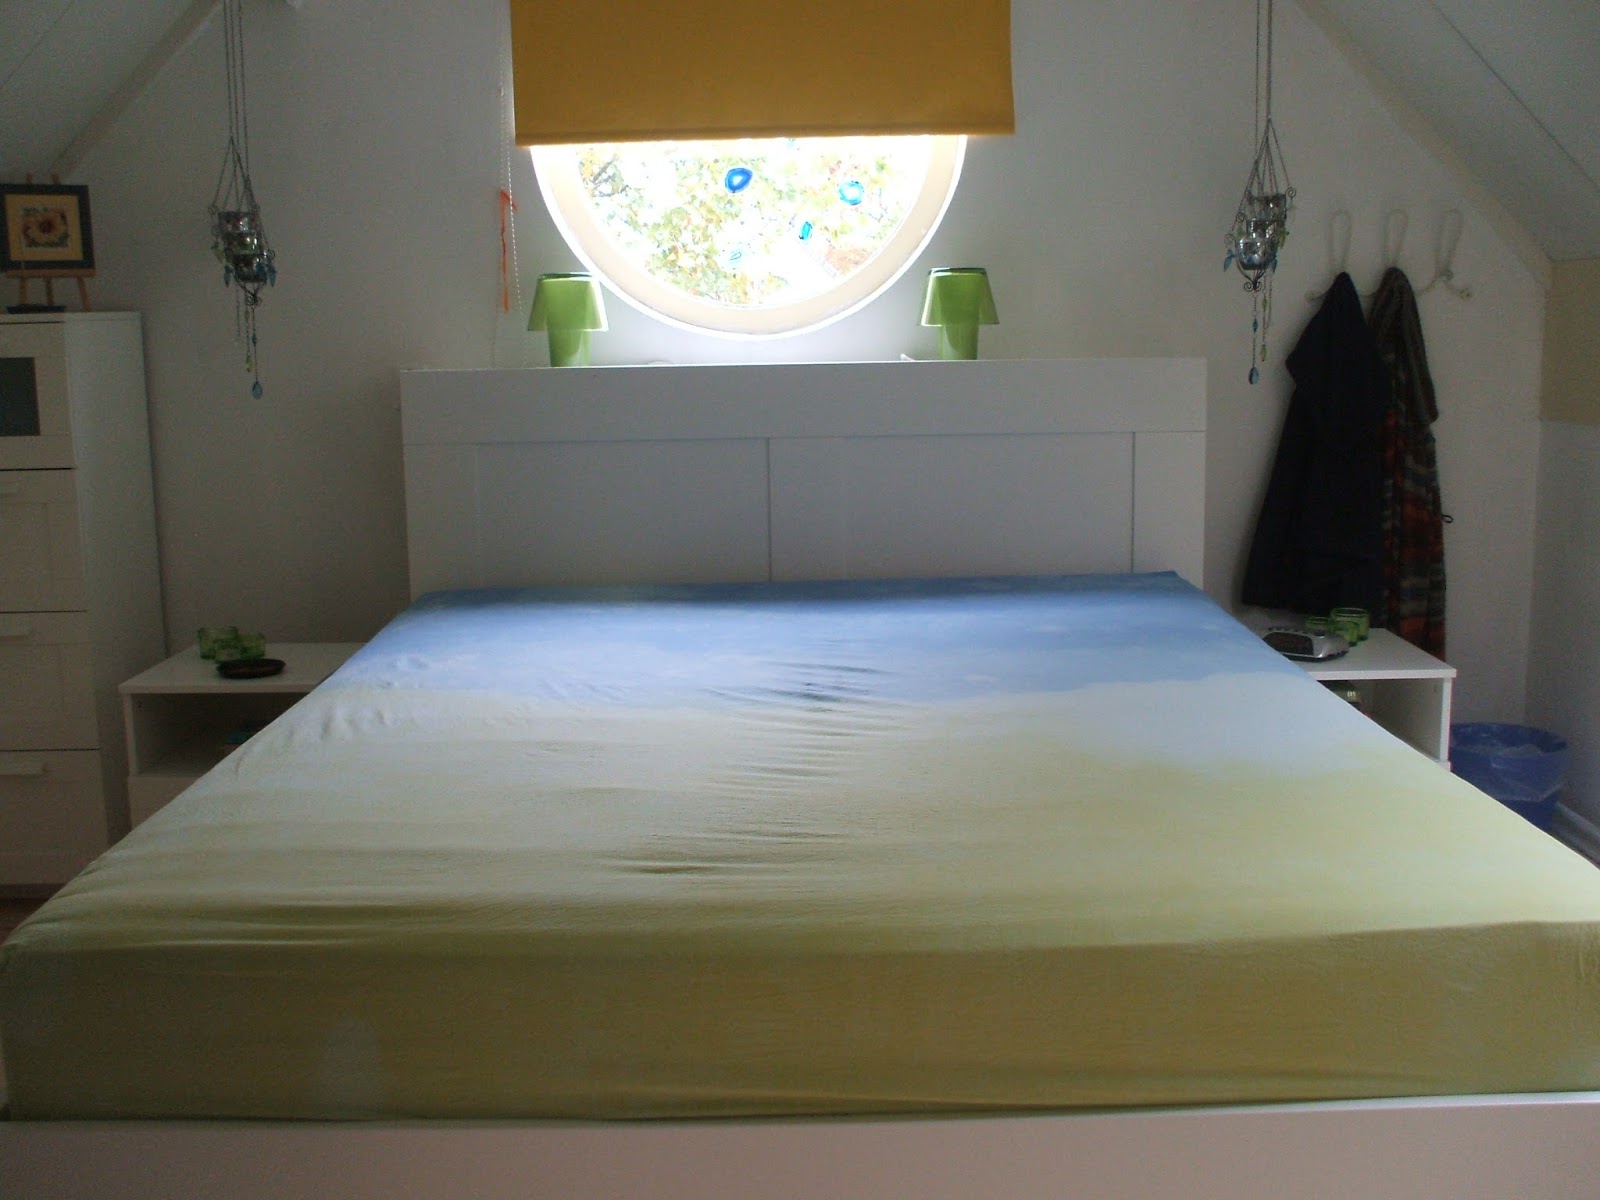
 Here it all is on my bed, the 6 pillow cases on the pillows, the duvet cover and the sheet hidden under it - it really brightens the room!
 A side shot so you can see the colour changes on the cover.
 Here is an attempt at showing the special thing that happens in artificial light - the yellow seems to change to a very light spring green - so wonderful that it changes like that! It's probably due to the excess blue dye when I put it in the washing machine.
All in all I'm happy with the results and I know I'll be using Dylon's hand dye dyes again - just on something smaller next time hehe.
Not so long ago I splurged and got myself a king sized wool filled 4 seasons duvet. My old one was also wool and 4 seasons but I'd previously been sold an extra long single person duvet and it's only because I am so short that it was "long enough", when used on it's side, to cover me. I had used this old duvet for years and just got tired of it being so short. A new duvet meant new duvet covers and while I found one that was okish I couldn't find another that I liked enough to buy.
So... A trip to IKEA got me a plain white duvet cover set, sheet and extra pillow cases as the duvet set only had 2 in it and I need 6. Then a trip to the shops got me 4 packs of Dylon dye - 2 in sunflower yellow and 2 in ocean blue. The plan was to tie dye the lot and have splashes of blue, yellow, green and white. In the past I have always used the dye for the washing machine so doing it by hand was a new adventure. The old tins had always put me off as they were so complicated to use but these "new" packets are a lot more user friendly so I decided to take the plunge.
When I started the actual task of wrapping string around the corner of a pillow case, I soon realised it would take me a gazillion days to do so as my hands didn't like the job and it was also hard on my iffy shoulder. Those of you who don't know me won't know that I am the lucky recipient of palindromic rheumatism, arthritis, a dodgy back and some other joint issues thanks to working too hard so any task that requires repetitive movements is going to hit me hard. I decided that it would be a better idea to dip dye instead - easier on the hands etc. *wink*
After washing out the old baby bath I had lurking in my garage that my oldest had kindly carried up to the bathroom for me, I proceeded to mix up the first lot of dye - the yellow. The dye once mixed with water in the jug was a lovely orange and I was glad I didn't skimp on getting rubber gloves or I'd have had garish yellow/blue hands by the end of this. I then proceeded to ignore the instructions as what I had planned required more water so less dye per litre of water. I knew in advance that this would result in a lighter colour.
 |
| This is why they say to use a bowl or stainless steel sink! |
I draped the duvet and sheet over a plastic step so it would not lie on the floor. Doing it this way is messy - the dye tends to drip a bit if you don't squeeze any excess dye out first. Don't do it this way if you are not in a tiled area that is easy to clean. Once the last bit had been in the bath for around 45 minutes I took it out and did my best to rinse it out as much as possible, doing the pillow cases was easy but the sheet and duvet were a lot more difficult.
I spread the items on the tiled floor so the white undyed parts wouldn't get in contact with the dyed parts. I then poured the leftover dye into a tub and threw an old white sheet in that looked a bit grubby as it had gone slightly greyish and needed a bit more life added to it - I wasn't sure if this was going to have any effect but I knew that the sheet couldn't get any worse than it was already. I left that sheet to soak for a couple of hours.
Then it was time for the blue dye - even though the yellow dye had been orange seeing the purple that was the result of the packets of blue dye made me rather worried, especially when the first bit of white fabric into the bath turned lilac. I took a deep breath and decided to give it some time thinking that if the worst came to the worst nothing would happen that could not get fixed by a trip to the washing machine with a pack or 2 of black washing machine dye. This time round I was trying it the other way - slowly putting more fabric into the bath as time went by.
Like with the yellow dye I did my best to rinse out the blue dye but by this time my back had decided to play up and it was very painful to do so when the worst was off I decided to see if the washing machine could get the rest out. I was thrilled with the results so far despite noticing that I'd not pushed the fabric in far enough to get a green area between the yellow and blue. and really hoped that the bright yellow and bright blue I saw would be what I ended up with. I then chucked 2 faded bottle green sheets into the blue dye to give them a little oomph that they were missing. I do like re-using dye, though really one should not as it's mostly stopped working by then.
I carefully carried it all up to the attic and made sure to put the blue dyed area's at the bottom of the machine with the yellow on top. and washed it according to the instructions. I hung up the pillow cases on hangers and the duvet cover and sheet over the banister.
2 days later it was all finally dry and I could get it onto my bed and take photo's
All in all I'm happy with the results and I know I'll be using Dylon's hand dye dyes again - just on something smaller next time hehe.
It's been a while.... again...
It's been a while since I last posted, mostly because I just can't share what I'm working on which then puts me off from sharing my TUSAL jars. The past 6 days my index finger has been so swollen I can't stitch, so instead I have embarked on my own Doctor Who scarf, something I've been wanting to do for many years. Seeing Carla's finished one certainly inspired me to get started - anything she can do I can also do - or at least that's what I try to convince myself.
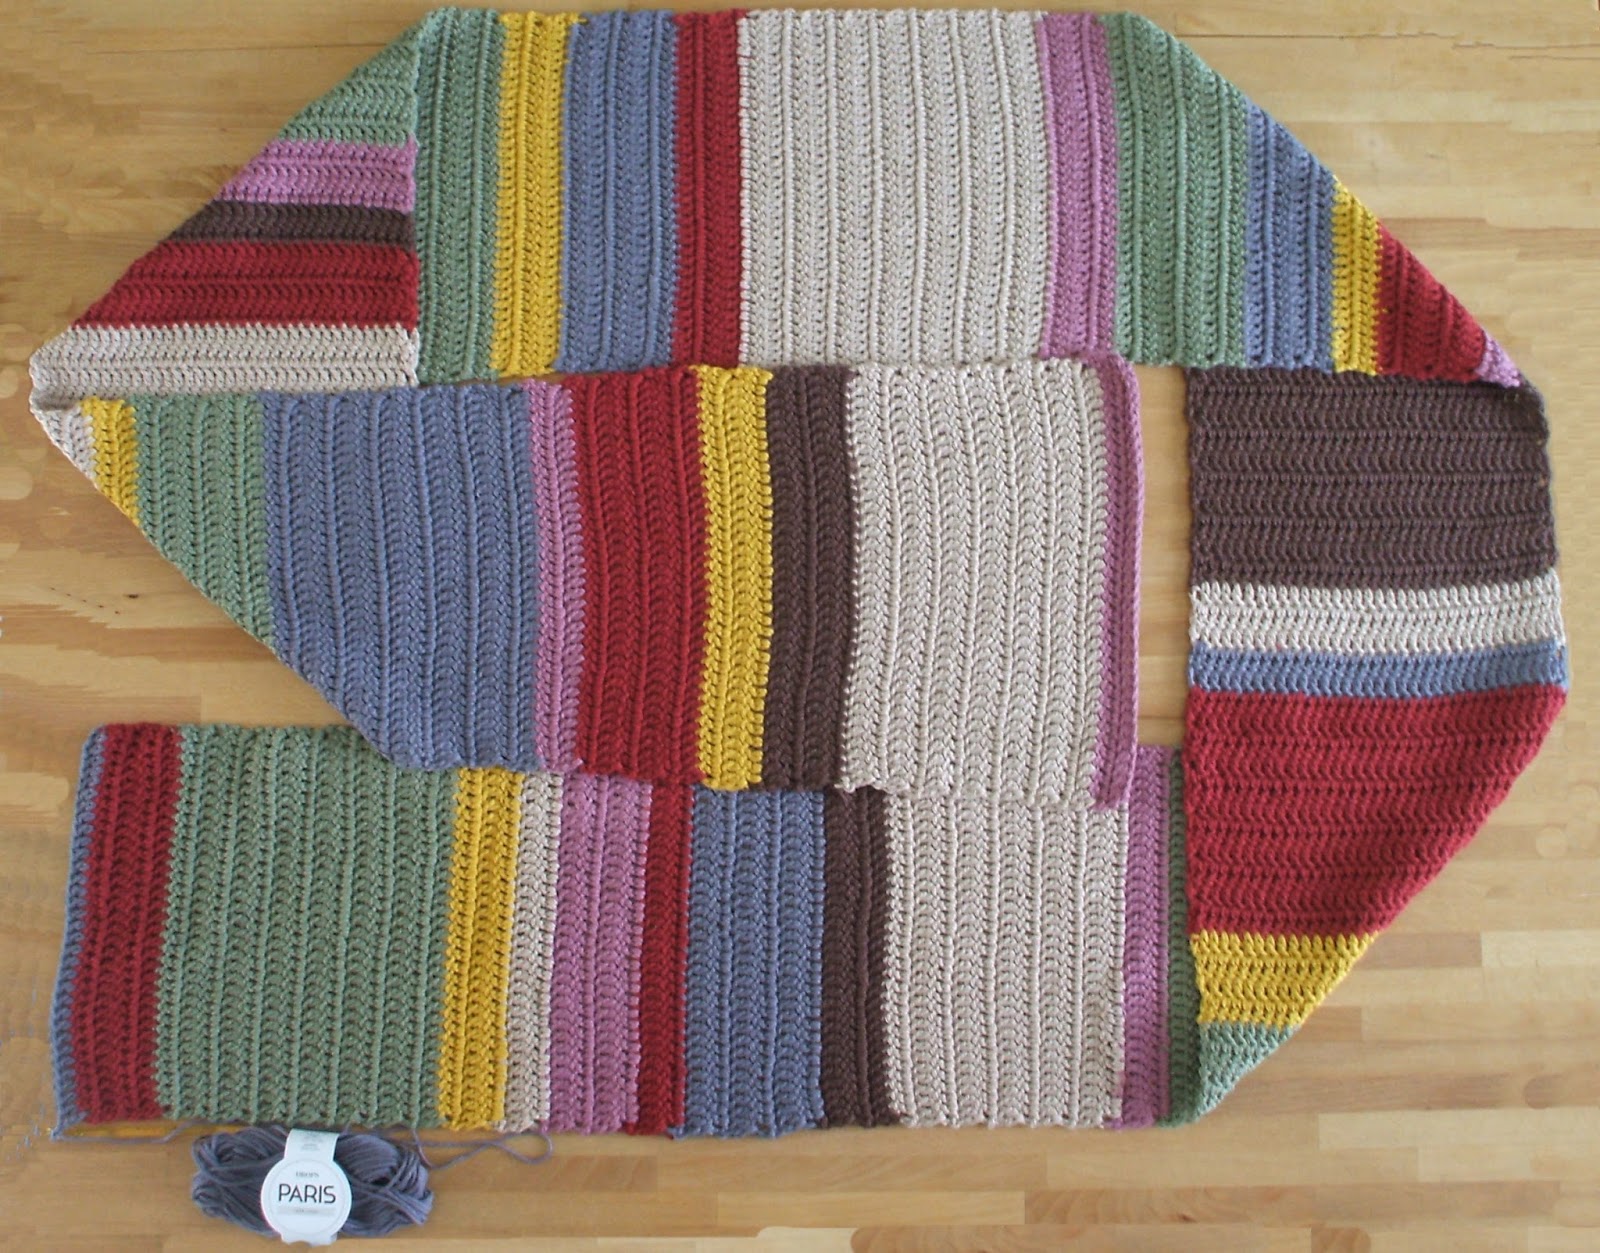
As I cannot knit too well and find it far too slow I decided to crochet it and am using the inches pattern for the Hero scarf from Doctor Who scarf as the basis of my work as it's easier to measure amounts than try to guess rows. I decided to use Carla's yarn amounts as the basis of my own yard order and added 1 ball to each to make up for the fact that I'm doing crochet. I had some trouble finding the right green, brown and purple and decided in the end to use Drops Paris I didn't take the time to check their own site which I linked here as I thought the photo's on the site I bought the yarn from were clear enough. As a result I didn't see that the purple that they have might have been a better match than the "dark old pink" that the site I was on called aubergine (and in honesty it is a more purple than the pinkish colour on the drops site).
Below you will see the daily progress I made over the last 6 days - it's been going really fast, even though the last 2 days I haven't done so much and might not manage much today either.
 This is the yarn I bought - LOTS - better known as 29 balls.
 The first day's work didn't start so well - I got muddled and made it too wide... twice! The first time I had made the chain 12 1/2 inches wide when It was supposed to be 11 and didn't notice till I was 9 rows in - aarrgghh! I started again as I didn't want to use more yarn than I already had bought and knew that a wider scarf would use more yarn. Even though the chain was 11 inches the second time it became 12 after adding the first row of stitches so I removed some stitches till I was 11 inches and then fiddled and removed the chains from the "starting" end of the chain - not the official way to do it but well.. it worked hehe. By pure coincidence it turns out that one double stitch = 1/2 inch with this yarn and a size 5 hook. In the end I ended up finishing the first 24 rows = 12 inches on the first day.

The second day I did an additional 36 rows = 18 inches bringing the total to 60 rows = 30 inches.
 Day 3 resulted in me having to "squish" the scarf to fit the width of my dining room table, which I've been using as the background for the photo's. I'd done 19 rows - 9 1/2 inches - I'd now done a total of 51 1/2 inches
 On the 4th day I managed to do 44 rows = 22 inches, quite a bit more than the other days so far. I had now done 73 1/2 inches
 Day 5 it had grown even more and as you can see it's starting to get rather difficult to photograph in it's entirety.
21 rows done so 10 1/2 inches. I had spent quite a bit of the evening dyeing my sheets/duvet cover and didn't get as much done. Total completed: 84 1/2 inches. I had passed the half way point on this day - so happy it's going this fast!
 Yesterday was day 6 and I reached this stage despite it being wash day - so again lots of going up and down stairs and feeling tired. Even so I managed another 20 rows so added another 10 inches to the final result bringing it to 94 1/2 inches complete.
I'm not sure how far I will get today, been taking photo's of the results of my dyeing 2 days ago after wrestling the massive duvet cover on (king sized) and flipping my mattress as it was that time of the month to do that. The next post will be all about the dyeing and the results.
As I cannot knit too well and find it far too slow I decided to crochet it and am using the inches pattern for the Hero scarf from Doctor Who scarf as the basis of my work as it's easier to measure amounts than try to guess rows. I decided to use Carla's yarn amounts as the basis of my own yard order and added 1 ball to each to make up for the fact that I'm doing crochet. I had some trouble finding the right green, brown and purple and decided in the end to use Drops Paris I didn't take the time to check their own site which I linked here as I thought the photo's on the site I bought the yarn from were clear enough. As a result I didn't see that the purple that they have might have been a better match than the "dark old pink" that the site I was on called aubergine (and in honesty it is a more purple than the pinkish colour on the drops site).
Below you will see the daily progress I made over the last 6 days - it's been going really fast, even though the last 2 days I haven't done so much and might not manage much today either.
The second day I did an additional 36 rows = 18 inches bringing the total to 60 rows = 30 inches.
21 rows done so 10 1/2 inches. I had spent quite a bit of the evening dyeing my sheets/duvet cover and didn't get as much done. Total completed: 84 1/2 inches. I had passed the half way point on this day - so happy it's going this fast!
I'm not sure how far I will get today, been taking photo's of the results of my dyeing 2 days ago after wrestling the massive duvet cover on (king sized) and flipping my mattress as it was that time of the month to do that. The next post will be all about the dyeing and the results.
Friday, 4 July 2014
An update.. at last... post, TUSAL, finish and WIP

What I got:
- 2 Mills Hills appliqué beading needles
- Thread Worx overdyed floss (5 yard) in Wild Fires (1107), War Paint (1151), and Dreamscape (1053)
- Caron Watercolours Lexi's Blue (289)
- Kreinik silk Mori milk paint (5.5 yard) Very Dark Hemlock (0416)
- Mill Hills Glass Beads (Size 11/0) Gold
- Weeks Dye Works (5 yards) Trick or Treat (4101)
- Kreinik Blending Filament Peacock (085)
- Kreinik Cord Vatican Gold (102C)
- Kreinik 1/16" Ribbon Emerald High Lustre (009HL)
- And behind it all in all it's blazing glory from the sales section: a 13 x 18" picture this plus solar 16 ct aida
So if you want to wash something do NOT get Weeks Dye Works threads as it will not have a happy ending.


The pattern is of Dashwood Mausoleum with the church behind it. It's 78 x 51 stitches 9 1/4 cm x 14 1/4 cm / 3 5/8"x 5 5/8"done on 14 ct white Aida. I can't remember how many colours it has I'm afraid.
Doing the "large" expanses of blue almost did my head in and I only had enough blue to add 1 extra line so I had to get creative and add the other two lines at the bottom using the greens - I think it worked out pretty well as it's hard to see where the pattern left off and my addition starts.

Saturday, 15 February 2014
UFO #11 Finished! - Introducing the 8th Century floor tile embroidery

This is made using a pattern from "Mosaic Masterpieces in Needlework and Handicraft based on motifs from The Holy Land" by Ann Roth (from a translated copy in Dutch printed in 1975) that I picked up in a wonderful dusty/musty/old book smell filled old book shop a long time ago. I'm not really sure when I started this BUT I know I did when I was married and mostly likely early on in the marriage as that was when I was doing embroidery, so probably around 1996 or 1997. The pattern was inspired by the tile floors that were excavated in Beit-sje'an in the convent of Mary: church of Sja Wee Zion


I'm not yet certain what I'm going to turn it into - I'm torn between just framing it, turning it into a pillow cover and making it into a file cover.
The all important stats:
Stitches: 238 x 190
Size: 11 7/8" x 9 3/8"
Fabric: 20ct Aida
Colours: 10
Number of stitches: 22,364
Friday, 14 February 2014
UFO #11: Darkest green complete!

Of course I'd run out of painkillers last night so I also had to go to the shops again and that did me in completely. For most people yesterday and today would be all in a day's work and they would probably do more, for me it's pushed me over the edge of what I can do in a day and it's going to take me tomorrow and probably a chunk of Saturday too to recover.
However I did manage to complete all of the green stitches and a few of the light gold too. Hopefully while I rest up I can get more stitching done tomorrow.
Thursday, 13 February 2014
UFO #11: The centre diamonds are closer to completion

Tuesday, 11 February 2014
UFO #11: blue lines complete!

I've got an early start tomorrow and a couple of appointments, so I probably won't manage as much as I'd like.
UFO #11: Blue advances even more

I am so glad that I asked my oldest son to also buy more of the blue when he was getting me the green I needed as I have run out of blue and now I don't need to race to the shops in the morning to get more blue.
Monday, 10 February 2014
Roast parsnip and carrot mash

Ingredients:
- Enough potatoes to feed everyone - scrubbed clean and cut to the same size (that's right - not peeled!)
- All of your left over roast veggies
- About a tablespoon of fat from the roasting tin
- Milk or egg to mix
- Salt and pepper (to taste)
- Put your potatoes in a pan, cover with water and put on a high heat till it boils.
- Simmer till cooked (about 20 mins)
- Meanwhile cut the cold roast veg into chunks of about 1 - 2 inches / 2,5 - 5 cm
- After the potatoes have been simmering for about 10 mins melt the roasting tin fat in a frying pan.
- Add the roast veg and gently fry them to warm them all the way through.
- When the potatoes are cooked you can easily stab them with a fork and they will feel soft.
- Drain the potatoes and put them back in the pan they came from.
- Pour the entire contents of the frying pan into the pan with the potatoes.
- Mash it all together.
- Add salt and pepper to taste.
- Add milk or alternatively if the potatoes are still very, very hot an egg and whisk quickly to mix to a nice mash consistency.
UFO #11: The end of the green lines

Any way... today's progress has seen me to the end of the green lines - and tomorrow will see the start of the second half of the blue - only time will tell how far I'll get.
Sunday, 9 February 2014
TW: Peacock Tapestry

As with the ECS
I wanted to have a look and see what the fabric would look like with the
colours needed for the PT to make sure that all the colours would be properly
visible and look nice and I'm glad to say they do so I appear to have made a
good choice when I bought that fabric 2 weeks ago before even deciding to do
this. I won't be starting this one yet, I need to properly collect the threads
I need first as quite a few of the colours you can see are already being used
in other projects and I don't yet have the speciality threads I need either,
however by the time I have completed the tile floor, ECS and Mike's
Mushrooms I most definitively will. I have already decided that the 504 I
have, which was discontinued by DMC, will be saved for this project so I have
set it aside, along with some other skeins I had in my stash box, so a start
has been made with collecting these threads. I have 8 colours of 73 and need 95
skeins in total + the Kreinick threads. I suddenly realise why the kits were
always so expensive lol.
Subscribe to:
Posts (Atom)