Sunday 24 March 2013

Mike's Mushrooms - Update 4

I finally finished the second section today - it took a bit longer than expected but the toothache thing of last weekend lead to an extracted tooth on Tuesday and it was a tad painful to look down the first few days after that so I wasn't embroidering as much. If you take a few steps (or take your glasses off hehe) you can see how realistic this is looking, something I'm really pleased with as that's exactly what I wanted from this project.

I have completed a section of 40 x 80 stitches now = 3200 stitches
The size of this section is 4,5 x 2 3/16 inches / 11,5 x 5,5 cm

About this project:
This is a "large" and complicated cross stitch project based on a photograph by a really talented Alaskan photographer who was incredibly kind and said I could make a cross stitch of it. The photographer is Mike Gates, go check out his site - his work is amazing!

The pattern was made for me as a prize for winning a competition on dA. It's 10 inches wide  x 14 1/2 inches high = 180 x 261 stitches on 18 ct coffee dyed Aida and it uses 147 colours. I am truly intimidated but I did ask for the pattern to be as close to the photo as possible and didn't limit size or colours and I certainly got what I asked for!

Tuesday 19 March 2013

Mike's Mushrooms - Update 3 & IHSW

As you can see I got a fair bit of progress done since I updated on Sunday, even though it's not complete you can clearly see where it's going now. The bit I was worried about turned out to be the shadowed part of the stalk of the second mushroom, so that's a bit of a relief hehe. Having done all the "large" bits of colour I decided to just start at the top of the list of colours and work my way down so I don't end up with 20 odd colours with just one or two stitches at the end - something I hated with the last section.


About this project:
This is a "large" and complicated cross stitch project based on a photograph by a really talented Alaskan photographer who was incredibly kind and said I could make a cross stitch of it. The photographer is Mike Gates, go check out his site - his work is amazing!

The pattern was made for me as a prize for winning a competition on dA. It's 10 inches wide  x 14 1/2 inches high = 180 x 261 stitches on 18 ct coffee dyed Aida and it uses 147 colours. I am truly intimidated but I did ask for the pattern to be as close to the photo as possible and didn't limit size or colours and I certainly got what I asked for!

The incomplete half of this section is what I managed to do during the IHSW ( I extended it a day hehe), not as much as I'd have liked but I have been plagued by wisdom tooth coming through, which broke a tooth... fortunately today is dentist day (at last!) and I can see what he can do to help me with it - anything is better than having to deal with this pain without being able to take painkillers due to my allergies.

Sunday 17 March 2013

Chicken and bacon burgers

I made this last night as I was in the mood for burgers but didn't have any mince (ground beef) to make it with. It was one of my experimental dishes that the kids LOVED so I thought I'd share it with you.

Ingredients:
  • 250 grams / 10 oz chicken breast - diced
  • 100 grams / 4 oz bacon (either slices or diced)
  • 1 large onion - roughly chopped
  • 1 egg
  • 50 - 75 grams / 3 - 4 oz breadcrumbs
  • Salt and pepper to taste.
Preparation:
  1. Put the chicken, bacon and onions into a food processor and whizz till it's finely chopped and looks like mince (ground chicken)
  2. Add an egg and 2/3 of the breadcrumbs
  3. Season to taste
  4. Whizz a bit more to mix it all in, add more breadcrumbs if it's a bit wet still.
  5. Make into patties that are about 10 cm / 4 inches across - I got 7 out of this mix but if you make them larger or smaller you will get more or less burgers.
  6. Fry for about 15 minutes in a frying pan (skillet) till brown and cooked through.
As you can see in the photo I served mine with mashed potatoes and tinned carrots and peas (not my favourite thing but I had a tin lurking that needed to be used) You can, of course, also make real burgers with them and put them on bread with a sauce and veg to taste.

Tip: If you make your hands wet before handling the meat to make patties the meat won't stick to your hands.

Mike's Mushrooms - Update 2

I finished the first section of the embroidery and spent quite a bit of time cursing the 1 and 2 stitch's I had to do for some colours as I did so. While I could have left them till I needed the colours later on in the project I really want to just do one section completely before moving on to the next. What can be seen in the completed section is how real it looks - even in such a small section. What you can also see is how odd the next section looks right now - almost as if I've completely ruined things. I certainly hope this isn't the case and have put my trust in the pattern.

You may notice that the colour of my lines are different - this is because someone reminded me that pencil isn't all that easy to remove, especially from between lines of stitching so I've changed to the water soluble pen I had forgotten I had.

About this project:
This is a "large" and complicated cross stitch project based on a photograph by a really talented Alaskan photographer who was incredibly kind and said I could make a cross stitch of it. The photographer is Mike Gates, go check out his site - his work is amazing!

The pattern was made for me as a prize for winning a competition on dA. It's 10 inches wide  x 14 1/2 inches high = 180 x 261 stitches on 18 ct coffee dyed Aida and it uses 147 colours. I am truly intimidated but I did ask for the pattern to be as close to the photo as possible and didn't limit size or colours and I certainly got what I asked for

Catching up... *again*

I'm so behind with updating some stuff so I'm just going to make another of my catch up blog posts. First of all the Diary cover you see above. This embroidery started with a little red "starfish" shape and then it took a life of it's own as it slowly evolved to become the heavily embroidered piece that it is now. It became a coral reef - full of life and unexpected things - there are starfish, seaweed, a crab and if you look carefully you may even spot the lobster that somehow ended up there. The red wavy bit at the bottom left is only attached at the bottom - the rest is completely free from the background. The long snakelike thing that curves from the bottom to the top of the piece has over 2000 stitches in it and took me several days to do - it's made with the Casalguidi Stitch. I had a lot of fun making this, it was nice trying out loads of new to me stitches and, as it was made free form, even I didn't know what it was going to look like till it was finished.

It's 4 x 3 1/8 inch / 10 x 8 cm, made on 14 ct black Aida using 5 colours of variegated perle (red, green, blue, orange, yellow), 4 colours DMC colour variations, beads and several kinds of ribbon. I used a total of 25 different stitches to create this, many from Sharon b's Dictionary of Stitches for Hand Embroidery and Needlework and some I found in my ancient copy of Enclyclopedia of needlework by TH. de Dillmont.

I made the embroidery into a cover for my far too pink diary, which I'd only got because I LOVE the (not so pink) interior and I knew I'd eventually get round to making a cover for it.

I used the following stitches:
Basque Stitch
Bullion Knot
Bullion stitch
Buttonhole Bar Stitch
Buttonhole Wheel
Casalguidi Stitch
Cast on stitch
Chain stitch
Coral Stitch
Cretan Stitch
Detached Buttonhole Stitch
Detached Chain Stitch
Double Cast On Stitch
Drizzle Stitch
French knot
Feather stitch
Ghiordes Knot
Knotted Cretan Stitch
Renaissance Stitch
Rosette of Thorns
Scroll Stitch
Sorbello Stitch
Whipped Fly Stitch
Whipped Spiders Wheel
Woven Spiders Wheel

One thing that really surprised me is that this was selected as a Daily Deviation over on deviant art!  There are around 35 volunteers there and they each get to choose something from the section they look after as a one day feature and one of the Artisan Crafts volunteers chose this! Thrilled barely covers how I felt about this when I found out hehe.

Although I haven't mentioned the February TUSAL (see sidebar to the left for a link to the project) yet, I did make my monthly jar. You can see threads from the clown I finished in January, the Elemental biscornus and the Soufflé girl Dalek heart.

And this is the not so late Match TUSAL In it are threads from the Coral reef diary cover, the little end bits one keeps from projects from the colours I used for the Dalek heart that I'd not tidied up on time and got a good soaking from a glass of coke that got knocked over. I'd washed ALL the threads on the spools and rewound them on new ones but just couldn't face all the little bits I'd saved so decided to put them in the jar instead. There are also threads from the start of Mike's Mushrooms.

In case anyone has forgotten it's IHSW weekend! So get stitching!!

I was going to add a recipe to this but have decided to write it up as a separate post instead so it's easier to find later on in time.

Monday 11 March 2013

Mike's Mushrooms & A Cake

Last Thursday I *finally* got started on the new daunting project. Having seen other people mark the grid on the fabric I decided to give it a go too and see if it helped me as my biggest fear was loosing count and getting things in the wrong place. As it turns out that was a great idea and I have made great progress since then.

I drew a 4 x 4 grid of 10 stitches per square on the fabric, first with blue chalk but that line was too thick so I changed to a pencil instead.

Ironically the first few colours I used were my most hated colour: pink and i started to get really worried that it would be too pink as a result but as I worked and used darker and more orangey colours it stopped looking too pink and now that the rust has been added it looks exactly like it ought to.

Today it  looks like this:
I'm working on the background behind the two mushrooms you can see in the picture (the pink/orange things), starting with black so that all the little bits I have in the pattern will be easier to do.

About this project:
This is a "large" and complicated cross stitch project based on a photograph by a really talented Alaskan photographer who was incredibly kind and said I could make a cross stitch of it. The photographer is Mike Gates, go check out his site - his work is amazing!

The pattern was made for me as a prize for winning a competition on dA. It's 10 inches wide  x 14 1/2 inches high = 180 x 261 stitches on 18 ct coffee dyed Aida and it uses 147 colours. I am truly intimidated but I did ask for the pattern to be as close to the photo as possible and didn't limit size or colours and I certainly got what I asked for

To celebrate I baked a cake - vanilla raspberry marble cake with royal icing topping and some marzipan raspberries on top. I didn't make as many as I wanted - my hands were complaining after only starting these few and they aren't all the same size but then raspberries normally aren't .

I used my favourite cake mix for this - half vanilla flavoured and half raspberry, and more or less got the marbling right - I tried using a chopstick to stir with this time - not as effective as a spoon but it did work.

Tuesday 5 March 2013

Finish it in 2013 project: February overview and WIP update post

It's the beginning of March and time to write my update post. I've copy/pasted the last post and will be adding updates for each item so you can see before and after pictures showing last months picture and a new on for this month :) I didn't get so much done this month - I was still feeling quickly tired at the beginning of the month - then got hit by a flare up of my rheumatism that especially effected my right index finger and I'm right handed so holding a needle was as good as impossible for almost a week.

New Project:

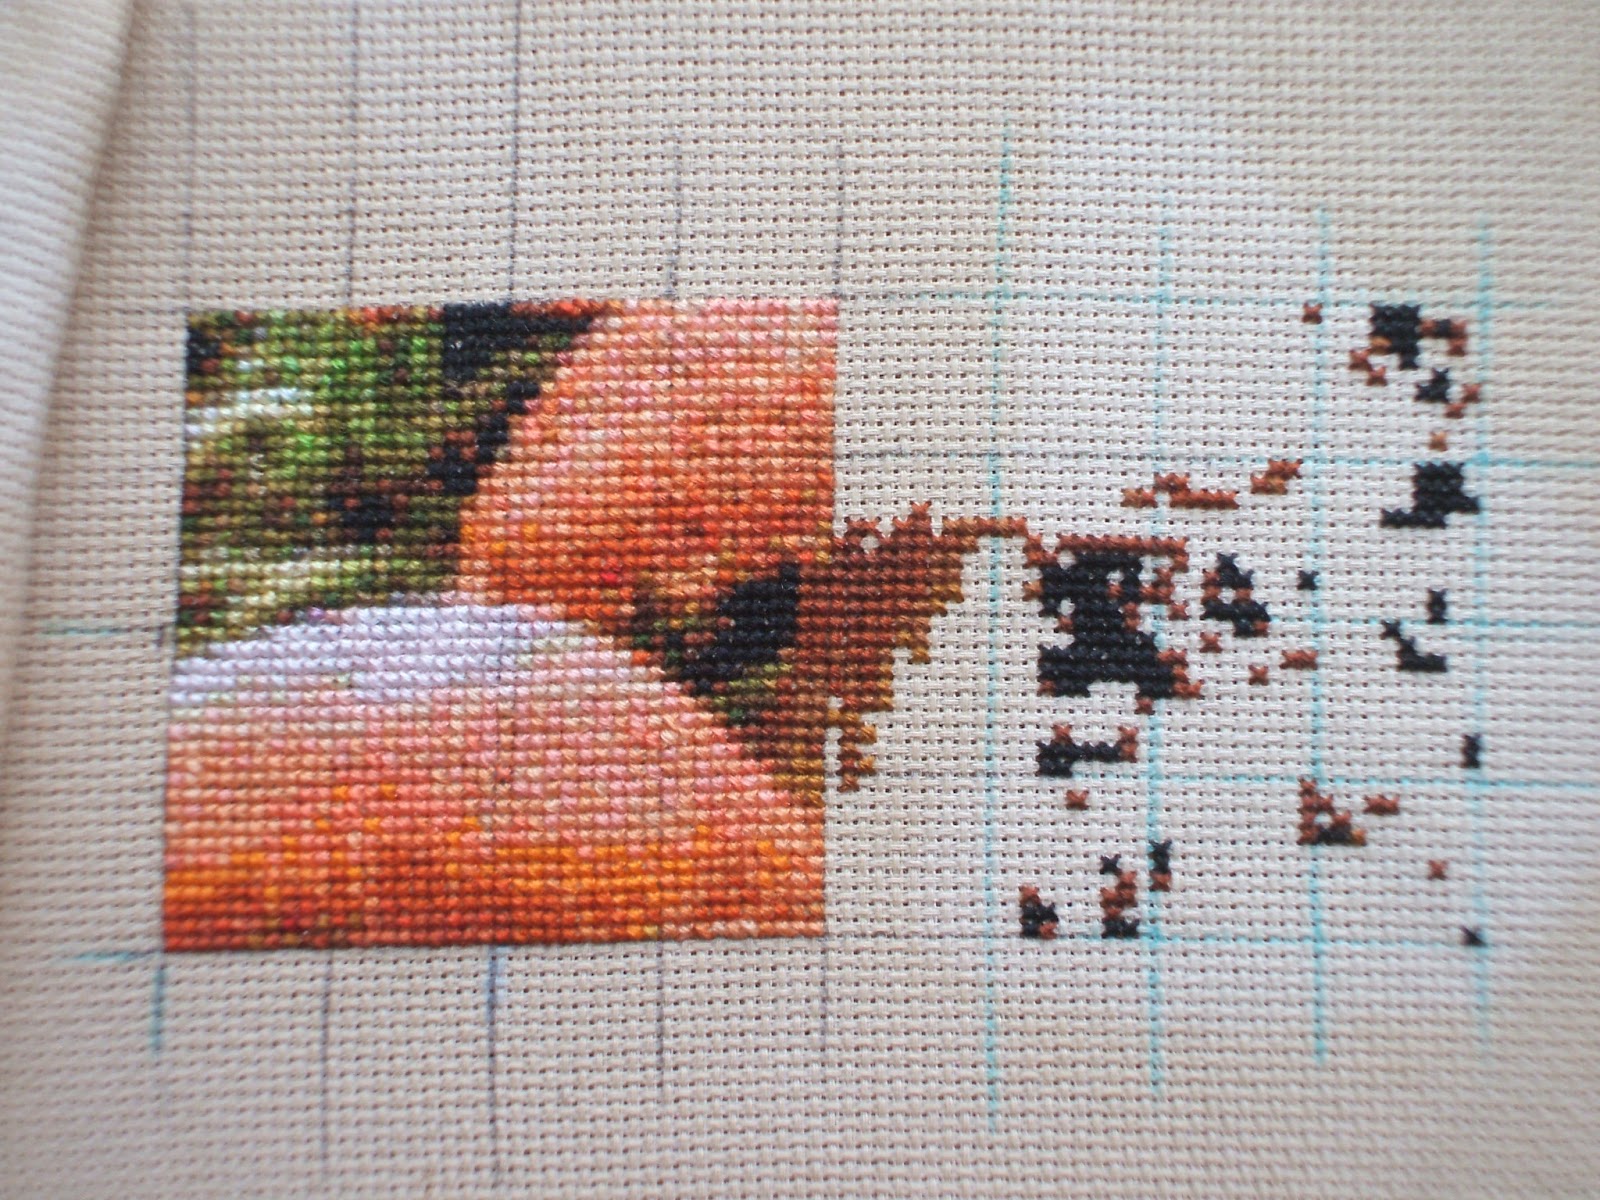
I am also going to start a "large" and complicated new cross stitch project this year based on a photograph by a really talented Alaskan photographer who was incredibly kind and said I could make a cross stitch of it. The photographer is Mike Gates, go check out his site - his work is amazing!

The pattern was made for me as a prize for winning a competition on dA. It's 10 inches wide  x 14 1/2 inches high = 180 x 261 stitches on 18 ct Aida and it uses 147 colours. I am truly intimidated but I did ask for the pattern to be as close to the photo as possible and didn't limit size or colours and I certainly got what I asked for!

In February I dyed the fabric for this using coffee.

Update: I have not done anything else for this yet.

New completed project:

 I made a cover for my diary using 25 different embroidery stitches - a new post with this will follow soon as it's worthy of it's own post.

The Current WIP's:


Sagittarius star sign by Lanarte - central area complete
Update: No progress made on this.

Air and Earth Biscornu - complete
Update: I finished both biscornu. 
  
8th century tile floor embroidery in greens and blues. 
 Update: I have added a bit more to the top border.

Sampler - started
Update: I am a bit behind with the TAST (see side bar).

The UFO's:


2 sleeping bunnies - a Priscilla babyland embroidery - about half done but I *so* hate doing 1/4 and 3/4 cross stitches.

Dog embroidery (portrait) made from a photo years ago by a company - about 1/5th done.

Dog embroidery (standing) made from a photo years ago by a company - barely started.

Autumn leaves needle book WIP - embroidery is 1/2 finished.


The Finishes can be found if you click the tab "2013 finishes" at the top of the page.