Showing posts with label Quilting. Show all posts

Monday, 7 October 2013

TUSAL update

This time I'm giving you a 3-in-1 TUSAL update as it's been a while since I have taken photo's of my TUSAL jars and put them on my blog. What is a TUSAL? It's a Totally Useless Stitch-A-Long! Check the side bar for a linky to the lovely lady who runs it. Quite a lot has been created lately but not always stitching related and as I only keep the threads from embroideries the jars are not as full as they might be. I am only including photo's of the embroidery things I've worked on, however everything mentioned is on my blog.

July

 In July the only thing I embroidered was the raccoon embroidery so the jar is empty aside from the tails of threads and the threads from the kit that I didn't use as they were too short for me to keep.

August

In august I worked a bit on the apple and on the failed mystery project B

September

 
In September it got a lot done I finished the apple and stitched a complete sewing kit.
Non stitching wise I made an e-reader cover and a cable pouch for the e-reader cable. as well as completing a recycled plastic messenger bag, a crochet plastic basket and a tiny little pouch that is the right size for a few coins or 2 AA sized batteries and a small quilt top.

Sunday, 22 September 2013

IHSW update

 I got quite a bit more done during the IHSW this weekend. So much more that I actually finished something stitching wise - just need to make it into what it needs to become. I also had a great time chatting with my friend Carla, so much so that time just flew!
 
This is the completed embroidery part of my mystery project A which I finished today. I had a spot of bother with being able to finish as I'd run out of the orange 741 with just 20-30 stitches left so I decided to use 740 instead for those  last stitches instead of waiting till Wednesday when I had money to get more.
In the mean time I finished this little mini quilt top made of leftover squares that didn't make it into my hexagon quilt or were too small for the hexagon quilt. The smallest squares are 1" /2,54 cm square. The quilt is 14 inches / 35,56 cm square

Tuesday, 17 September 2013

Hexagon flowers

On Deviant art the Artisan Crafts Community Volunteers hold a monthly challenge The august challenge was "memories" and we were free to interpret the theme any way we wanted. This entry was made for the August #CRArtisanCrafts's challenge. This is what I wrote on my entry:

I had a long think about it and decided to make the first patchwork thing I had ever made: An English Paper Pieced hexagon patchwork pincushion.

The reason I chose this as the project for the #CRArtisanCrafts August Artisan Crafts Monthly Challenge theme was because I still remember how pleased I was when I was finally given the Habitat kit to make it that I'd been looking at longingly for so many months before for my birthday. This was waaaay back in the 70's when Habitat sold such things and they had a tall rotating rack with crafty things one could make. The patchwork hexagon kit caught my attention and I wanted it *so* much but I didn't have enough pocket money to spend on it. So every time we ended up in Habitat I went to that rack to see if they were still there and every time I was relieved to see this was the case. I kept on saving my pocket money to buy it but in those days I didn't get much so it was taking a long time.

I had some trouble learning how to do the corners and as my mother insisted that I basted through the paper and I wasn't so good at removing them then I wasn't able to re-use the papers but I enjoyed making it and am sad that I no longer have it as it was lost in one of the many house moves we had back then.

I started with just the one - the white one but had so much fun picking colours and sewing them together that I soon had a few more sewn and ready to stuff. I needed to get a new bag of stuffing so it was some time before I got round to finishing them but I managed to do it *just* before the deadline.

I ended up winning one of the two prizes for this challenge which was a bit of a surprise as I was sure someone else would win as there were so many wonderful entries.
 
These are completely hand sewn 1"/2.54 cm sided hexagons made with 14 different fabrics per pincushion and are stuffed with poly stuffing

The border strips that are not...

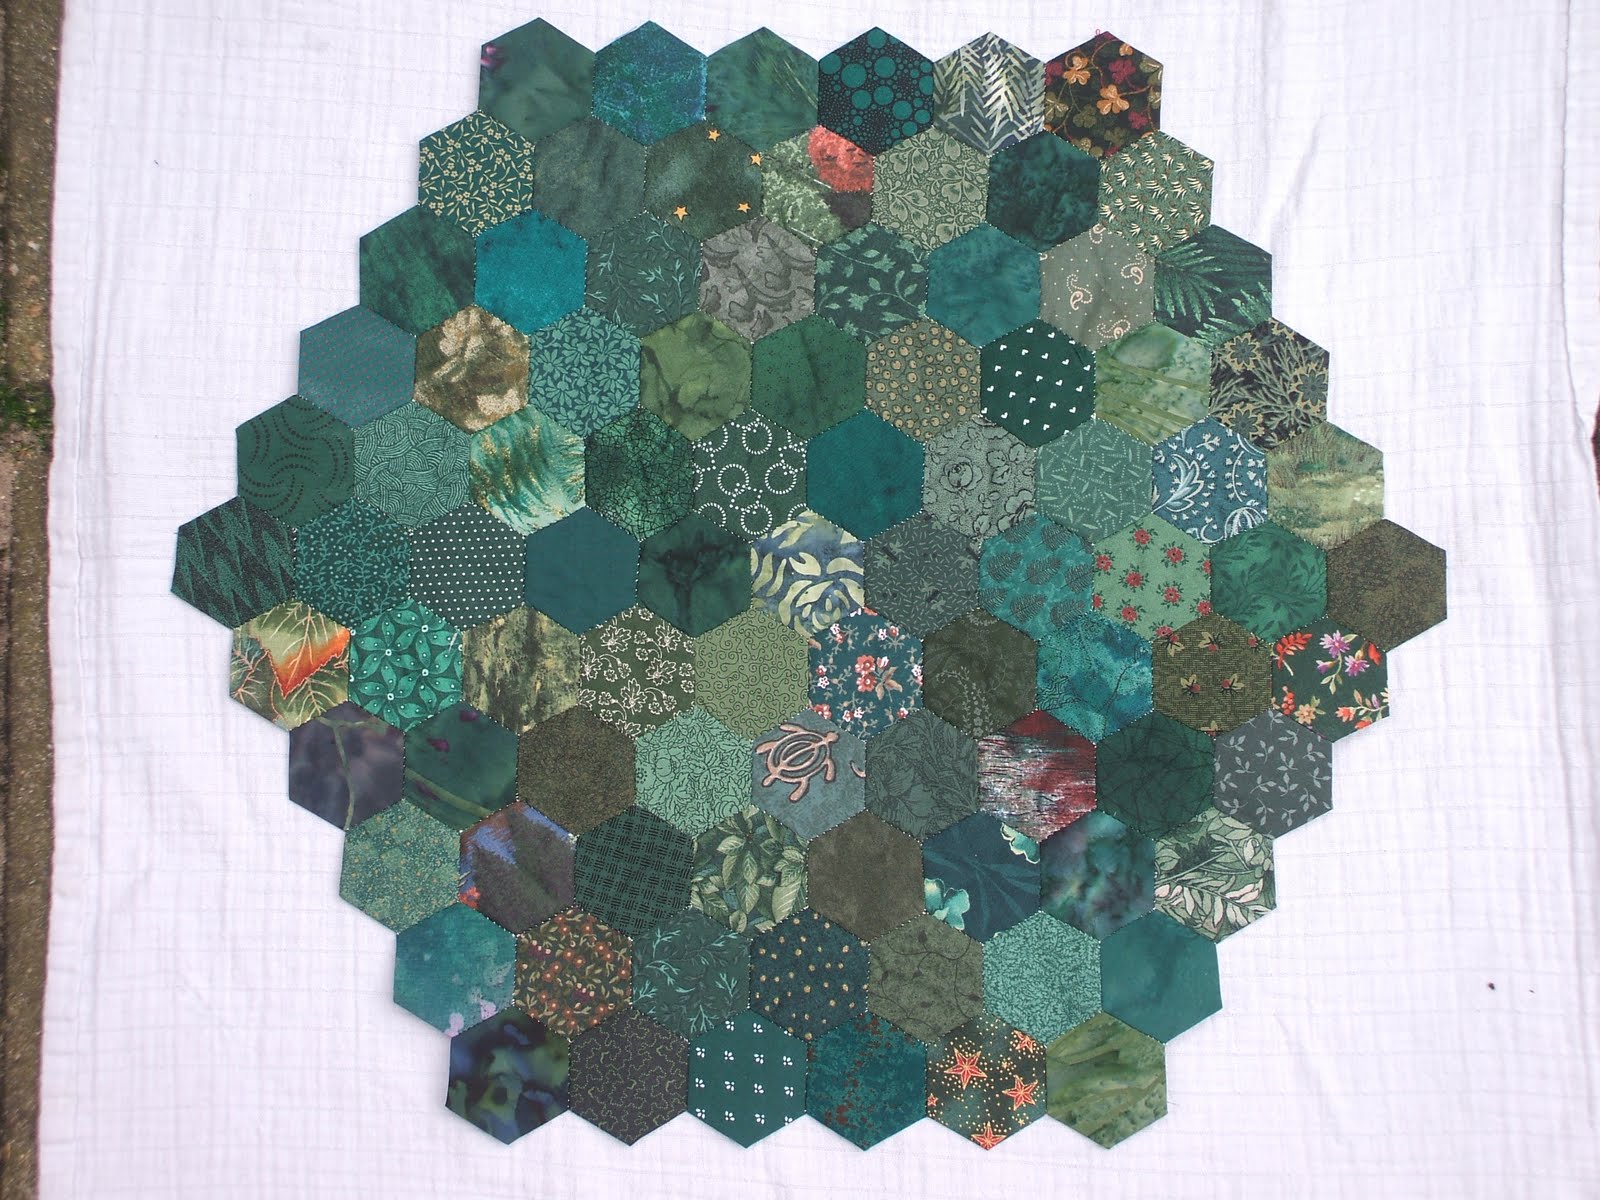
Last January I was happily living in the blissful dream that I could do a gazillion tiny 1/2" diamonds to be able to attach the border strips to the quilt, I have awoken from this dream and realised that this will be too difficult for me to achieve. So I decided to use up the strips of hexagons in other ways. First I made a lovely reversible cover for the nook my darling bf had given me because he wanted me to enjoy even more books.

I had to do quite a bit of seam ripping to get the right lengths of strip for the cover + do some creative adding of the hexagons to make the flap. I made it reversible as it seemed a shame to waste the opportunity to do so as it's quite easy to make reversible when you are joining hexagons together by hand.

The entire cover is made by hand and contains 350 1/2" mini hexagons, 175 for each side, the flap is weighted with an old Belgium 0,20 Frank coin I had lurking in a drawer.
It's 6 3/4"/17.14 cm square

I still had some of the strips left so went on to make a matching reversible pouch for the cable, which certainly makes it easier to find the cable in my drawer of cables - I think I'll be making more cable pouches now hehe.

The entire cover contains 96 1/2" mini hexagons, 48 for each side.

It's 4 1/2" x 3 1/4"/ 11.4 x 8.5 cm

Having finished the cable pouch I still had the rest of the rather longer greens, blues and whites left and I sewed some of them together - this project isn't complete yet but I did use the scraps to make the little coin purse you can see above. It's just the right size for a few coins, a Lego minifig or 2 AA sized batteries.

The entire cover contains 40 1/2" mini hexagons, 20 for each side.

It's 2" x 2 1/2"/ 5 x 6.35 cm

Thursday, 8 August 2013

Insane Hexagon update

If you had thought that I'd forgotten about this project you could be forgiven as I've not worked on it or updated any progress for over 18 months. I did pick it back up again in May when I was given new meds that made concentrating on anything complicated almost impossible. I have since completed all 3 reds that I could made from the fabric I had.
  
Next up: cutting the yellows.

These are (from top to bottom) the 33rd, 34th and 35th blocks in this project.

For more information see:  The insane hexagon quilt
To see all the quilt blocks together look here:  Insane Hexagon Project

Thursday, 25 April 2013

Travel sewing bag

2 years ago I started making this to take with me on my travels with the kids during the summer holiday as we went on our day trips to other towns and to visit museums (my kids LOVE museums... as long as they are the interesting kind and not just filled with modern art). What with one thing and another and me trying to make something super duper complicated (for a bag) and not knowing how to complete it, the bag ended up in the pile of UFOs.

I finally worked out how to make my neat edges with the flaps I wanted: add a zip at the join of the blue inner lining and the patchwork bag flap. That way I could turn it right sides out after sewing around the sites.

The bag closes by folding the top flap down and then folding in the side flaps. Then the front is lifted towards the back and the Velcro strips do the rest. The bag flap is closed with a thread wound around a button - a simple and quick way to keep it closed securely.

The flaps can be folded up and fixed in place with Velcro strips on the front flap to create a corralled area to work in, say in a moving train or on a boat so that things don't fall to the ground and get lost. It also makes it easier to pick up the bag while open and move it from one place to another.

  • It has one pocket with a zip that is the same size as the bag itself. As the bag is fully lined on the patchwork side this will not result in the seam allowances getting ravelled. 
  • It has 4 gusseted pockets in different colours sewn onto the lining, these pockets close with Velcro.
  • It has a scissors holder (the triangle thing)
  • It has a thread holder with inbuilt needle holder. (the cylinder thing)
  • It has a tiny biscornu pincushion.
  • The entire outer cover and the inside of the flap is hand sewn 2" patchwork hexagons
  • The strap is made out of 3" squares machine sewn together.

Stats:
Closed the bag is 10 1/2 inches wide and 8 inches high / 27 cm x 20 cm
Open it's 22 inches long and 8 inches wide / 56 cm x 20 cm
Fully opened out it's 25 1/2 inches long and 17 inches wide 65 cm x 43 cm

Wednesday, 13 June 2012

"Hup Holland" keyrings with charms

Youngest's school has the tradition of not celebrating the birthdays of teachers on their actual birthday but all the teachers of a year (or sometimes more years) get together and plot a party that lasts either all morning or all afternoon of a school day (in older classes they also do stuff like a sleepover and a gala dinner) and the kids then usually take a small gift of some sort (the teachers try to encourage something home made from the kids but youngest isn't all that crafty unfortunately). I really hope the teachers like them :)

So this year I made keyrings/bag decorations in the colours of the theme of the party "Hup Holland" which is the football supporters chant at Dutch national football matches (that's soccer for the USA people who are wondering :) )

The large things hanging from ribbons are 4 different coloured  (red/white/blue/orange) 60 degree diamonds sewn together with a layer of leave in stabiliser stuck in place with iron on adhesive so that I didn't have to stuff the shapes but could keep them lightweight.

I also made little "delfts blue" hearts with blue and white fabric bonded to a little heart shape cut from the stabiliser. and strung larger beads onto the ribbons and tied them in place around seashell or sun charms

I bound the tops of the ribbons together with embroidery floss then wrapped it around the ring 3 times and made it pretty with a blanket stitch going all the way round and then over the bit I'd wrapped the thread round.

Thursday, 24 May 2012

Update time...

So life has been busy and I've not really been remembering to post here... not that I've not done anything - just not posted it all here too.

Cooking wise I've mostly been doing stuff I've posted about already so you don't need to see it again ;)

I've lately been more into embroidery than into quilting so that's what I've mostly been doing. Below are some pictures of what I've been making instead - many of the pieces are inspired by humon's SATW comic which I LOVE.


Sunday, 8 January 2012

Borders update


Not much to say here at this point - this is how far I am with the borders so far, still only using one of each colour as mentioned in my previous post about the borders Borders.... already?  I have done as much border as I can for each colour I used in the quilt so far and will be doing the orange, yellow and red as soon as I have finished making the blocks for each colour. I have found that I rather enjoy sewing these little hexagons together and then when I go back to the 1" ones the seem so very large lol.

Screaming Oranges


I don't know if there is a better way to describe how loud these oranges are but they are anything but shy and retiring. They are so bright they make the white background look bluish. They are however perfect as a colour to be sewing with during the dark days of January just after all the Christmas stuff has been cleared up and put away and things are seeming more than a bit dull.

I'm not really sure what's next - the reddish oranges require me to cut a load of red fabrics as well to see what suits and I don't think I have enough salmon to make a full block yet.. so there too more cutting will be required.
 
I won't be adding the link to the Imgur gallery view this time - I find it really ugly and you can see it better if you go to that site itself.


This is the 32nd block and the 2nd orange one.


For more information see:  The insane hexagon quilt
To see all the quilt blocks together look here:  Insane Hexagon Project

Wednesday, 4 January 2012

Summer Sunset.


Just when you thought I'd forgotten all about my hexagons here I am back with a new block that I finished a few hours ago. Things had gone a bit more slowly due to me being busy with other projects and because I had some troubles getting the colours decided for this block and the block that is next.  This block is orangey yellows and I'm putting it with the oranges as it feels more orange than yellow to me.

This is the 31st block and the 1st orange one.
Next up: the second orange one - Screaming Orange

For more information see:  The insane hexagon quilt 
To see all the quilt blocks together look here:  Insane Hexagon Project

Time flies...

Goodness it's been a while since I last updated this - it's not that I didn't have anything to update it with - it's just that I lacked the time - below are some highlights of what I've been up to in the mean time.. Just images or I'll never catch up lol.


The WCD baking competition:


The 2+ meter strip of brown mini hexagons that I'd put in a jar for a competition elsewhere in early October.


Halloween cookies and mini cupcakes in odd (and not so odd) flavours (melon, cranberry, toffee and peach)


Taco's done our way:


The gift wrapping for oldest's "Sinterklaas suprise" for a class mate (she loved it!) that I made in 3 days flat including sewing the scraps together to make the fabric.


Christmas decorations:


 The Christmas eve bacon quiche:


Last night's dinner - Secret Chicken noodle soup:

Friday, 30 September 2011

Borders.... already?

 
Usually one waits with the borders till the main part of the quilt is finished. However I was tired of cutting orange fabrics and wanted to sew something so I got out the box of green 1 1/2 inch squares and decided to see how far I got with them before I ran out with the only rule being that I could only use one of each and no more than one. When I started with the greens I had a small bit that was about 30 cm / 12 inches long and now I have 2 lengths.


The green length is 45 inches / 114 cm and is made up of 147 units
The blue length is 46 inches / 119 cm and is made up of 153 units
So the total length made so far is 91 inches / 233 cm which is about enough for one side. The angled edges are to make joining the sections easier later on.

Does it make sense to make the borders already?
Well yes and no:
  • Yes it makes sense as it spreads the work of sewing the fiddly bits together so I don't have to spend weeks *just* sewing 1/2 inch sided hexagons together. 
  • No it doesn't make sense because I have no idea how big the border needs to be, however because I am sewing it in sections and am only using one of each scrap I have, I can always make them longer if I need it.
For now I'm continuing with this a bit longer and am in the middle of preparing the browns which will be about as long as the green length I made.

Saturday, 17 September 2011

Light Army Greens...


Done at last! I was starting to get pretty bored of green after about the 7th block - I wanted a change but that wasn't to be. Finishing the greens is a milestone in itself but on top of that it's also the 3/4 mark for me - only another 10 blocks are needed for the project HOWEVER I will be seeing how many blocks I get from all the colours I want to use for this as then I can play around with the blocks and see what I like best.

Still left to go are the reds, yellows and oranges. I'm doing orange next as oldest wanted to choose which ones I did and he likes orange a lot (youngest choose the greens)


This is the 30th block and the 10th green one.
Next up: Cutting oranges!

For more information see:  The insane hexagon quilt
To see all the quilt blocks together look here:  Insane Hexagon Project

Tuesday, 13 September 2011

Dark Army Greens...


Since I had basted all the remaining greens already (See Making snakes... ) and didn't know which one to do first I asked I one of the IRC channels I lurk in which I should do: "light: or "dark" without telling them what the choice was about. Everyone that voted said "dark" so I did this one first. It would have been done sooner but I had to fix Dilly first and got side tracked by making a necklace as well.

This is the 29th block and the 9th green one.
Next up: the tenth (and last) green one - light army greens

For more information see:  The insane hexagon quilt
To see all the quilt blocks together look here:  Insane Hexagon Project

Sunday, 11 September 2011

Darkest greens...


As I mentioned a few days ago I'd had a severe case of butter fingers and dropped all the fabrics for the last 3 blocks. This is the first of those 3 that I'd mass basted and prepared at the time. In the photo's it doesn't look much darker than the last block but when looking at them next to each other there is a clear difference.

This is the 28th block and the 8th green one.
Next up: the ninth green one - dark army greens (by popular vote of an IRC channel I lurk in)

For more information see:  The insane hexagon quilt
To see all the quilt blocks together look here:  Insane Hexagon Project

Thursday, 8 September 2011

Making Snakes...


When I'm preparing the hexagons for the next block I start by basting (see image above on how I do that) them around a hexagon paper and then laying them out on top of another block so I can see what they will look like when completed. This gives me the chance to make sure that the fabrics chosen work together and that the overall look of the block is what I want. When I was getting out the fabrics for the next block I accidentally dropped the fabrics for 3 blocks (don't ask *wink*) and since I had to sort the fabrics again and didn't have space on the dining room table for this I decided to baste the hexagons and sort them straight into the hexagons as if I was doing one block but then with 3 blocks. I ended up doing 300 hexagons to get the 270 I needed for the blocks as I'm pretty fussy about how the colours go together.


Having sorted them I then carefully strung them onto a thread so as to keep the order I'd laid them out into - since I always sew in the same way I can go "backwards' and thread them onto the thread in the reverse order that I sew them and then I can just take them off the thread one by one as I sew them into a block and it will be exactly the same as when I laid it out. I call these threads with hexagons "Snakes" In the picture above you can see the 3 "Snakes" I made. I put the two I'm not working on into a box to keep them safe till I need them.

It probably sounds very complicated but for me it's as simple as making a cup of tea

Thursday, 1 September 2011

The first year...


This time last year I started sewing the hexagons for my Insane Hexagon Quilt now one year on I'm 27 blocks, 2457 units and 6 colours down the road on my way to completing the quilt. I still have 3 green blocks and an unknown number of red, orange and yellow blocks to go before I'm finished with the central area of the quilt. If you right click the picture and choose "view picture" you will see a high resolution image of the blocks. They are laid out on a double bed comforter cover in order of being made - starting at the top white one and then going right to left on each row - and pinned in place as I had to make the photo on the road in my street as my garden is too small for it to be completely photographed in the sun and I didn't want to have to spend ages laying out the blocks while a car could come driving up any second.  The spaces you see between the blocks are intentional as I plan on sewing the blocks together with a diamond spacer between the blocks. I'll be using a lovely black fabric for it which is a really dark grey leaf print on black which, once cut up, looks more like a marble than anything.

I also have plans for an equally insane border made up of 1/2 inch hexagons - I haven't worked out how many I need yet and I don't think I want to know *wink* the spaces between the border and the blocks will be filled with equally insane small diamonds (boy will I be cursing when I have to do this bit lol)


The strip you can see here is 30 cm - 12 inches long and made up of  35 hexagons of 1/2 inch sides. Making the border will probably take me longer than making the central part.

Wednesday, 31 August 2011

Emeralds come in many colours


Just when I thought I wouldn't be able to complete any more before the end of my first year working on this and I go and finish another lol  There isn't much to say at this point so I'll let the picture do the talking :-)

This is the 27th block and the 7th green one.
Next up: the eighth green one - dark greens

For more information see:  The insane hexagon quilt
To see all the quilt blocks together look here:  Insane Hexagon Project