Thursday, 25 April 2013

Travel sewing bag

2 years ago I started making this to take with me on my travels with the kids during the summer holiday as we went on our day trips to other towns and to visit museums (my kids LOVE museums... as long as they are the interesting kind and not just filled with modern art). What with one thing and another and me trying to make something super duper complicated (for a bag) and not knowing how to complete it, the bag ended up in the pile of UFOs.

I finally worked out how to make my neat edges with the flaps I wanted: add a zip at the join of the blue inner lining and the patchwork bag flap. That way I could turn it right sides out after sewing around the sites.

The bag closes by folding the top flap down and then folding in the side flaps. Then the front is lifted towards the back and the Velcro strips do the rest. The bag flap is closed with a thread wound around a button - a simple and quick way to keep it closed securely.

The flaps can be folded up and fixed in place with Velcro strips on the front flap to create a corralled area to work in, say in a moving train or on a boat so that things don't fall to the ground and get lost. It also makes it easier to pick up the bag while open and move it from one place to another.

  • It has one pocket with a zip that is the same size as the bag itself. As the bag is fully lined on the patchwork side this will not result in the seam allowances getting ravelled. 
  • It has 4 gusseted pockets in different colours sewn onto the lining, these pockets close with Velcro.
  • It has a scissors holder (the triangle thing)
  • It has a thread holder with inbuilt needle holder. (the cylinder thing)
  • It has a tiny biscornu pincushion.
  • The entire outer cover and the inside of the flap is hand sewn 2" patchwork hexagons
  • The strap is made out of 3" squares machine sewn together.

Stats:
Closed the bag is 10 1/2 inches wide and 8 inches high / 27 cm x 20 cm
Open it's 22 inches long and 8 inches wide / 56 cm x 20 cm
Fully opened out it's 25 1/2 inches long and 17 inches wide 65 cm x 43 cm

Wednesday, 24 April 2013

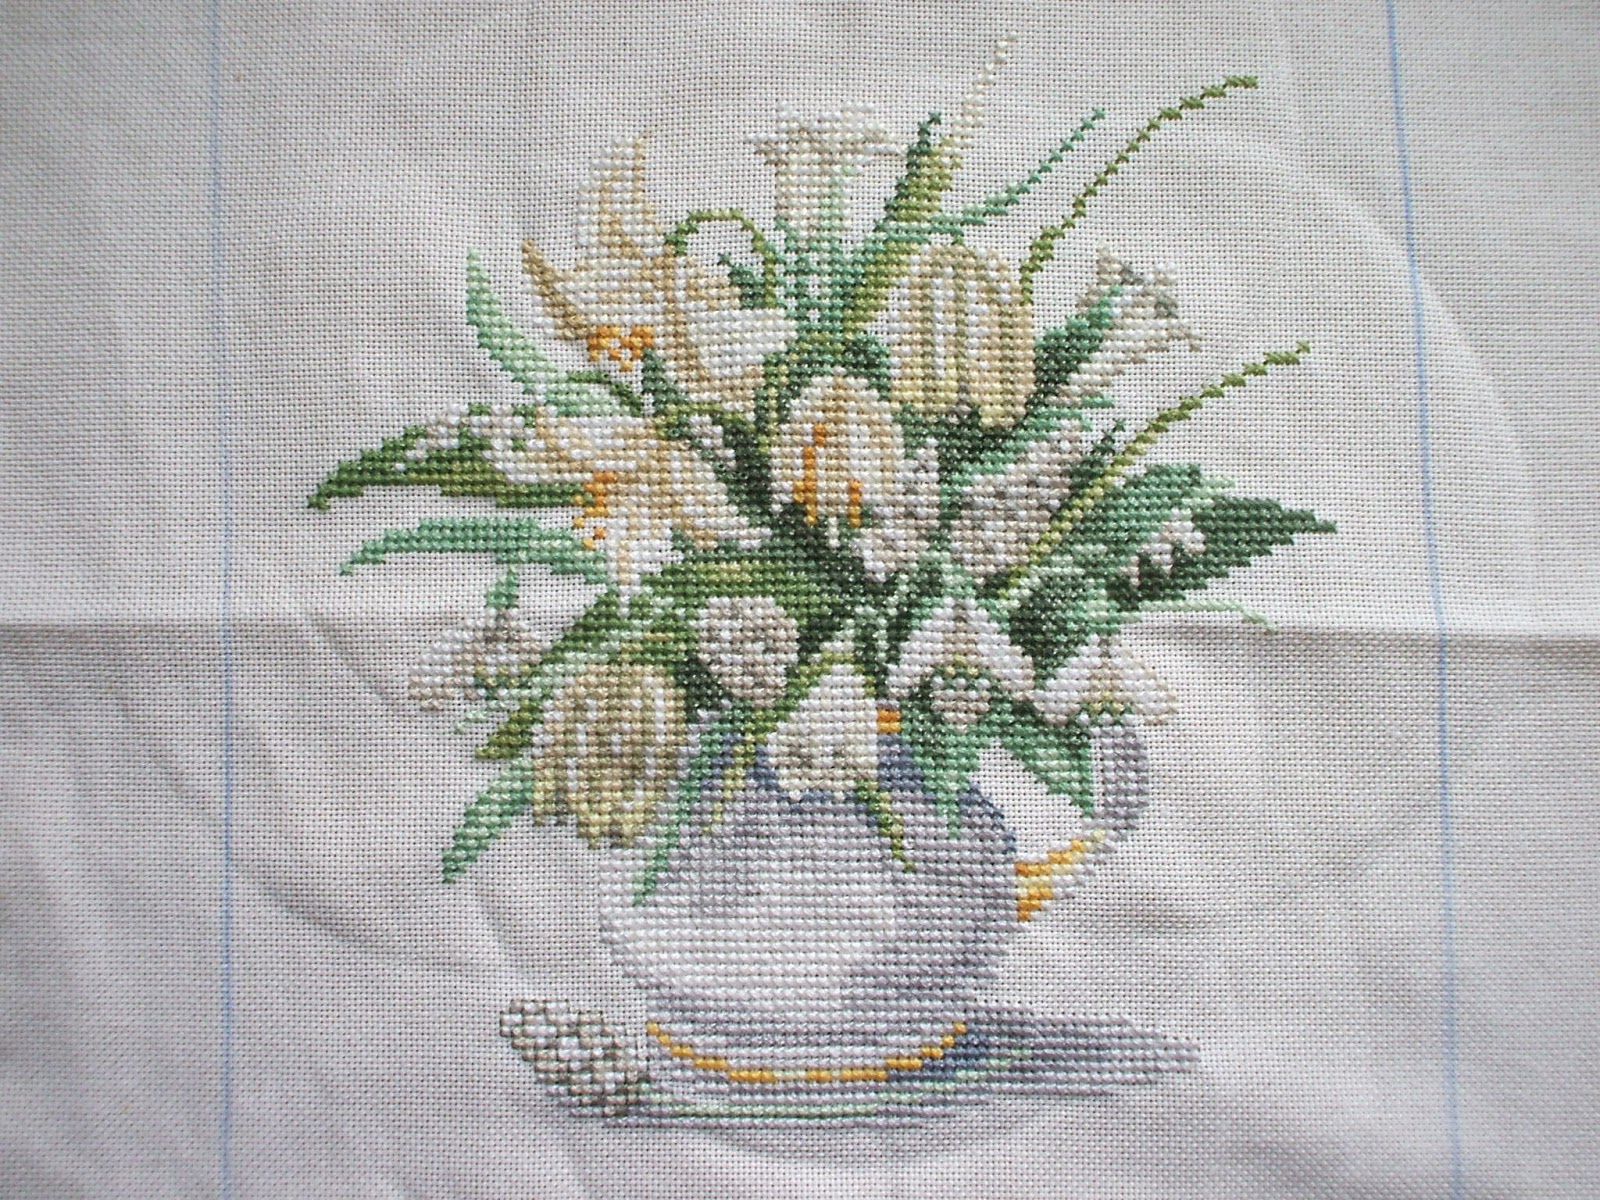
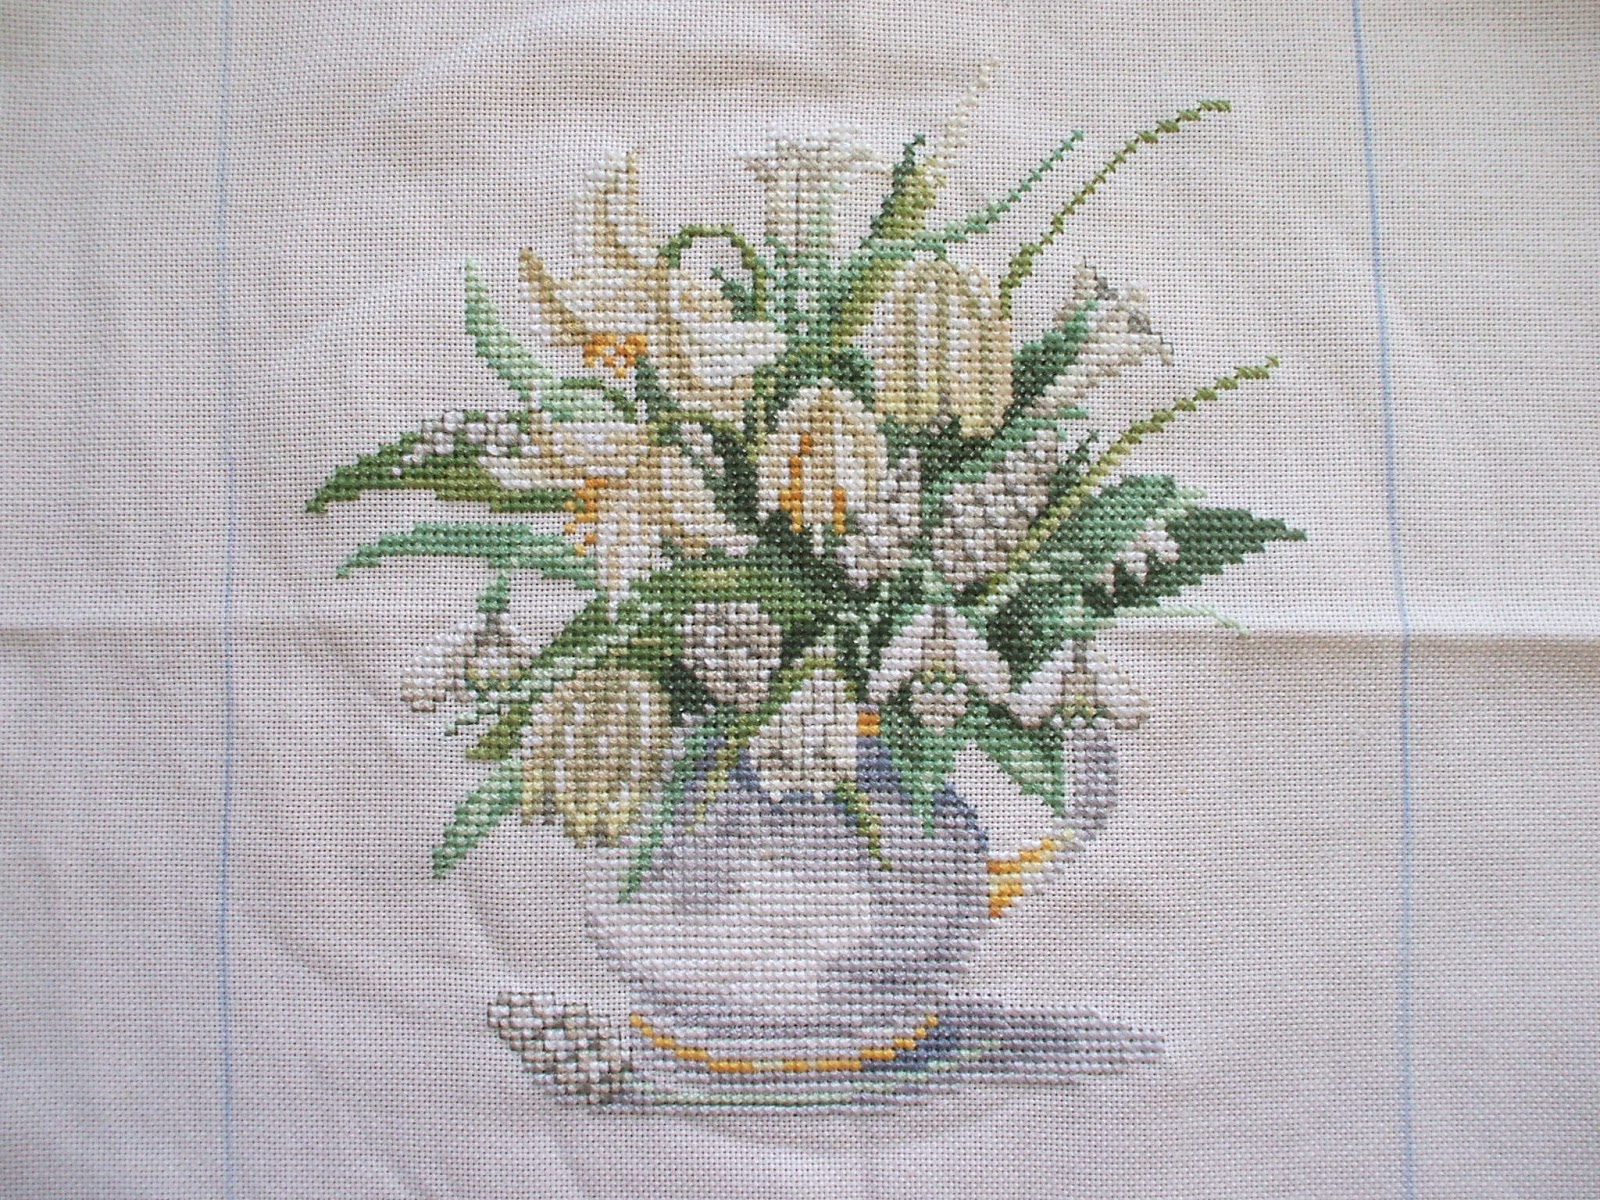
The Mystery Project - part 7, the central part is complete.

Now it's time to spot the difference - can you see where the backstitching is? If you can't see it all don't be sad, I had a devil of a job seeing where I was working when I was adding them and I kept track with the pattern lol.
Not much else to say today, so I'll just go on and work on the next bits.

Tuesday, 23 April 2013

The Mystery Project part 6

As you may remember this is where I started yesterday and despite the appointments (the one with the specialist in the hospital was cancelled but I only found out when i got there - yay!) I got so much done that I actually finished the main piece of embroidery! All I have to do now is do the backstitching and then I can get onto the second element of this project.
Just one appointment today so I ought to be able to complete the back stitching in between cleaning the kitchen.

Monday, 22 April 2013

The Mystery Project part 5 & IHSW update

I'm starting with a picture of yesterdays progress as I have from the beginning or the project so that it's easier for you to compare progress :) Yesterday I got quite a bit more done, having no kids certainly helped a bit but as they were returned in the evening not completely hehe. I was also feeling the after effects of Friday's sink emptying fun a lot less. What didn't help was that I had to remove a section of leaf as I'd mixed up colours and used the wrong one which looked like the right colour in the artificial light. It was just the one thread length so it wasn't all that bad.

I have finished with 3 of the yellows now and don't have that many flowers left to do before this part is completed up to the back stitch phase (ugh). When this is done I have a few more elements to add to complete this embroidery.

I have a bunch of appointments today so won't have as much stitching time as I'd normally have.

IHSW update: I got a lot of stitching done - this project was barely started when I picked it up again on Thursday as can be seen here: The Mystery Project & IHSW and now it's 75% complete.

Sunday, 21 April 2013

The Mystery Project part 4

As you may remember this is where I stopped yesterday. I didn't get so much done as my body was firmly telling me that all the bailing I had done was "A Bad Thing" and shouldn't be repeated. It also made getting up and moving very painful so I didn't move all that much as a result either.
I managed to do some more of the leaves, the snowdrop and most of a lily. You will also notice that I have more colours in the sidelines waiting to be used as all of time continued outside the area the ring was in and I didn't want to cut the thread when all I had to do were a couple more stitches with that colour. With all the greens and creams it would be very easy to confuse them so I have added a little tab to each with the colour symbol so I know which is which.
I'm not so sore today so I hope to be able to get a bit more done.


Saturday, 20 April 2013

The Mystery Project part 3 and a bit more

This was where I was yesterday when I made the last update. I didn't get as much done as I would have liked but I was slightly distracted by the rather unexpected results of a downpour. I had been raining for a while and then the rainfall intensified to the extent when the sewers couldn't cope with the results and water started coming UP my sink drain and filling my sink. To avoid getting a flooded kitchen I had to act quickly and I started bailing out the sink and throwing the resulting water out into my back garden through the open back door. I spent over 20 minutes racing the water level in my sink and managed to avoid it overflowing, though a few times it got pretty close. However the last thing I needed was sewer water all over my counter tops and in my cupboards, though admittedly some got on the tile floor but that was easy enough to clean. Then once the rain had stopped there was the fun task of disinfecting all area's that had come in contact with the sewer water - good fun that lol.

After all that I was in quite a bit of pain so wasn't really much to much else, including going collecting for the heart foundation which I was supposed to do. I feel quite bad about that but it's not really something I can do much about really. I did however get some of the green done and I finished all of the greys and I completed the bottom half of the embroidery.
The "bit more" I promised in the header is a little bit of news about my blog - nothing exciting mind, just 2 new pages in the bar at the top. I made one page where I put my WIPs and one page where I put my UFOs to make it easier for anyone who is curious to find them.

Friday, 19 April 2013

The Mystery Project part 2


Yesterday I showed you the picture above with my progress of the day before. Today I'm back with another update as I got quite a bit done. I had started doing the white at the bottom following the line of the light grey I'd done the day before and then completed the rest of the while of the vase working from there. It wasn't till I started doing the darker grey after completing the while in this section that I noticed that I was one stitch too far too the right on the first 5 lines from the bottom. Fortunately I only had to remove about 50 stitches to sort it out as I could leave most of the white in place.
The weird stitches outside the ring are threads that I still need to continue along with to outside the ring but as I don't want to move the ring yet have just got out of the way for now.

Thursday, 18 April 2013

The Mystery Project & IHSW


 Don't forget it's IHSW this weekend! This time it's a child free weekend for me so I hope to get a lot done in between preparing the vegetable bed for planting outside seeds.
While looking at my UFOs last year I came across this but couldn't find which pattern belonged to it, so I set it aside knowing that I'd probably eventually find out what it was for. I was right - a couple of days ago while thinking about my options for the #stitchingpirates latest contest over on deviantArt and while starting to put a printed in a magazine pattern into the PC Stitch so I could play around with it and Frankenstein the pattern, I realised that *some* of the squares had been coloured in with pencil - the way I do with patterns I'm following. A moment of pondering later and I knew what it was and I'm so happy - I've been wanting to do this pattern "forever" as I really love the flowers but don't like the background as much and judging by the rectangle I've drawn on the fabric I was planning to do something other than the square background in the pattern.

I finished putting the pattern into PC Stitch on Tuesday and have started stitching - it's going easily and quickly which is nice too - a nice break from the complications of the mushrooms.
As you can see there is quite a bit of progress happening here and that;s just what I managed between doing some gardening, the dentist for the post tooth removal check up (supposed to be 2 weeks ago but my rheumatism had hit the jaw and I decided to wait for the flare up to go away) and he gave me some really good news while he was at it - the 3 wisdom teeth that have erupted can stay where they are! This is a huge relief as I was really worried that they'd have to take them out but all I needed was a filling and they were good to go. I also went on a quick trip to town for some stuff.

Monday, 15 April 2013

Always Time for Tea

This little embroidery is entirely the fault of a really special friend of mine who did a grand job of enabling me after which I did indeed create this in a couple of hours. It's a pattern from World of Cross Stitching. Issue 202 that I did a few colour adjustments on as I just cannot stand pink or purple.

First I swapped the lilac for a muted orange (209 -> 3854) then I swapped the darker pink for darkish ecru like colour ( 760 -> 3866) and the lighter pink for a really pale yellow (3713 -> 712) You can't really see much difference in the two colours unfortunately but I wasn't going to unpick it again as I'd first used "ecru" instead of the 712 but that was even less visible in difference, so I ripped it out. I have to admit that I rather like the cream coloured cups now that they are finished - much more like something I'd buy myself :)

Stats:
Size of embroidery: 1 1/4" x 3 1/4" / 3,25 x 8,5 cm
Fabric: 18 ct Aida

Friday, 12 April 2013

Giant Jelly...


Today we heard that my oldest son got accepted into the school of his choice , which is more than enough reason to celebrate in my book. To do something slightly different I decided to use up the last 3 packets of jelly from England (that's jello for all you lovely American's out there :) ) I had raspberry, strawberry and blackcurrant which go together nicely.

This takes a good 5 hours to make and will feed *lots* as it's 3 pints / 1 1/2 litres of jelly. You will need a really large bowl for this - glass is best to show off the layers though you could turn it out into a dish if you wish but jelly isn't all that stable so the height might be fatal.

Ingredients:
  • 3 complimentary packets of jelly (jello)
  • A couple of handfuls of raspberries (frozen or fresh)
Preparation:
  1. Take half a pack of raspberry jelly and make it as per the instructions, remembering to halve the amount of water used at each step. 
  2. Cool to room temperature 
  3. When the raspberry jelly is almost cool make half of the strawberry jelly.
  4. Put the raspberry jelly into the dish and into the fridge
  5. When the strawberry jelly is almost cool make half of  the blackcurrant jelly.
  6. Check to make sure that the raspberry jelly is set enough to take a bit of pressure - it doesn't need to be completely set.
  7. Carefully pour the cooled strawberry jelly over the raspberry jelly layer.
  8. Put the dish back into the fridge.
  9. When the blackcurrant jelly is almost cool make second half of  the raspberry jelly.
  10. Check to make sure that the strawberry jelly is set enough to take a bit of pressure.
  11. Carefully pour the cooled blackcurrant jelly over the strawberry jelly layer.
  12. Put the dish back into the fridge. 
  13. When the raspberry jelly is almost cool make second half of the strawberry jelly.
  14. Check to make sure that the blackcurrant jelly is set enough to take a bit of pressure.
  15. Gently place the raspberries on the blackcurrant jelly.
  16. Carefully pour the cooled raspberry jelly over the layer of raspberries.
  17. Put the dish back into the fridge. 
  18. When the strawberry jelly is almost cool make second half of  the blackcurrant jelly.
  19. Check to make sure that the raspberry jelly is set enough to take a bit of pressure.
  20. Carefully pour the cooled strawberry jelly over the raspberry jelly layer.
  21. Put the dish back into the fridge.
  22. Check to make sure that the strawberry jelly is set enough to take a bit of pressure.
  23. Carefully pour the cooled blackcurrant jelly over the strawberry jelly layer.
  24. Put the dish back into the fridge.  
  25. When the top blackcurrant layer is completely set the jelly is ready to feast on.

Enjoy!
Note: It's a dark day so I couldn't take photo's indoors and my garden is still a bit of a mess so the close up was taken pointing towards the light so you can see the jelly layers at their best while the full view was taken in front of a convenient wall.

Finish it in 2013 project: March overview and WIP update post + TUSAL

New Project:

I started a "large" and complicated new cross stitch project this year based on a photograph by a really talented Alaskan photographer who was incredibly kind and said I could make a cross stitch of it. The photographer is Mike Gates, go check out his site - his work is amazing!

The pattern was made for me as a prize for winning a competition on dA. It's 10 inches wide  x 14 1/2 inches high = 180 x 261 stitches on 18 ct Aida and it uses 147 colours. I am truly intimidated but I did ask for the pattern to be as close to the photo as possible and didn't limit size or colours and I certainly got what I asked for!

In February I dyed the fabric for this using coffee. I started stitching in March

Update: The first 3 sections are complete 

New completed project:

 I made a cover for my diary using 25 different embroidery stitches - a new post with this will follow soon as it's worthy of it's own post.

The Current WIP's:


Sagittarius star sign by Lanarte - central area complete
Update: No progress made on this.

   
8th century tile floor embroidery in greens and blues. 
 Update: I have added a bit more to the top border.

Sampler - started
Update: I am behind with the TAST (see side bar) and haven't worked on it this month.

The UFO's:


2 sleeping bunnies - a Priscilla babyland embroidery - about half done but I *so* hate doing 1/4 and 3/4 cross stitches.

Dog embroidery (portrait) made from a photo years ago by a company - about 1/5th done.

Dog embroidery (standing) made from a photo years ago by a company - barely started.


Autumn leaves needle book WIP - embroidery is 1/2 finished.


Tusal:


This month I only worked on Mike's Mushrooms so all the threads in the jar are from that.

Thursday, 11 April 2013

New handbag + accessories

I cut this bag out over a year ago planning to make it before I got side tracked by whatever I decided to do instead. I was getting a bit tired of my current handbag so decided to get this out and finish it. Since I'd done most of the fabric cutting already making this bag only took a couple of hours.

I used one of my favourite fabrics for the outer cover and chose to use a matching green check for the centre panel. I used 2 shades of red for the inner bag - a lovely bright red for the lining and a paler red for the pockets.

It's a pattern by Lazy Girl Designs called "Gracie handbag" which I adapted a bit to suit my personal likes and needs. First and most obvious is that I didn't add the handles but made a single long shoulder strap instead as I prefer to wear my bags across one shoulder and down the other side. The other thing I did was add two little loops on the inside side seam (one on each side) with a D-ring in them to hang things on. When I'd finished the bag it looked a bit "unfinished" so I used a bit of leftover shoulder strap on the closure flap to liven it up a little.


When I made my new handbag I realised that my old blue and yellow rail card holders wouldn't suit it . So I decided to make myself a new one, however having the closure to the holder at the bottom was something I didn't want this time so I decided to workout how to add it to the top instead - using the old trial and error method I tried a few things trying to avoid the pattern I'd used before as I wanted to make a tutorial for it if it worked. However this didn't really work so I decided to adjust the pattern instead.

Since I wanted it to be red on the inside I cut the front piece from 2 fabrics and added a bit extra for the seam allowance I needed. I measured on the old card holder where the flap ended and added the seam allowance before cutting a bit for that + another piece the same size as the front cover to complete the outer back section. I first sewed a bit of green into the front flap to give it the stripe you see and sewed the flap, smaller back cover piece and a loop made from green together before pretending the back was made out of one piece and continuing from there. You will notice that I forgot to trim the corners of the flap but in the end I decided it looked ok and I wasn't going to rip this apart a 3rd time lol.

This can be attached to the D-ring in my handbag

Then I decided I wanted a nice cover for my passport and after some fiddling worked out how to get all the seams on the inside. I added some Velcro to the front and a closure strap (using another bit of the shoulder strap from the bag + some green to make the stripe) to keep it closed in my bag.
Since I'm going to be going abroad later this year I decided to also make a little purse (wallet for all you lovely American's out there ) to put the other currency in while I'm using the currency of the country I'm in since I've found that it's a pain to have 2 currencies in the same purse at the same time.

I made this from 4 pieces of fabric using this pattern as the inspiration and then adding my own twist to it, and made my life difficult in the process.

First of all I sewed the two smaller pieces together along the bottom seam then I measured where that seam touched the inner lining and sewed along the seam line again to fix it in place effectively hiding the seams and invisibly fixing the inner coin section to the lining. I then folded the purse to be into the end shape and found the velcro closure placement and sewed them in place.

Once that was done I started fiddling and folding the bits of fabric, pinning it in place and turning it right sides out till I'd worked out how to sew it all together with a single additional seam, did a few origami like twists while turning things right sides out through what would become a zipper seam and spent a while cursing while inserting the zip as it could have done with a tinsy bit more space for ease of sewing. I hand sewed the front cover to the zip to hide the seams (and because I couldn't sew the last bit by machine without sewing the coin purse shut hehe)

Mike's Mushrooms - Update 5

I completed the 3rd section the other day but I've been a bit busy and haven't updated my blog.

I have completed a section of 80 x 80 stitches (-/- a corner of 40 x 40 stitches to be completely exact) now = 5400 stitches
The size of this section is 4,5 inches square (-/- a corner of 2 3/16 inch square) / 11,5 square (-/- a corner of 5,5 cm)

About this project:
This is a "large" and complicated cross stitch project based on a photograph by a really talented Alaskan photographer who was incredibly kind and said I could make a cross stitch of it. The photographer is Mike Gates, go check out his site - his work is amazing!

The pattern was made for me as a prize for winning a competition on dA. It's 10 inches wide  x 14 1/2 inches high = 180 x 261 stitches on 18 ct coffee dyed Aida and it uses 147 colours. I am truly intimidated but I did ask for the pattern to be as close to the photo as possible and didn't limit size or colours and I certainly got what I asked for!

Sunday, 24 March 2013

Mike's Mushrooms - Update 4

I finally finished the second section today - it took a bit longer than expected but the toothache thing of last weekend lead to an extracted tooth on Tuesday and it was a tad painful to look down the first few days after that so I wasn't embroidering as much. If you take a few steps (or take your glasses off hehe) you can see how realistic this is looking, something I'm really pleased with as that's exactly what I wanted from this project.

I have completed a section of 40 x 80 stitches now = 3200 stitches
The size of this section is 4,5 x 2 3/16 inches / 11,5 x 5,5 cm

About this project:
This is a "large" and complicated cross stitch project based on a photograph by a really talented Alaskan photographer who was incredibly kind and said I could make a cross stitch of it. The photographer is Mike Gates, go check out his site - his work is amazing!

The pattern was made for me as a prize for winning a competition on dA. It's 10 inches wide  x 14 1/2 inches high = 180 x 261 stitches on 18 ct coffee dyed Aida and it uses 147 colours. I am truly intimidated but I did ask for the pattern to be as close to the photo as possible and didn't limit size or colours and I certainly got what I asked for!

Tuesday, 19 March 2013

Mike's Mushrooms - Update 3 & IHSW

As you can see I got a fair bit of progress done since I updated on Sunday, even though it's not complete you can clearly see where it's going now. The bit I was worried about turned out to be the shadowed part of the stalk of the second mushroom, so that's a bit of a relief hehe. Having done all the "large" bits of colour I decided to just start at the top of the list of colours and work my way down so I don't end up with 20 odd colours with just one or two stitches at the end - something I hated with the last section.


About this project:
This is a "large" and complicated cross stitch project based on a photograph by a really talented Alaskan photographer who was incredibly kind and said I could make a cross stitch of it. The photographer is Mike Gates, go check out his site - his work is amazing!

The pattern was made for me as a prize for winning a competition on dA. It's 10 inches wide  x 14 1/2 inches high = 180 x 261 stitches on 18 ct coffee dyed Aida and it uses 147 colours. I am truly intimidated but I did ask for the pattern to be as close to the photo as possible and didn't limit size or colours and I certainly got what I asked for!

The incomplete half of this section is what I managed to do during the IHSW ( I extended it a day hehe), not as much as I'd have liked but I have been plagued by wisdom tooth coming through, which broke a tooth... fortunately today is dentist day (at last!) and I can see what he can do to help me with it - anything is better than having to deal with this pain without being able to take painkillers due to my allergies.

Sunday, 17 March 2013

Chicken and bacon burgers

I made this last night as I was in the mood for burgers but didn't have any mince (ground beef) to make it with. It was one of my experimental dishes that the kids LOVED so I thought I'd share it with you.

Ingredients:
  • 250 grams / 10 oz chicken breast - diced
  • 100 grams / 4 oz bacon (either slices or diced)
  • 1 large onion - roughly chopped
  • 1 egg
  • 50 - 75 grams / 3 - 4 oz breadcrumbs
  • Salt and pepper to taste.
Preparation:
  1. Put the chicken, bacon and onions into a food processor and whizz till it's finely chopped and looks like mince (ground chicken)
  2. Add an egg and 2/3 of the breadcrumbs
  3. Season to taste
  4. Whizz a bit more to mix it all in, add more breadcrumbs if it's a bit wet still.
  5. Make into patties that are about 10 cm / 4 inches across - I got 7 out of this mix but if you make them larger or smaller you will get more or less burgers.
  6. Fry for about 15 minutes in a frying pan (skillet) till brown and cooked through.
As you can see in the photo I served mine with mashed potatoes and tinned carrots and peas (not my favourite thing but I had a tin lurking that needed to be used) You can, of course, also make real burgers with them and put them on bread with a sauce and veg to taste.

Tip: If you make your hands wet before handling the meat to make patties the meat won't stick to your hands.

Mike's Mushrooms - Update 2

I finished the first section of the embroidery and spent quite a bit of time cursing the 1 and 2 stitch's I had to do for some colours as I did so. While I could have left them till I needed the colours later on in the project I really want to just do one section completely before moving on to the next. What can be seen in the completed section is how real it looks - even in such a small section. What you can also see is how odd the next section looks right now - almost as if I've completely ruined things. I certainly hope this isn't the case and have put my trust in the pattern.

You may notice that the colour of my lines are different - this is because someone reminded me that pencil isn't all that easy to remove, especially from between lines of stitching so I've changed to the water soluble pen I had forgotten I had.

About this project:
This is a "large" and complicated cross stitch project based on a photograph by a really talented Alaskan photographer who was incredibly kind and said I could make a cross stitch of it. The photographer is Mike Gates, go check out his site - his work is amazing!

The pattern was made for me as a prize for winning a competition on dA. It's 10 inches wide  x 14 1/2 inches high = 180 x 261 stitches on 18 ct coffee dyed Aida and it uses 147 colours. I am truly intimidated but I did ask for the pattern to be as close to the photo as possible and didn't limit size or colours and I certainly got what I asked for

Catching up... *again*

I'm so behind with updating some stuff so I'm just going to make another of my catch up blog posts. First of all the Diary cover you see above. This embroidery started with a little red "starfish" shape and then it took a life of it's own as it slowly evolved to become the heavily embroidered piece that it is now. It became a coral reef - full of life and unexpected things - there are starfish, seaweed, a crab and if you look carefully you may even spot the lobster that somehow ended up there. The red wavy bit at the bottom left is only attached at the bottom - the rest is completely free from the background. The long snakelike thing that curves from the bottom to the top of the piece has over 2000 stitches in it and took me several days to do - it's made with the Casalguidi Stitch. I had a lot of fun making this, it was nice trying out loads of new to me stitches and, as it was made free form, even I didn't know what it was going to look like till it was finished.

It's 4 x 3 1/8 inch / 10 x 8 cm, made on 14 ct black Aida using 5 colours of variegated perle (red, green, blue, orange, yellow), 4 colours DMC colour variations, beads and several kinds of ribbon. I used a total of 25 different stitches to create this, many from Sharon b's Dictionary of Stitches for Hand Embroidery and Needlework and some I found in my ancient copy of Enclyclopedia of needlework by TH. de Dillmont.

I made the embroidery into a cover for my far too pink diary, which I'd only got because I LOVE the (not so pink) interior and I knew I'd eventually get round to making a cover for it.

I used the following stitches:
Basque Stitch
Bullion Knot
Bullion stitch
Buttonhole Bar Stitch
Buttonhole Wheel
Casalguidi Stitch
Cast on stitch
Chain stitch
Coral Stitch
Cretan Stitch
Detached Buttonhole Stitch
Detached Chain Stitch
Double Cast On Stitch
Drizzle Stitch
French knot
Feather stitch
Ghiordes Knot
Knotted Cretan Stitch
Renaissance Stitch
Rosette of Thorns
Scroll Stitch
Sorbello Stitch
Whipped Fly Stitch
Whipped Spiders Wheel
Woven Spiders Wheel

One thing that really surprised me is that this was selected as a Daily Deviation over on deviant art!  There are around 35 volunteers there and they each get to choose something from the section they look after as a one day feature and one of the Artisan Crafts volunteers chose this! Thrilled barely covers how I felt about this when I found out hehe.

Although I haven't mentioned the February TUSAL (see sidebar to the left for a link to the project) yet, I did make my monthly jar. You can see threads from the clown I finished in January, the Elemental biscornus and the Soufflé girl Dalek heart.

And this is the not so late Match TUSAL In it are threads from the Coral reef diary cover, the little end bits one keeps from projects from the colours I used for the Dalek heart that I'd not tidied up on time and got a good soaking from a glass of coke that got knocked over. I'd washed ALL the threads on the spools and rewound them on new ones but just couldn't face all the little bits I'd saved so decided to put them in the jar instead. There are also threads from the start of Mike's Mushrooms.

In case anyone has forgotten it's IHSW weekend! So get stitching!!

I was going to add a recipe to this but have decided to write it up as a separate post instead so it's easier to find later on in time.

Monday, 11 March 2013

Mike's Mushrooms & A Cake

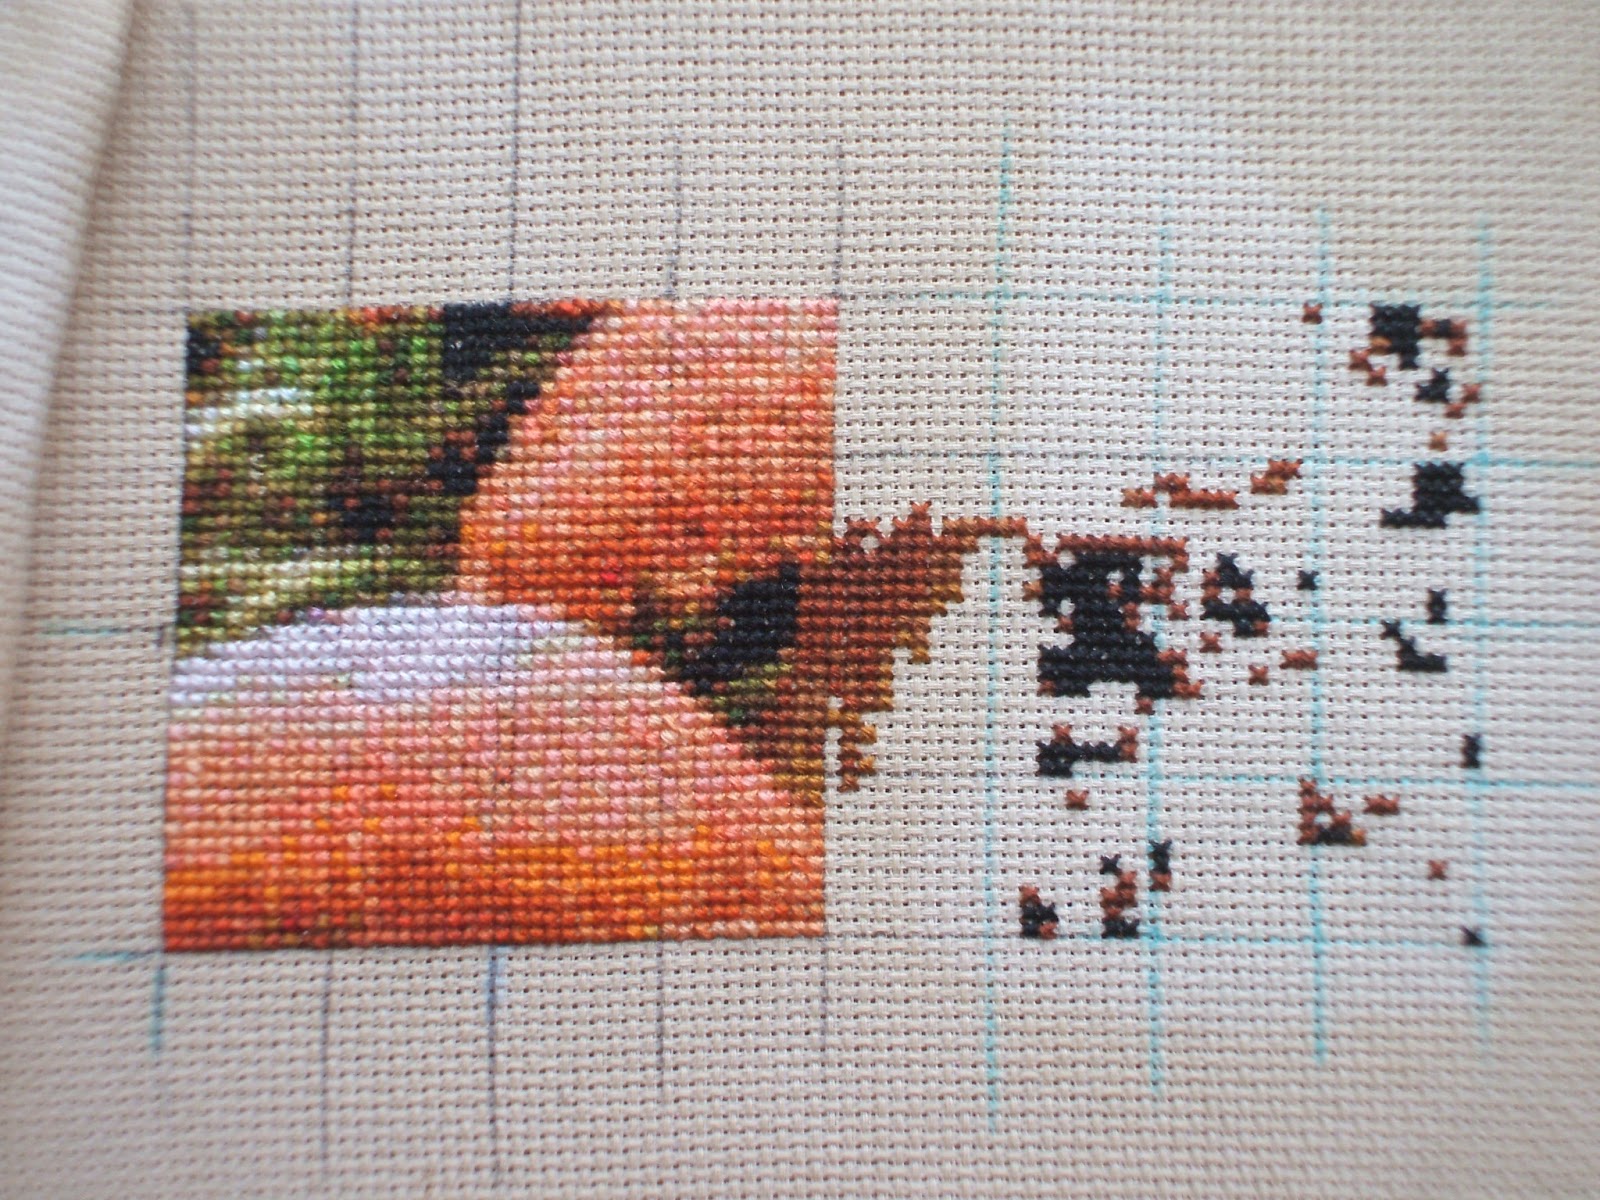
Last Thursday I *finally* got started on the new daunting project. Having seen other people mark the grid on the fabric I decided to give it a go too and see if it helped me as my biggest fear was loosing count and getting things in the wrong place. As it turns out that was a great idea and I have made great progress since then.

I drew a 4 x 4 grid of 10 stitches per square on the fabric, first with blue chalk but that line was too thick so I changed to a pencil instead.

Ironically the first few colours I used were my most hated colour: pink and i started to get really worried that it would be too pink as a result but as I worked and used darker and more orangey colours it stopped looking too pink and now that the rust has been added it looks exactly like it ought to.

Today it  looks like this:
I'm working on the background behind the two mushrooms you can see in the picture (the pink/orange things), starting with black so that all the little bits I have in the pattern will be easier to do.

About this project:
This is a "large" and complicated cross stitch project based on a photograph by a really talented Alaskan photographer who was incredibly kind and said I could make a cross stitch of it. The photographer is Mike Gates, go check out his site - his work is amazing!

The pattern was made for me as a prize for winning a competition on dA. It's 10 inches wide  x 14 1/2 inches high = 180 x 261 stitches on 18 ct coffee dyed Aida and it uses 147 colours. I am truly intimidated but I did ask for the pattern to be as close to the photo as possible and didn't limit size or colours and I certainly got what I asked for

To celebrate I baked a cake - vanilla raspberry marble cake with royal icing topping and some marzipan raspberries on top. I didn't make as many as I wanted - my hands were complaining after only starting these few and they aren't all the same size but then raspberries normally aren't .

I used my favourite cake mix for this - half vanilla flavoured and half raspberry, and more or less got the marbling right - I tried using a chopstick to stir with this time - not as effective as a spoon but it did work.

Tuesday, 5 March 2013

Finish it in 2013 project: February overview and WIP update post

It's the beginning of March and time to write my update post. I've copy/pasted the last post and will be adding updates for each item so you can see before and after pictures showing last months picture and a new on for this month :) I didn't get so much done this month - I was still feeling quickly tired at the beginning of the month - then got hit by a flare up of my rheumatism that especially effected my right index finger and I'm right handed so holding a needle was as good as impossible for almost a week.

New Project:

I am also going to start a "large" and complicated new cross stitch project this year based on a photograph by a really talented Alaskan photographer who was incredibly kind and said I could make a cross stitch of it. The photographer is Mike Gates, go check out his site - his work is amazing!

The pattern was made for me as a prize for winning a competition on dA. It's 10 inches wide  x 14 1/2 inches high = 180 x 261 stitches on 18 ct Aida and it uses 147 colours. I am truly intimidated but I did ask for the pattern to be as close to the photo as possible and didn't limit size or colours and I certainly got what I asked for!

In February I dyed the fabric for this using coffee.

Update: I have not done anything else for this yet.

New completed project:

 I made a cover for my diary using 25 different embroidery stitches - a new post with this will follow soon as it's worthy of it's own post.

The Current WIP's:


Sagittarius star sign by Lanarte - central area complete
Update: No progress made on this.

Air and Earth Biscornu - complete
Update: I finished both biscornu. 
  
8th century tile floor embroidery in greens and blues. 
 Update: I have added a bit more to the top border.

Sampler - started
Update: I am a bit behind with the TAST (see side bar).

The UFO's:


2 sleeping bunnies - a Priscilla babyland embroidery - about half done but I *so* hate doing 1/4 and 3/4 cross stitches.

Dog embroidery (portrait) made from a photo years ago by a company - about 1/5th done.

Dog embroidery (standing) made from a photo years ago by a company - barely started.

Autumn leaves needle book WIP - embroidery is 1/2 finished.


The Finishes can be found if you click the tab "2013 finishes" at the top of the page.