Initially I was full of idea's but I can't actually paint so kept on hitting the brick wall of "this looks awful". So I ended up putting it aside as a project till I did get an idea. I'm glad I did in the end as I did get an idea of what to do and it's completely out of the box, which is more my style anyway when it comes to crafting.
If anyone reading this thinks this is a complaint then please don't as this is just me explaining why it took me so many months to get this blog post written as promised. I love a challenge and this was certainly that!
So just to be clear: although Dylon kindly sent me the paints I used, the way I used them and what I have written are entirely my own thoughts, ideas and opinions.
With that bit over it's time to tell you what I did with the paints... I used them to hand dye embroidery fabric! It might seem a bit odd but I found it works really well.
Materials:
- Dylon fabric paint, I used royal blue (8) and turquoise (28) but any colour of the normal range works well.
- Small containers to mix the paint in
- Spoons or something else to stir with, one per colour paint you make
- Fabric - I used 18ct and 20ct Aida embroidery fabric
- Paintbrush
- Optional: plant spray that hasn't been used to spray chemicals.
 |
| Experiments made before I got started: drops, swirls and stripes |
- Dylon fabric paint was NOT made to be used like this and results may vary according to the material you use the paint on.
- Dylon fabric paint for dark fabric does not like being diluted and is therefore not suitable for this method.
- Before starting it's important to protect your work surface as this is going to get a bit messy. I put down a layer of newspaper and followed that with a plastic shopping bag I had cut open - a bin (garbage) bag works well too - just make sure you have plenty of space around the fabric you use.
- Any creases in the news paper or plastic bag can result in the paint pooling which can affect the end result.
- When I started this it was a huge experiment so I started on a few scraps of 18ct Aida I had left over from another project, I suggest you play around on some scraps first to see what pattern you like before working on a larger project.
- If the paints are not spreading enough either use a plant spray filled with water or dip your fingers in water and splash that on the fabric and the paint will spread more.
- Once mixed the paint keeps for a week or so if you keep it covered (or if you forget just add water and mix well)
- First you need to mix your paints. 1/2 a coffee spoon (about 2-3 ml) mixed with a tablespoon of water makes the paint thin enough to work with. Stir the mixture till all the paint is diluted
- You can mix colours! I made 4 colours using the 2 paints I chose to use:
- Just royal blue
- Just turquoise
- 1 part royal blue and 2 parts turquoise
- 2 parts royal blue and 1 part turquoise
- Hand wash your fabric to remove any sizing or other chemicals from the production process so that the fabric takes the dye.
- If you wring the fabric you might create creases which will affect the dye result, if this is what you want go for it, otherwise hold it up for a bit to let most of the water drip out.
- You need to keep the fabric wet to let the paint spread.
- Give the paint another stir before starting, this means that any bits that you missed earlier will be mixed in.
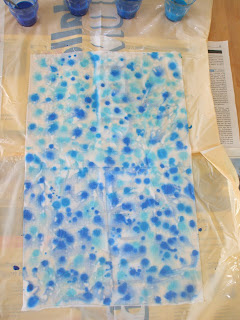
- I used a small paintbrush to make the spots and drops on the fabric.
- Start with one colour and cover the fabric with spots before moving on to the next colour
- Keep adding colours till you are happy with the result, remember that as it dries the colours will continue to spread.
 |
| I added more paint after this but sadly forgot to take a photo. |
- It will take quite some time for the fabric to dry so it's best to leave it overnight to dry.
- Heat set the fabric according to the instructions on the paint.
- Hand wash, dry and iron again to remove any creases from washing and you are ready to use your fabric for whatever you wish!
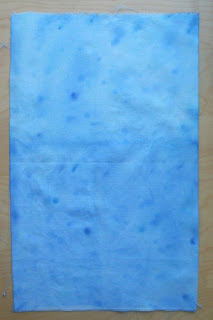
- You can see the result I got from this at the top of this post.
I hope you enjoyed this post, if you do use this to dye your own fabric I'd love to see your results!


No comments:
Post a Comment
Sorry about the comment form moderation... some bored idiots are spamming my blog.