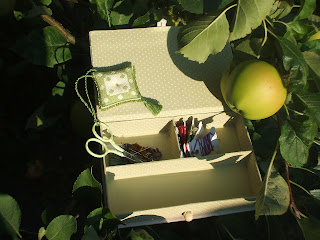
It's a handy little box that can carry all I need and fits into my travel bag as well as my handbag. As it has no accessories I decided to make them myself to make the box just that bit more functional for how I would like to use it. Of course I started with the fob and decided to share that this month as part of my Fob a Month project. I also designed a pincushion and a scissor case for the scissors. I haven't yet decided how to deal with the ORTS but I'm sure that once I have the other pieces made that will become clear.
What isn't so clear in the photo's is that the green fabric has white polka dots on it and that's where my pattern inspiration came from. The fob is double sided with one side having the inverse colours to the other.
I will be sharing the patterns I have already designed with you as soon as I have completed stitching them. If you wish to make the fob, pincushion and scissor case as a matching set you will need a piece of 18ct Aida or 32ct linen of at least 10" x 15" or 7,5" x 20" - you need to start pretty close to the edge to make sure you have enough fabric left for the rest. You need a 1/4" seam allowance for each piece so the sections must be stitched at least 1/2" away from each other using the back stitch lines as the counting point.
The fob is 1 7/8" square. 34 stitches square.
What you need to make the example above:
- 1 piece of 3 1/2"x 7" 18ct Aida or 32ct linen if you are ONLY stitching the fob - otherwise see above for the amount needed.
- DMC 3347 and 3348
- Your stuffing of choice
- DMC 3347 for the cord and tassel
- Green seed beads
- 2 small crystal bicones
Instructions: Fold the fabric in half before starting - on each half you will stitch either the back or the front at least 1/4" away from the centre line so you have 1/4" seam allowance for each side. Once the cross stitching is done do the back stitch outlines.
Press the completed stitching from the back to make sure there are no creases. Then cut the pieces out 1/4" away from the back stitch lines.
Place the 2 pieces wrong sides together and fold the seam lines between the layers and whip stitch the 2 sides together only going through the back stitch lines, the same as you would for a biscornu, adding a green bead every other stitch, remembering to add the cord and tassel at opposite corners. (Believe me if you do forget things either get pretty complicated or you end up ripping out a whole load of stitches)
When you are about 1" away from the starting point take a moment to add some stuffing, you want it plump but not too plump. Then finish sewing the last bit of seam.
Last of all sew the 2 beads in the centre of each side using a single thread to stitch them in place by going through each side's bead, then through to the other side and repeating that 2 or 3 times for each bead.
I hope you enjoy this pattern, please do share a link to yours if you make it!


I ove the polka dot pattern - simple, yet very charming ^_^
ReplyDeleteThank you :D
DeleteWell, as pretty as that little box is and the fob you made for it....I just happened to notice SCISSORS...those are NEW! Did those come with the cute box?
ReplyDeleteThank you! :D Yes they are new, they didn't come with the box - I BOUGHT them myself. when my bf took me shopping in a craft shop when I was in the UK in July.
Delete