Wednesday, 19 October 2011

Old favourites... Part 4 - Fish pie


Last week I made fish pie for the kids - normally I'd instantly blog about it but the IRS in my shoulder started playing up and I have been resting my arm as much as I have been able to, so blogging stuff had to be put on hold. Fish pie made like this is one of the kids favourite fish dishes and the love it when I make a mashed potato top instead of the more usual pastry one - not really sure why they like it more like this but well... that's kids for you *wink*

Ingredients for a medium large oven dish (2-4 people depending on size of appetite) :
  •  Leftover mashed potato, enough to put a layer on the dish or 750 grams /  1 1/2 pounds potatoes cooked and mashed.
  • About  100 grams/ 4 oz salmon
  • About 200 grams / 8 oz cod
  • 2 small onions, finely diced.
  • Milk
  • Pepper
  • 1 small bay leaf (fresh if possible)
  • Knob of butter
  • 1 tablespoon of flour
  • 1 - 2 fish stock cube ( to taste)
How to make it:
  1. Put the fish in a pan with the bay leaves, some pepper and onions.
  2. Pour in enough milk to cover and bring to the boil, allow to simmer for 10 minutes if fresh 15 if frozen.
  3. Strain the fish, catching the milk in a bowl.
  4. Preheat the oven to 220 C/430 F  
  5. In a clean pan melt a knob of butter.
  6. Add the flour stirring all the time till it bubbles.
  7. Pour in some of the milk and stir till thickened, keep adding the milk till it's all gone, making sure that you don't stop stirring.
  8. Turn the heat down low.
  9. Crumble the stock cube(s) into the sauce - do one at a time and taste to make sure you don't add too much.
  10. Add some pepper to taste if needed.
  11. Take the bay leaf out of the strained fish/onion mix and flake the fish.
  12. Add the fish/onions to the sauce.
  13. Stir gently to mix and put it in the bottom of an oven dish.
  14. Cover the fish with spoonfuls of the mashed potato.
  15. Gently spread it over the fish where needed to make it smooth and about even.
  16. Put in the oven for about 30 - 45 minutes depending till brown on top and hot all the way through.
Enjoy!

Monday, 10 October 2011

Tea time...


Every now and then I spoil the kids and we have tea as a snack and then later a supper with more healthy stuff. Tea being the mealtime in this case not the beverage, although admittedly I do like a nice cup of tea with my tea *wink*. In this case we had 4 types of mini cupcakes: "after 8", almond, apple & cinnamon and "stroopwafel" flavours. I had also baked another batch of the caramel/fudge cupcakes and to top it all off we had digestive biscuits and mini stroopwafels.

I had made the "after 8"cupcakes by adding a few drops of peppermint essance + chocolate chips to the batter along with a bit of green food colouring so they'd be the same colour as the ice cream the kids like so much.

The stroopwafel cupcakes were made by crushing some stroopwafels and adding them to the batter along with a hint of cinnamon to give the batter flavour.

The almond ones were made with ground almond and a few drops of almond essence to give a nice rich slightly nutty flavour (you can use any nut for this of course )

I "cheated" and bought the biscuits *grin*

Saturday, 8 October 2011

Kitchen revamp.. or at least partly...


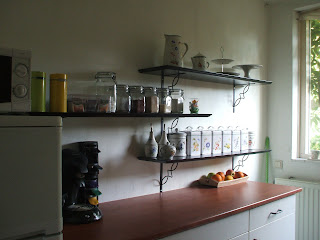
Last January after getting a new kitchen unit installed on the other wall I used the old lower unit to make a second work surface etc. by swapping the metal sink surface for a cherry surface to match the new kitchen. Since my health is iffy at best it took a while before I was ready to face the pain of painting the walls and I spent the last week slowly preparing and painting the entire wall (also behind the fridge and kitchen unit) a bit at a time. Although the picture here doesn't show it, it was in bad shape so needed a lot of prep work to make the surface almost flat and it didn't help that last time when ex painted he didn't bother with any prep work at all so the paint tried to come off when I used a roller so I had to use a brush instead (my shoulder wasn't too happy about that). The green was stubborn and so it needed 2 layers of paint to subdue the green completely.

I also needed some additional shelving to put all the jars/tins I use for flour/sugar/pasta etc., so I had bought some black shelves with ornamental brackets to fix them up with. You can't see it here but I haven't actually screwed the shelves to the brackets yet because the MDF is murder to hand screw into so I need to get an additional bit for my drill so I can use that.


This is the end result - the wall next to the window is still the same white it was before - it needs painting as well but that is a job for another day after I  have recovered from doing all this. I have space on the wall to add 2 more shelves, which I will do at a later date when I have the money to buy them .